Mazda 3 Service Manual: Relay Block Removal/Installation [With Advanced Keyless Entry And Push Button Start System]
1. Disconnect the negative battery cable..
2. Remove the following parts:
a. Driver-side front scuff plate.
b. Driver-side front side trim.
c. Hood release lever.
d. Upper panel.
e. Shift knob (MTX)(See MANUAL TRANSAXLE SHIFT MECHANISM REMOVAL/INSTALLATION [G66M-R].)(See MANUAL TRANSAXLE SHIFT MECHANISM REMOVAL/INSTALLATION [A26M-R].)
f. Selector lever knob (ATX)(See AUTOMATIC TRANSAXLE SHIFT MECHANISM REMOVAL/INSTALLATION.)
g. Shift panel.
h. Side wall.
i. Console.
j. Lower panel.
k. Knee bolster.
3. Remove the nut and clip.

4. Disconnect the connectors.
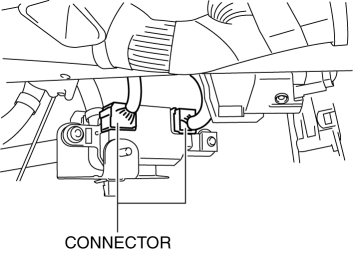
5. Remove the nut and clip.
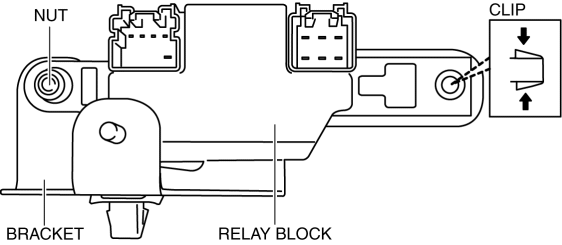
6. Remove the relay block from the bracket.
7. Install in the reverse order of removal.
 Relay Block Inspection [With Advanced Keyless Entry And Push Button Start System]
1. Disconnect the negative battery cable..
2. Remove the following parts:
a. Driver-side front scuff plate.
b. Driver-side front side trim.
c. Hood release lever.
d. Upper panel.
e. Shift ...
 Relay Inspection [Mzr 2.0, Mzr 2.5, Mzr 2.3 Disi Turbo]
Relay Type
Connector type
Part name
Type A
Front fog light relay
Headlight relay (HI)
Headlight rel ...
Other materials:
Pilot Bearing Inspection [A26 M R]
CAUTION:
Secure the steering wheel using tape or a cable to prevent the steering shaft
from rotating after disconnecting the steering shaft. If the steering wheel
rotates after the steering shaft and the steering gear and linkage are disconnected,
the internal parts of the clock spr ...
Caliper (Rear) Disassembly/Assembly
1. Disassemble in the order indicated in the table.
1
Dust seal
(See Dust Seal Assembly Note.)
2
Bleeder cap
3
Bleeder screw
4
Caliper body
2. Assemble in the reverse orde ...
Oil Seal (Differential) Replacement [G66 M R]
1. On level ground, jack up the vehicle and support it evenly on safety stands.
2. Remove the aerodynamic under cover No.2..
3. Drain the oil from the transaxle..
4. Remove the front splash shield..
5. Separate the drive shaft and joint shaft from the transaxle..
6. Remove the oil seals u ...
