Mazda 3 Service Manual: Air Bleeding
CAUTION:
-
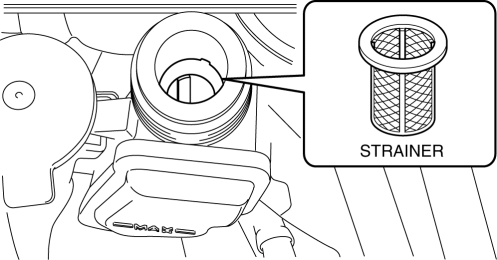
If the strainer is removed, impurities may penetrate the power steering system and damage it. To prevent this, always bleed air with the strainer installed.
-
Do not maintain the steering wheel fully turned for 5 s or more. The oil temperature could rise and damage the oil pump.
NOTE:
-
Add fluid and bleed air using the following procedure. Otherwise, additional time will be required to add fluid because of mesh resistance.
Fluid Level Adjustment
NOTE:
-
The following procedure is for adding (adjusting) fluid if the lack of fluid level has dropped as a result of fluid leakage.
1. Working with two people, one person protects the area around the sub tank using a cloth and adds fluid to the sub tank.
CAUTION:
-
Do not spread a cloth near the drive belt, otherwise the cloth could get caught in the drive belt when starting the engine causing damage to parts in the engine compartment.
2. The other person starts the engine and idles it.
3. Turn the steering wheel fully to the left and right slowly several times.
-
If the steering wheel operation speed is too fast, the fluid may spatter from the filler port. Do not exceed the steering wheel operation speed reference value.
-
Steering wheel operation speed (reference value)
-
90 °/s
4. Inspect the fluid level and, if the fluid level has dropped, repeat Step 1—3 until the level is between MAX and MIN on the sub tank while idling the engine.
Power Steering Component Parts Replacement
NOTE:
-
The following procedure is for adding fluid to the tank (full amount) after replacing the electric power steering oil pump component or steering gear and linkage.
1. Remove the aerodynamic undercover No.2..
2. Disconnect the return hose from the power steering pipe component.
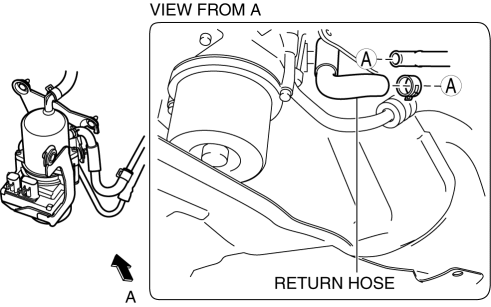
3. Add fluid until fluid escapes from the return hose.
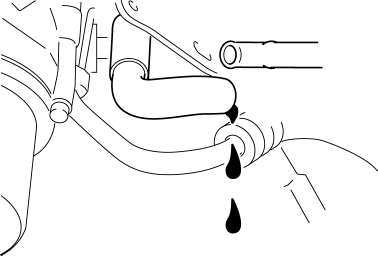
4. Assemble the return hose to the power steering pipe component.
5. Working with two people, one person protects the area around the sub tank using a cloth and adds fluid to the sub tank.
CAUTION:
-
Do not spread a cloth near the drive belt, otherwise the cloth could get caught in the drive belt when starting the engine causing damage to parts in the engine compartment.
6. The other person starts the engine and idles it.
7. Turn the steering wheel fully to the left and right slowly several times.
-
If the steering wheel operation speed is too fast, the fluid may spatter from the filler port. Do not exceed the steering wheel operation speed reference value.
-
Steering wheel operation speed (reference value)
-
90 °/s
8. Inspect the fluid level and, if the fluid level has dropped, repeat Step 5—7 until the level is between MAX and MIN on the sub tank while idling the engine.
 Linkage, Power
...
 Electric Power Steering Oil Pump Component Disassembly/Assembly
CAUTION:
The internal parts of the EHPAS control module and motor could be damaged
if they receive an impact. Be careful when handling the EHPAS control module
and motor to prevent the c ...
Other materials:
Caliper (Rear) Disassembly/Assembly
1. Disassemble in the order indicated in the table.
1
Dust seal
(See Dust Seal Assembly Note.)
2
Bleeder cap
3
Bleeder screw
4
Caliper body
2. Assemble in the reverse orde ...
Glove Compartment Light Bulb Removal/Installation
1. Disconnect the negative battery cable..
2. Remove the following parts:
a. Passenger-side front scuff plate.
b. Passenger-side front side trim.
c. Dashboard under cover.
d. Glove compartment.
e. Passenger-side lower panel.
3. Remove the glove comportment bulb from the socket.
4 ...
Rear Stabilizer Control Link Inspection
1. Remove the rear stabilizer control link from the vehicle..
2. Inspect for bending or damage. If there is any malfunction, replace the rear
stabilizer control link.
3. Rotate the ball joint stud 10 times and shake it side to side 10
times.
4. Measure the ball joint rotational torque usin ...
