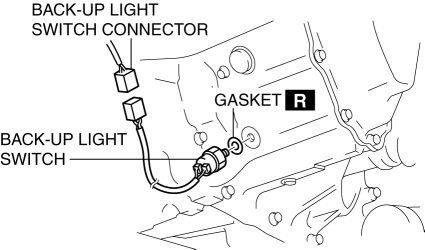
Mazda 3 Service Manual: Back Up Light Switch Removal/Installation [G35 M R]
1. Remove the battery cover..
2. Disconnect the negative battery cable.
3. Remove the battery component. (ex: battery, battery tray and PCM component).
4. Remove the aerodynamic under cover No.2..
5. Drain the oil from the transaxle..
6. Disconnect the back-up light switch connector and remove the back-up light switch.

7. Install the back-up light switch (with a new gasket) to the transaxle case.
-
Tightening torque
-
20—29 N·m {2.1—2.9 kgf·m, 15—21 ft·lbf}
8. Install the battery component. (ex: battery, battery tray and PCM component)(See BATTERY REMOVAL/INSTALLATION [MZR 2.0, MZR 2.5].)
9. Install the battery cover..
10. Add the specified amount and type of oil..
11. Install the aerodynamic under cover No.2..
 Back Up Light Switch Removal/Installation [C66 M R]
1. Remove the battery cover..
2. Disconnect the negative battery cable..
3. Remove the aerodynamic under cover No.2..
4. Remove in the order indicated in the table.
5. Install in the reverse o ...
 Back Up Light Switch Removal/Installation [G66 M R]
1. Remove the battery cover..
2. Disconnect the negative battery cable.
3. Remove the battery component. (ex: battery, battery tray and PCM component).
4. Remove the aerodynamic under cover No. ...
Other materials:
Electric Variable Valve Timing Actuator Inspection [Skyactiv G 2.0]
WARNING:
A hot engine can cause severe burns. Turn off the engine and wait until it
is cool before servicing.
CAUTION:
Do not disassemble the electric variable valve timing actuator because it
is a precision unit.
1. Remove the battery cover..
2. Disconnect the ne ...
Hood Adjustment
Gap Adjustment
1. Verify that the gap between the hood and the body is within the specification.
Standard clearance
a: -2.8—0.8 mm {-0.11—0.03 in}
b: –1.2—1.2 mm {–0.047—0.0.47 in}
2. Disconnect the negative battery cable..
3. Remove the following parts:
a. Front bu ...
Electro Hydraulic Power Assist Steering (EHPAS) Control Module Configuration
CAUTION:
If the EHPAS CM configuration is not completed, the EHPAS will not operate
properly. If the EHPAS CM is replaced, always carry out the EHPAS CM configuration
so that the EHPAS operates properly.
1. Connect the M-MDS (IDS) to the DLC-2.
2. After the vehicle is ident ...
