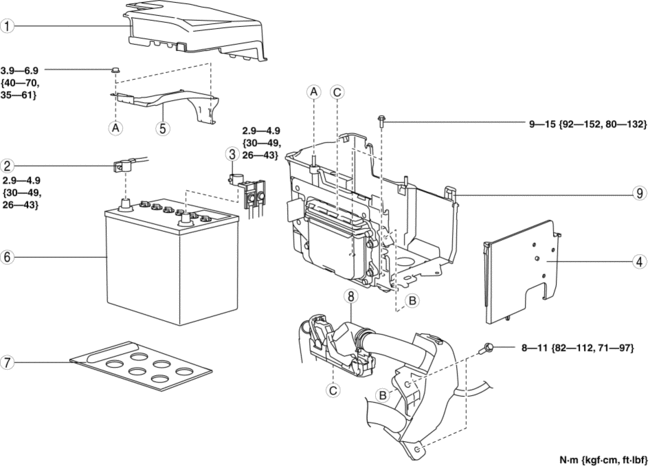
Mazda 3 Service Manual: Battery Removal/Installation [Skyactiv G 2.0]
1. Remove in the order indicated in the table.
2. Install in the reverse order of removal.
|
1 |
Battery cover (See Battery Cover Removal Note.) (See Battery Cover Installation Note.) |
|
2 |
Negative battery cable |
|
3 |
Positive battery cable |
|
4 |
Battery box (See Battery Box Installation Note.) |
|
5 |
Battery clamp (See Battery Clamp Installation Note.) |
|
6 |
Battery (See Battery Installation Note.) |
|
7 |
Battery stopper (See Battery Stopper Installation Note.) |
|
8 |
PCM connectors . |
|
9 |
Battery tray and PCM component (See Battery Tray and PCM Component Removal Note.) |
Battery Cover Removal Note
CAUTION:
-
To prevent component damage, stand at the front of the vehicle and remove the battery cover one side at a time.
-
When pulling the clips, do not apply excessive force to a clip using the screwdriver or pair of pliers.
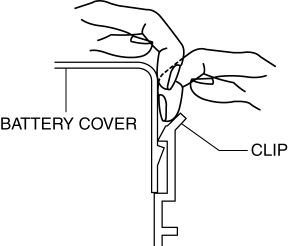
-
If excessive force is applied to the clips, they could be damaged. When removing the battery cover, use the following procedure to prevent damaging the clips.
1. Remove the battery cover using the following procedure.
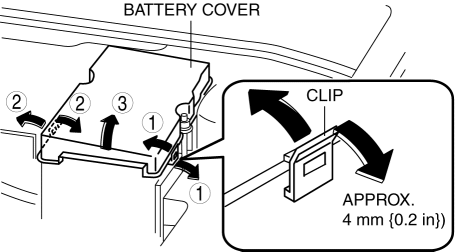
a. Pull the clip (LH) in the outward direction approx.4 mm {0.2 in}
and disengage the battery cover tabs.
b. Pull the clip (RH) in the outward direction approx.4 mm {0.2 in}
and disengage the battery cover tabs.
c. Remove the battery cover.
Battery Tray and PCM Component Removal Note
1. Remove the air cleaner component..
2. Remove the battery tray and PCM component.
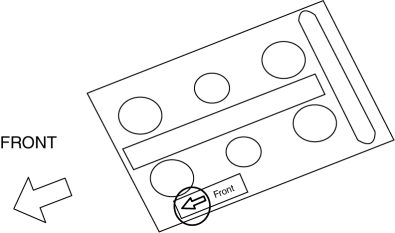
Battery Stopper Installation Note
1. Assemble the battery stopper so that the arrow on it is pointed toward the front of the vehicle.
Battery Installation Note
CAUTION:
-
To prevent damaging the clips on the battery tray, install the battery carefully so that it does not contact the clips.
Battery Clamp Installation Note
1. Assemble the battery clamp so that the arrow on it is pointed toward the front of the vehicle.
Battery Box Installation Note
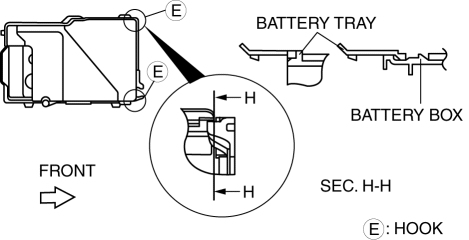
1. Assemble with battery box hooks E aligned with the battery tray holes at two points.
Battery Cover Installation Note
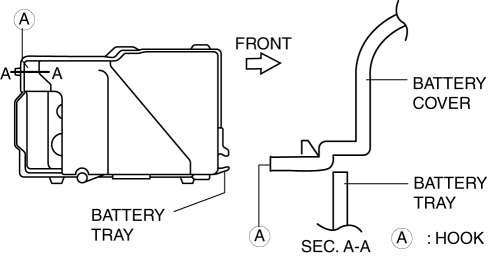
1. Install with battery cover hook A aligned with the battery tray hole.
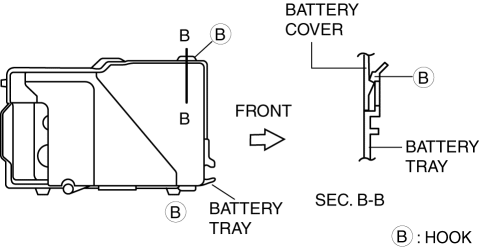
2. Set the battery cover to battery tray hooks B at two points.
 Battery Removal/Installation [Mzr 2.3 Disi Turbo]
1. Remove in the order indicated in the table.
2. Install in the reverse order of removal.
1
Battery cover
(See Battery Cover Removal Note.)
(See Battery Cover In ...

Other materials:
M Position Switch Inspection [Fw6 A EL]
Continuity Inspection
NOTE:
The M position switch is built into the selector lever component.
1. Remove the battery cover..
2. Disconnect the negative battery cable..
3. Remove the console..
4. Disconnect the selector lever component connector.
5. Verify that the continuit ...
Fuel Filler Cap Inspection [Mzr 2.0, Mzr 2.5]
Leakage Inspection
1. Perform the following SST (Evaporative Emission System Tester 134-01049A)
self-test:
NOTE:
If the tester does not work correctly during self-test, refer to the tester
operators manual for more detailed procedures.
a. Verify that the gas cylinder valve is c ...
Front Tilt Motor Inspection
1. Remove the battery cover..
2. Disconnect the negative battery cable and wait 1 min or more..
3. Disconnect the front tilt motor connector.
4. Apply battery positive voltage to the front tilt motor terminals and inspect
the front tilt motor operation
If not as specified, replac ...
