Mazda 3 Service Manual: Body Control Module (Bcm) Removal/Installation
CAUTION:
-
When replacing the BCM, the configuration procedure must be performed before removing the BCM. Replacing the BCM without performing the configuration procedure will result in system malfunction.
ATX
1. Perform the BCM configuration when replacing it..
2. Disconnect the negative battery cable..
3. Remove the following parts:
a. Front scuff plate (LH).
b. Front side trim (LH).
c. Upper panel.
d. Selector lever knob.
e. Shift panel.
f. Side wall.
g. Console.
4. Set the hood release lever out of the way..
5. Remove the lower panel. (driver-side).
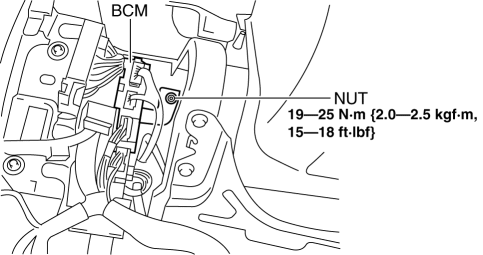
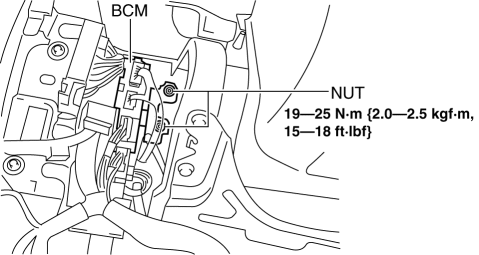
6. Remove the nut shown in the figure.
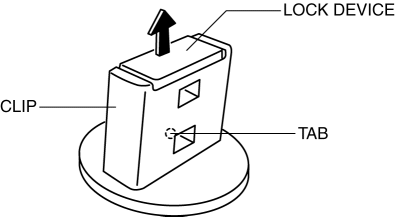
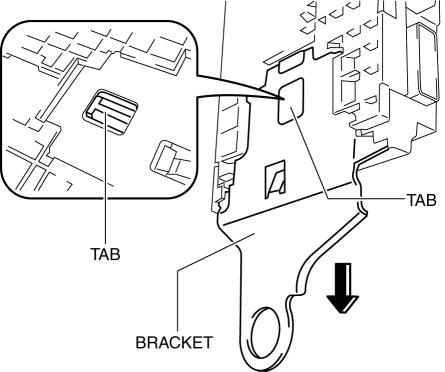
7. Pry off the lock device of the clip while pressing the tab in the position shown in the figure.
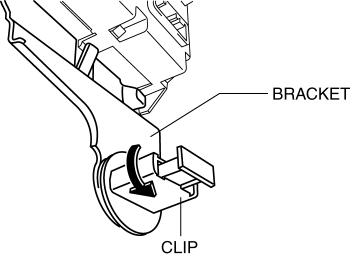
8. Rotate the clip in the direction of the arrow shown in the figure.
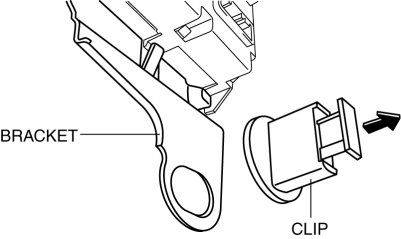
9. Remove the clip by pulling it in the direction of the arrow shown in the figure.
10. Disconnect the connector shown in the figure.

11. While pressing the tab shown in the figure, pull the bracket in the direction of the arrow and remove it.
12. Remove the BCM.
13. Install in the reverse order of removal.
MTX
1. Perform the BCM configuration when replacing it..
2. Disconnect the negative battery cable..
3. Remove the following parts:
-
Front scuff plate (LH).
-
Front side trim (LH).
-
Upper panel.
-
Shift knob.
-
Shift panel.
-
Side wall.
-
Console.
4. Set the hood release lever out of the way..
5. Remove the lower panel. (driver-side).
6. Remove the starter cut relay. (with advanced keyless entry and push button start system).
7. Remove the nuts shown in the figure.
8. Pry off the lock device of the clip while pressing the tab in the position shown in the figure.
9. Rotate the clip in the direction of the arrow shown in the figure.
10. Remove the clip by pulling it in the direction of the arrow shown in the figure.
11. Disconnect the connector shown in the figure.
12. While pressing the tab shown in the figure, pull the bracket in the direction of the arrow and remove it.
13. Remove the BCM.
14. Install in the reverse order of removal.
 Body Control Module (Bcm) Inspection
1. Remove the following parts:
a. Front scuff plate (LH).
b. Front side trim (LH).
c. Upper panel.
d. Shift knob (MTX).
e. Selector lever knob (ATX).
f. Shift panel.
g. Side wall.
h. C ...
 Controller Area Network (Can) System
Outline
With the addition of the following, the system wiring diagram and CAN communication
table have been added.
USB adapter
System Wiring Diagram
CAN Signal ...
Other materials:
Schedule 1
U.S.A. residents - Engine oil flexible maintenance interval
Use when the maintenance monitor for “Oil Change” is set to “Flexible”. For
details, see maintenance monitor.
Chart symbols:
I: Inspect: Inspect and clean, repair, adjust, fill up, or replace if
necessary.
T: Tighten
Remarks:
...
Washer Motor Inspection
1. Disconnect the negative battery cable..
2. Remove the front mudguard (RH)..
3. Disconnect the washer motor connector.
4. After connecting washer motor terminal A to the positive battery terminal,
and terminal B to the negative battery terminal, verify that washer fluid flows
to the wind ...
Fuel Gauge Sender Unit Inspection
MZR 2.3 DISI Turbo, SKYACTIV-G 2.0
NOTE:
The fuel gauge sender unit is integrated with the fuel pump unit.
1. Disconnect the negative battery cable..
2. Remove the rear seat cushion..
3. Remove the fuel pump unit..
4. Verify that the resistance between terminals A and C of the f ...
