Mazda 3 Service Manual: Car Navigation Unit Removal/Installation
With Audio Unit (Without Display)
NOTE:
-
Car-navigation unit is integrated with the multi information display.
1. Refer to MULTI INFORMATION DISPLAY REMOVAL/INSTALLATION.
With Audio Unit (With Display)
1. Disconnect the negative battery cable..
2. Remove the following parts:
a. Upper panel.
b. Shift knob (MTX).
c. Selector lever knob (ATX).
d. Shift panel.
e. Side wall.
f. Console.
3. Remove clips A and B.

4. Remove the clip C.
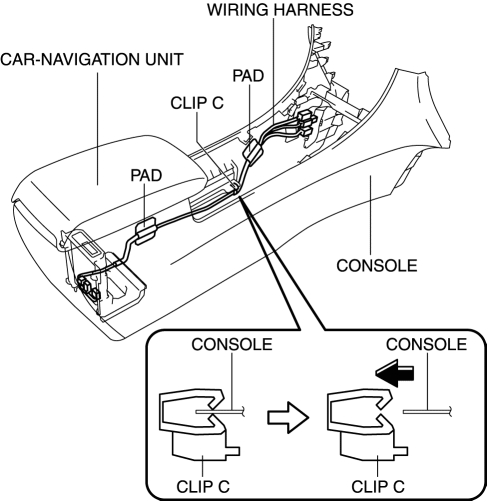
5. Remove the pad.
6. While pressing the clip tabs in the direction of arrow (1) shown in the figure, press the clip in the direction of arrow (2) to detach the tab of clip D from the console.
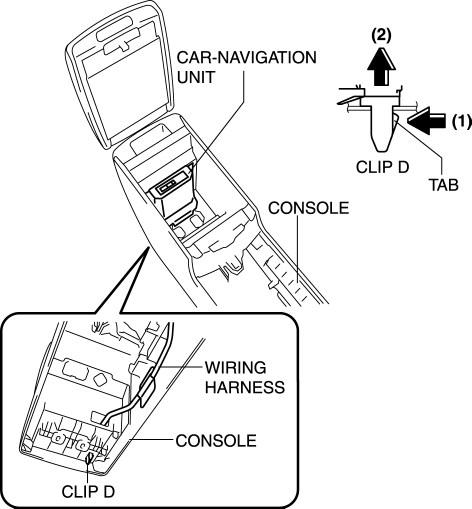
7. Remove the clip D.
8. Move the car-navigation unit assembly in the direction of arrows (1) and (2) shown in the figure and remove the hook.
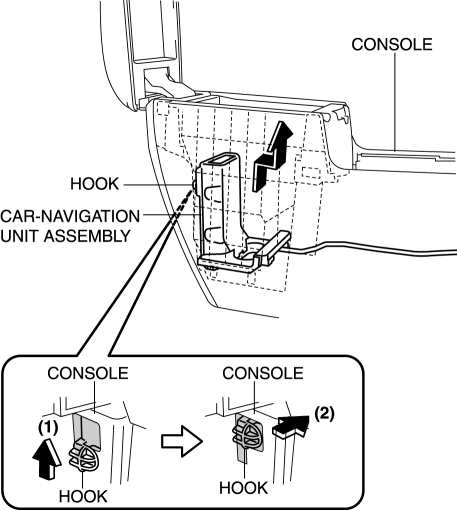
9. Remove the car-navigation unit assembly.
10. Remove the wiring harness from the bracket hook.
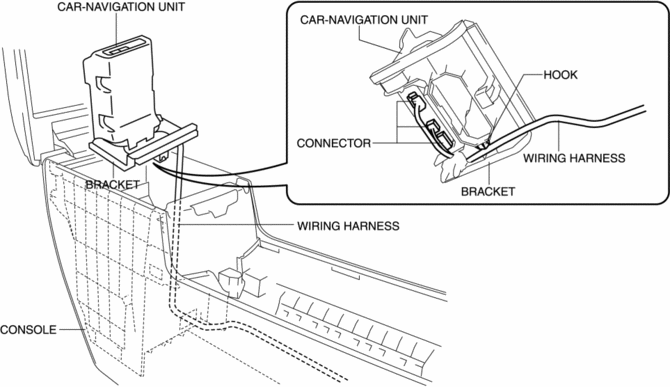
11. Disconnect the connector.
12. Pull the wiring harness from the console.
13. Remove the screws.

14. Remove the car-navigation unit from the bracket.
15. Install in the reverse order of removal.
 Car Navigation Unit
Purpose
Reads the SD card data inserted into the car-navigation unit and sends the
read data to the audio unit.
Function
The car-navigation unit has the following functions:
...
 Global Positioning System (Gps) Antenna Removal/Installation
With Audio Unit (Without Display)
1. Disconnect the negative battery cable..
2. Remove the following parts:
a. Upper column cover.
b. Instrument cluster.
3. Remove in the order indicated in t ...
Other materials:
Brake Pedal Removal/Installation
CAUTION:
The clearance between the brake switch and the brake pedal is automatically
adjusted to the correct amount when the brake switch is inserted into the installation
hole on the brake pedal and rotated to fix in place. If the brake switch is
not properly installed, the clearan ...
Rear Door Hinge Removal/Installation
1. Disconnect the negative battery cable..
2. Remove the following parts:
a. Rear door.
b. Front scuff plate.
c. Rear scuff plate.
d. B-pillar lower trim.
3. Remove in the order indicated in the table.
1
Bolt
2
Nut
...
Antenna (5-Door)
AM/FM Radio Antenna *
The AM/FM radio antenna receives both
AM and FM signals.
(Type A)
To remove the antenna, turn it
counterclockwise.
To install the antenna, turn it clockwise.
Make sure the antenna is securely
installed.
CAUTION
To prevent damage to the antenna,
r ...
