Mazda 3 Service Manual: Center Roof Antenna Inspection
4SD
1. Disconnect the negative battery cable..
2. Remove the rain sensor cover. (Vehicles with auto light/wiper system).
3. Disconnect the rain sensor connector. (Vehicles with auto light/wiper system)
4. Partially peel back the seaming welts.
5. Remove the following parts:
a. Sunroof seaming welt (vehicles with sunroof)
b. A-pillar trim.
c. Front scuff plate.
d. Rear scuff plate.
e. B-pillar lower trim.
f. Upper anchor of the front seat belt.
g. B-pillar upper trim.
h. Rear seat cushion.
i. Tire house trim.
j. C-pillar trim.
k. Map light.
l. Sunvisor.
m. Assist handle.
n. Headliner.
o. Center roof antenna.
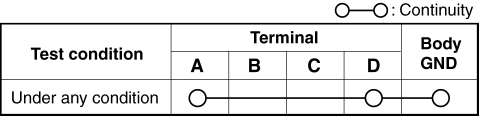
6. Verify that there is no continuity between the center roof antenna terminals A and B using an ohmmeter.
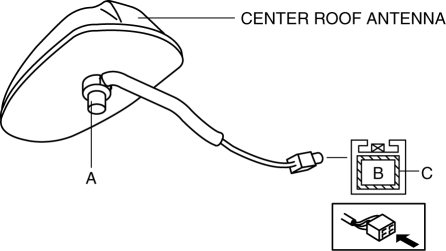
7. Inspect for continuity between the center roof antenna terminals using an ohmmeter.
-
If not as indicated in the table, replace the center roof antenna.
5HB
NOTE:
-
The center roof antenna has a built-in antenna amplifier.
Antenna Amplifier Inspection
1. Disconnect the negative battery cable..
2. Remove the rain sensor cover. (Vehicles with auto light/wiper system).
3. Disconnect the rain sensor connector. (Vehicles with auto light/wiper system)
4. Partially peel back the seaming welts.
5. Remove the following parts:
a. Sunroof seaming welt (vehicles with sunroof)
b. A-pillar trim.
c. Front scuff plate.
d. Rear scuff plate.
e. B-pillar lower trim.
f. Upper anchor of the front seat belt.
g. B-pillar upper trim.
h. Rear seat cushion.
i. Tire house trim.
j. Trunk side upper trim.
k. C-pillar trim.
l. Map light.
m. Sunvisor.
n. Assist handle.
o. Headliner.
6. Connect the negative battery cable..
7. Switch the ignition to ON.
8. Turn the audio unit power to ON.
9. Tune in the radio.
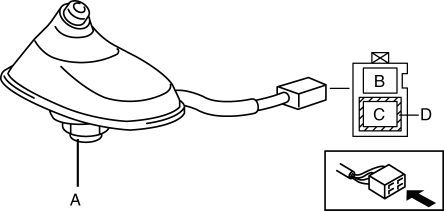
10. Verify that voltage is B+ at the antenna amplifier terminal B.
-
If the battery voltage cannot be verified, replace the center roof antenna.
-
If the battery voltage can be verified, go to the feeder line inspection.
Feeder Line Inspection
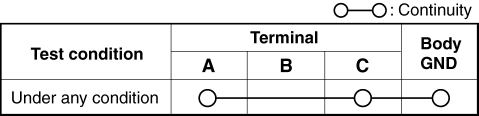
1. Remove the center roof antenna..
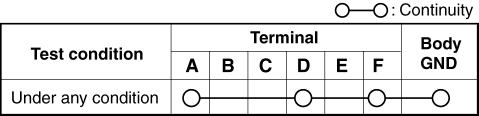
2. Verify that there is no continuity between the center roof antenna terminals A and C using an ohmmeter.
AM/FM type
AM/FM/SIRIUS type
3. Inspect for continuity between the center roof antenna terminals using an ohmmeter.
-
If not as indicated in the table, replace the center roof antenna.
AM/FM type
AM/FM/SIRIUS type
 Bass Box Removal/Installation
1. Disconnect the negative battery cable..
2. Disconnect the connector.
3. Remove the short-cord.
4. Remove the bolt.
5. Remove the bass-box.
6. Install in the reverse order of removal. ...
 Center Roof Antenna Removal/Installation
4SD
1. Disconnect the negative battery cable..
2. Remove the rain sensor cover. (Vehicles with auto light/wiper system).
3. Disconnect the rain sensor connector. (Vehicles with auto light/wiper s ...
Other materials:
Charcoal Canister Removal/Installation [Mzr 2.0, Mzr 2.5]
Except for Mexico
1. Remove in the order indicated in the table.
1
Evaporative hose
2
Quick release connector
(See QUICK RELEASE CONNECTOR (EMISSION SYSTEM) REMOVAL/INSTALLATION [MZR
2.0, MZR 2.5].)
3
Charc ...
Battery Recharging [Skyactiv G 2.0]
Using GR8-1291:
(See GR8-1291 INSTANT TRAINING MODULE (VIDEO) .)
WARNING:
Keep all flames away from the battery, otherwise evaporated gas from the
battery fluid may catch fire and cause serious injury.
1. Remove the battery filler caps and check the water level. If necessary, add ...
Windshield Defrosting and
Defogging
Set the mode selector dial to the
position and turn the fan control dial to the
desired speed.
In this position, the outside air position is automatically selected, and when
the fan control dial is ON, the air conditioner automatically turns on. The air
conditioner will directly dehumidify ...
