Mazda 3 Service Manual: Climate Control Unit Removal/Installation [Manual Air Conditioner]
1. Disconnect the negative battery cable..
2. Remove the following parts:
a. Upper panel.
b. Shift lever knob (MTX).
c. Selector lever knob (ATX).
d. Shift panel.
e. Side wall.
f. Console.
g. Front scuff plate.
h. Front side trim.
i. Dashboard under cover.
j. Glove compartment.
k. Hood release lever.
l. Lower panel.
m. Center panel.
n. Audio unit.
o. Shower duct (driver-side).
3. Remove in the order indicated in the table.
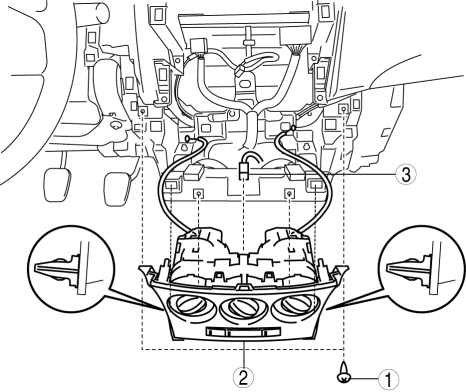
|
1 |
Screw |
|
2 |
Climate control unit (See Climate Control Unit Removal Note.) (See Climate Control Unit Installation Note.) |
|
3 |
Connector |
4. Install in the reverse order of removal.
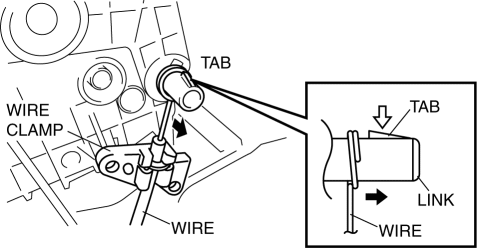
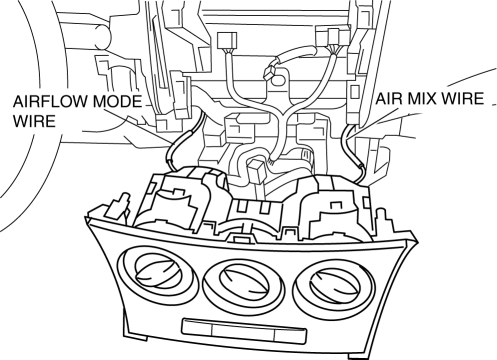
Climate Control Unit Removal Note
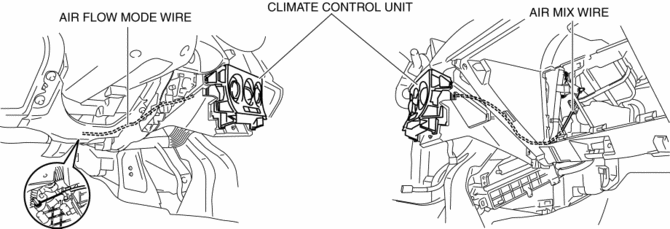
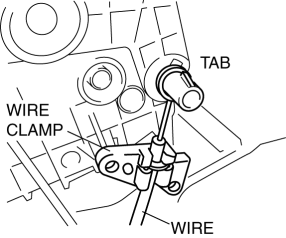
1. Disconnect each wire to links and remove it to the wire clamps.
2. Pull out the air mix wire and airflow mode wire from the dashboard.
Climate Control Unit Installation Note
1. Pass each wire through the hole on the dashboard as shown in the figure.
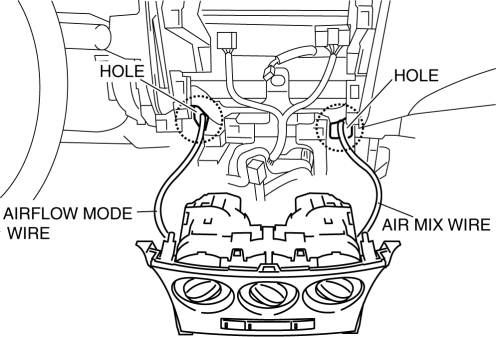
2. Route each wire as shown in the figure.
3. Connect the climate control unit connector.
4. Connect each wire to links and install it to the wire clamps.
5. Verify that the dial is turned fully from one end to the other.
 Climate Control Unit Removal/Installation [Full Auto Air Conditioner]
1. Disconnect the negative battery cable..
2. Remove the following parts:
a. Upper panel.
b. Shift lever knob (MTX).
c. Selector lever knob (ATX).
d. Shift panel.
e. Side wall.
f. Consol ...
 Condenser Inspection
1. Inspect the condenser for cracks, damage, and oil leakage.
If there is any malfunction, replace the condenser.
2. Visually inspect the fins for clogging of foreign material.
I ...
Other materials:
Steering Gear And Linkage Assembly
CAUTION:
To prevent damage to the steering gear, secure it to the vise using a copper
plate or clean cloth.
1. Assemble in the order indicated in the table.
1
Gear housing
2
Mounting rubber
(See Mounting Rubber Assembly No ...
Oil Seal (Differential) Replacement [G66 M R]
1. On level ground, jack up the vehicle and support it evenly on safety stands.
2. Remove the aerodynamic under cover No.2..
3. Drain the oil from the transaxle..
4. Remove the front splash shield..
5. Separate the drive shaft and joint shaft from the transaxle..
6. Remove the oil seals u ...
Fuel Economy Monitor
For vehicles with type B audio, the Control Status and Fuel Consumption are
switched and
displayed by operating each icon in the display.
In addition, after completing a trip, the total energy efficiency to date is
displayed in the
ending display when the ending display is turned on.
Se ...
