Mazda 3 Service Manual: Drive Belt Removal/Installation [Mzr 2.3 Disi Turbo]
1. Remove the aerodynamic under cover No.2 and splash shield as a single unit..
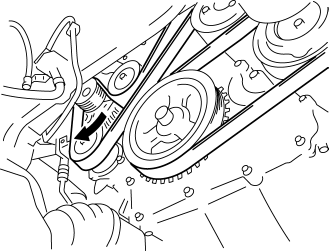
2. Rotate the drive belt auto tensioner in the direction shown in the figure and remove the drive belt.
3. Install the drive belt.
4. Verify that the drive belt auto tensioner indicator mark does not exceed the limit..
5. Install the aerodynamic under cover No.2 and splash shield as a single unit..
 Drive Belt Removal/Installation [Mzr 2.0, Mzr 2.5]
MZR 2.0
A/C drive belt removal
1. Remove the aerodynamic under cover No.2 and splash shield as a single unit..
2. Remove the nut shown in the figure and set the power steering pipe component
ou ...
 Drive Belt Removal/Installation [Skyactiv G 2.0]
WARNING:
A hot engine can cause severe burns. Turn off the engine and wait until it
is cool before servicing.
NOTE:
Remove/install the drive belt from the underside of the veh ...
Other materials:
A Pillar Trim Removal/Installation
1. Partially peel back the seaming welt.
2. Pull the upper end of the A-pillar trim in the direction of the arrow shown
in the figure and remove clip A and B.
3. Cut the lead wire connecting clip B and grommet using a nipper and pull out
the A-pillar trim in the direction of the arrow sh ...
Timing Chain Removal/Installation [Mzr 2.0, Mzr 2.5]
1. Remove the battery cover..
2. Disconnect the negative battery cable..
3. Remove the plug hole plate..
4. Disconnect the wiring harness.
5. Remove the ignition coils..
6. Remove the spark plugs..
7. Remove the ventilation hose.
8. Remove the coolant reserve tank with the hose still c ...
Discharge Headlight Control Module Removal/Installation
CAUTION:
Incorrect servicing of the discharge headlights could result in electrical
shock. Before servicing the discharge headlights, always refer to the discharge
headlight service warnings..
1. Disconnect the negative battery cable..
2. Remove the front bumper..
3. Remove t ...
