Mazda 3 Service Manual: Exhaust System Removal/Installation [Mzr 2.0, Mzr 2.5]
WARNING:
-
A hot engine and exhaust system can cause severe burns. Turn off the engine and wait until they are cool before removing the exhaust system.
1. Remove the battery cover..
2. Disconnect the negative battery cable..
3. Remove the plug hole plate..
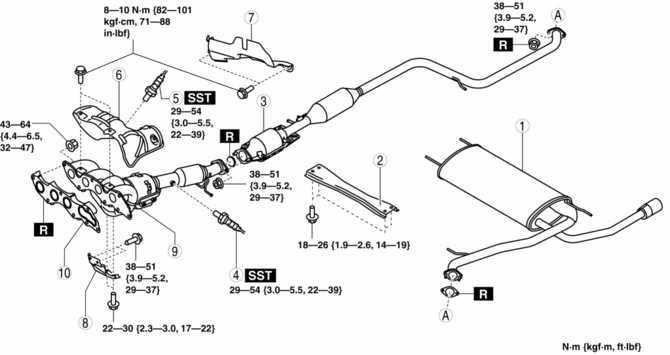
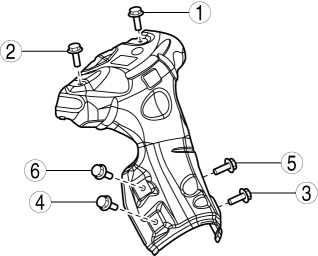
4. Remove in the order indicated in the table.
5. Remove the insulator..
6. Install in the reverse order of removal.
MZR 2.0
|
1 |
Main silencer |
|
2 |
Tunnel member (rear) |
|
3 |
TWC |
|
4 |
HO2S (See HEATED OXYGEN SENSOR (HO2S) REMOVAL/INSTALLATION [MZR 2.0, MZR 2.5].) |
|
5 |
A/F sensor (See AIR FUEL RATIO (A/F) SENSOR REMOVAL/INSTALLATION [MZR 2.0, MZR 2.5].) |
|
6 |
Exhaust manifold insulator (See Exhaust Manifold Installation Note.) |
|
7 |
insulator |
|
8 |
Exhaust manifold bracket |
|
9 |
Exhaust manifold (See Exhaust Manifold Removal Note.) |
|
10 |
Exhaust manifold gasket |
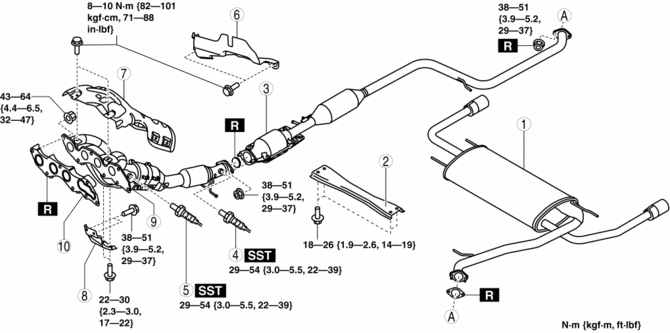
MZR 2.5 (Except for Mexico)
MZR 2.5 (Mexico)

|
1 |
Main silencer |
|
2 |
Tunnel member (rear) |
|
3 |
TWC |
|
4 |
HO2S (See HEATED OXYGEN SENSOR (HO2S) REMOVAL/INSTALLATION [MZR 2.0, MZR 2.5].) |
|
5 |
A/F sensor (See AIR FUEL RATIO (A/F) SENSOR REMOVAL/INSTALLATION [MZR 2.0, MZR 2.5].) |
|
6 |
insulator |
|
7 |
Exhaust manifold insulator (See Exhaust Manifold Installation Note.) |
|
8 |
Exhaust manifold bracket |
|
9 |
Exhaust manifold (See Exhaust Manifold Removal Note.) |
|
10 |
Exhaust manifold gasket |
Exhaust System Insulator Removal/installation Note
1. Remove the exhaust system insulator in the order shown in the figure.
2. Install in the reverse order of removal.

|
1 |
Insulator (rear No.1) (See Insulator (Rear No.1, No.2, No.3) Removal Note.) |
|
2 |
Insulator (rear No.2) (See Insulator (Rear No.1, No.2, No.3) Removal Note.) |
|
3 |
Insulator (rear No.3) (See Insulator (Rear No.1, No.2, No.3) Removal Note.) |
|
4 |
Insulator (middle No.1) |
|
5 |
Insulator (middle No.2) |
|
6 |
Insulator (front) (See Insulator (Front) Removal Note.) |
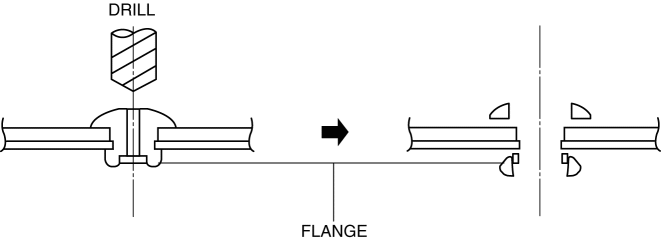
Insulator (Rear No.1, No.2, No.3) Removal Note
NOTE:
-
The insulator (rear No.1, No.2, No.3) are installed using rivets.
1. Push out the mandrel using a hammer and punch (2—2.8 mm {0.08—0.11 in} diameter).
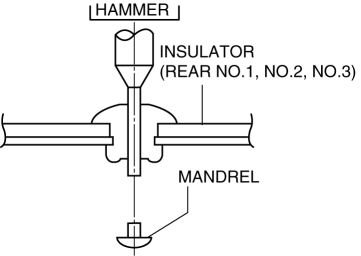
2. Remove the flange using a drill (5 mm {0.20 in} drill bit).
Insulator (Front) Removal Note
1. Remove the tunnel member (front).
2. Remove the insulator (front).
Exhaust Manifold Removal Note
1. Windshield wiper arm and blade..
2. Remove the cowl grille..
3. Remove the windshield wiper motor..
4. Remove the cowl panel..
5. Remove the exhaust manifold.
Exhaust Manifold Installation Note
1. Temporarily tighten the exhaust manifold installation nuts.
2. Tighten the exhaust manifold new installation nuts in the order shown in the figure.

-
Tightening torque
-
43—64 N·m {4.4—6.5 kgf·m, 32—47 ft·Ibf}
Exhaust Manifold Insulator Installation Note
1. Temporarily tighten the exhaust manifold insulator.
2. Tighten the exhaust manifold insulator in the order shown in the figure.
MZR 2.0

MZR 2.5
-
Tightening torque
-
8—10 N·m {82—101 kgf·cm, 71—88 in·Ibf}
 Exhaust System Inspection [Mzr 2.0, Mzr 2.5]
1. Start the engine and inspect each exhaust system component for exhaust gas
leakage.
If there is leakage, repair or replace the appropriate component..
...
 Forced Induction
...
Other materials:
Combination Switch Removal/Installation
CAUTION:
Handling the air bag module improperly can accidentally deploy the air bag
module, which may seriously injure you. Read the air bag system service warnings
and cautions before handling the air bag module..
1. Switch the ignition to off.
2. Disconnect the negative batte ...
Operation
System triggering conditions
The horn sounds intermittently and the
hazard warning lights flash for about 30
seconds when the system is triggered by
any one of the following:
Unlocking a door with the key, door
lock switch, or an inside door-lock knob.
Forcing open a door, the hood or th ...
Entertainment System
Outline
Auxiliary jack/USB port has been adopted.
USB adapter has been adopted.
An audio unit which supports USB devices such as USB memory or iPods has
been adopted.
911 assist function has been added to the Bluetooth unit.
RDS-TMC (Radio Data System-Traffi ...
