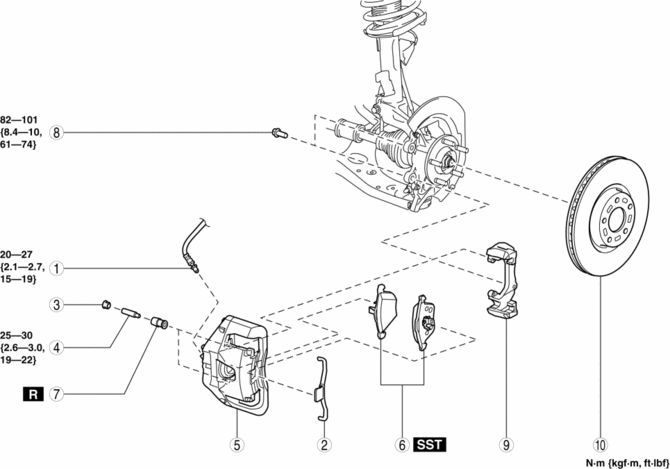
Mazda 3 Service Manual: Front Brake (Disc) Removal/Installation [Mzr 2.3 Disi Turbo]
1. Remove in the order indicated in the table.
2. Install in the reverse order of removal.
3. After installation, pump the brake pedal a few times and verify that the brakes do not drag.
|
1 |
Brake hose (See Brake Hose Installation Note.) |
|
2 |
Retaining clip (See Retaining Clip Removal Note.) |
|
3 |
Cap |
|
4 |
Bolt |
|
5 |
Caliper |
|
6 |
Disc pad (See Disc Pad Installation Note.) |
|
7 |
Boot |
|
8 |
Bolt |
|
9 |
Mounting support |
|
10 |
Disc plate |
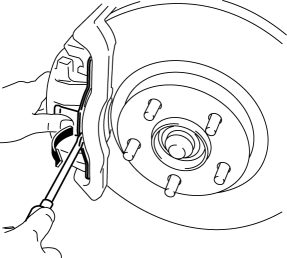
Retaining Clip Removal Note
1. Move the retaining clip in the direction shown by the arrow using a flathead screwdriver and remove it from the caliper.
Disc Pad Installation Note
1. Clean the exposed area of the piston.
2. Push the piston in using the SST
.
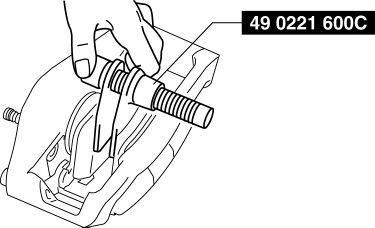
3. Install the disc pad to the caliper.
Brake Hose Installation Note
1. Install the brake hose to the caliper.
2. Tighten the flare nut while holding the brake hose at point A with a spanner or equivalent.
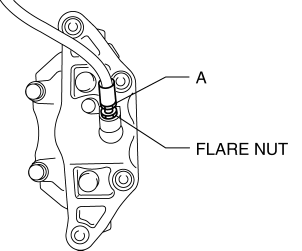
3. Verify that the brake hose is not twisted.
 Front Brake (Disc) Removal/Installation [Mzr 2.0, Skyactiv G 2.0, Mzr 2.5]
1. Remove in the order indicated in the table.
2. Install in the reverse order of removal.
3. After installation, pump the brake pedal a few times and verify that the brakes
do not drag.
...
 Rear Brake (Disc) Inspection
Brake Judder Repair Hints
Description
1. Brake judder concern has the following 3 characteristics:
Steering wheel vibration
1. The steering wheel vibrates in the rotation direction. This characte ...
Other materials:
Confirmation Step 3: Antenna System Simple Inspection [Radio]
Because the antenna system is equipped with a capacitor, the continuity cannot
be checked. Therefore proceed the following simple inspection.
Turn the AM radio on.
Tune to the frequency that there is no broadcast and you will hear a
buzzing sound.
Turn ...
Front Door Latch And Lock Actuator Removal/Installation
1. To access the glass installation bolt, position the front door glass so that
the distance from the top of the front door glass to the upper part of the front
beltline molding is approx. 80 mm {3.1 in}.
2. Disconnect the negative battery cable..
3. Remove the following parts:
a. Inne ...
Manual Transaxle Shift Pattern
The shift pattern of the transaxle is
conventional, as shown.
Depress the clutch pedal all the way down
while shifting; then release it slowly.
Your vehicle is equipped with a device to
prevent shifting to R (reverse) by mistake.
Push the shift lever downward and shift
to R.
...
