Mazda 3 Service Manual: Front Bumper Disassembly/Assembly
Standard Type
Except SKYACTIV-G 2.0
1. Disassemble in the order indicated in the table.
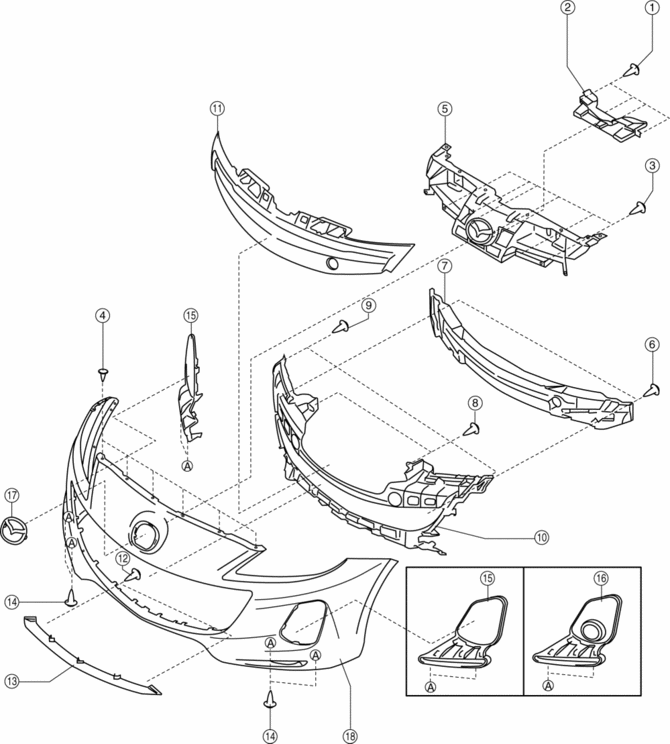
|
1 |
Screw A |
|
2 |
Guard cover |
|
3 |
Screw B |
|
4 |
Fastener C |
|
5 |
Intake air guide |
|
6 |
Fastener D |
|
7 |
Front energy-absorbing form |
|
8 |
Screw E |
|
9 |
Fastener F |
|
10 |
Front bumper mesh |
|
11 |
Front bumper upper mesh |
|
12 |
Screw G |
|
13 |
Airdam skirt |
|
14 |
Screw H |
|
15 |
Front fog light hole cover (Vehicles without front fog light) |
|
16 |
Front fog light cover (Vehicles with front fog light) |
|
17 |
Ornament |
|
18 |
Front bumper facia |
2. Assemble in the reverse order of disassembly.
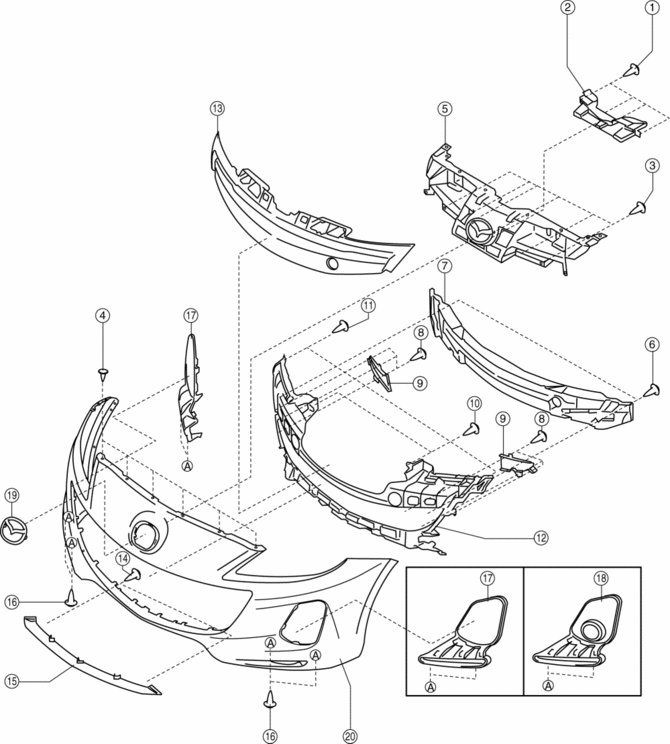
SKYACTIV-G 2.0
1. Disassemble in the order indicated in the table.
|
1 |
Screw A |
|
2 |
Guard cover |
|
3 |
Screw B |
|
4 |
Fastener C |
|
5 |
Intake air guide |
|
6 |
Fastener D |
|
7 |
Front energy-absorbing form |
|
8 |
Screw E |
|
9 |
Front bumper cover |
|
10 |
Screw F |
|
11 |
Fastener G |
|
12 |
Front bumper mesh |
|
13 |
Front bumper upper mesh |
|
14 |
Screw H |
|
15 |
Airdam skirt |
|
16 |
Screw I |
|
17 |
Front fog light hole cover (Vehicles without front fog light) |
|
18 |
Front fog light cover (Vehicles with front fog light) |
|
19 |
Ornament |
|
20 |
Front bumper facia |
2. Assemble in the reverse order of disassembly.
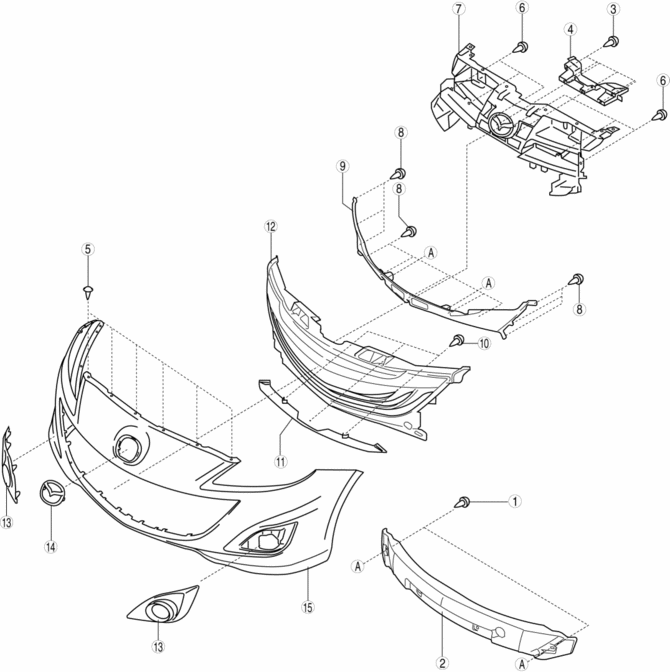
Mazdaspeed3 Type
1. Remove the front fog lights..
2. Disassemble in the order indicated in the table.
|
1 |
Fastener A |
|
2 |
Front energy-absorbing form |
|
3 |
Screw B |
|
4 |
Guard cover |
|
5 |
Fastener C |
|
6 |
Screw D |
|
7 |
Intake air guide |
|
8 |
Screw E |
|
9 |
Front bumper mesh rear |
|
10 |
Screw F |
|
11 |
Airdam skirt |
|
12 |
Front bumper mesh front |
|
13 |
Front fog light hole cover |
|
14 |
Ornament |
|
15 |
Front bumper facia |
3. Assemble in the reverse order of disassembly.
 Front Beltline Molding Removal/Installation
1. Fully open the front door glass.
2. Disconnect the negative battery cable..
3. Remove the inner garnish..
4. Remove the front door trim..
5. Remove the power outer mirror..
6. Remove clip ...
 Front Bumper Reinforcement Removal/Installation
1. Disconnect the negative battery cable..
2. Remove the following parts:
a. Front bumper.
b. Seal plate.
3. Remove the bolts A.
4. Remove the bolts B.
5. Remove the front bumper r ...
Other materials:
Front Door Checker Removal/Installation
1. Fully close the front door glass.
2. Disconnect the negative battery cable..
3. Remove the inner garnish..
4. Remove the front door trim..
5. Remove the front door speaker..
6. Remove the bolt A.
7. Remove the bolts B.
8. Pull out the front door checker from the front speake ...
Rear Window Wiper and
Washer
The ignition must be switched ON to use
the wiper.
Rear Window Wiper
Turn the wiper on by turning the rear
wiper/washer switch
Rear Window Washer
To spray washer fluid, turn the rear wiper/
washer switch to the position. After the
switch is released, the washer will stop.
If the w ...
Child Restraint Seat Anchor Removal/Installation
4SD
1. Remove the cover.
2. Remove the bolt and child-restraint seat anchor.
3. Install in the reverse order of removal.
5HB
1. Remove the trunk end trim..
2. Remove the bolt and child-restraint seat anchor.
3. Install in the reverse order of removal. ...
