Mazda 3 Service Manual: Front Door Latch Switch Inspection
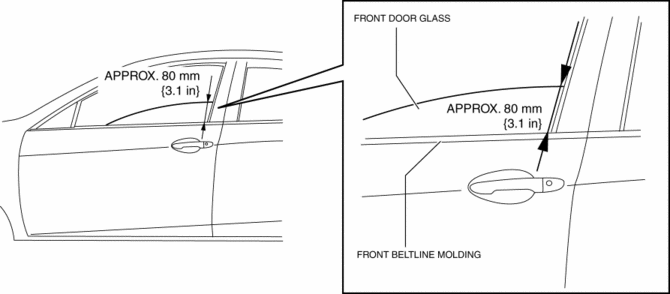
1. To access the glass installation bolt, position the front door glass so that the distance from the top of the front door glass to the upper part of the front beltline molding is approx. 80 mm {3.1 in}
.

2. Disconnect the negative battery cable..
3. Remove the following parts:
a. Inner garnish.
b. Front door trim.
c. Front door speaker.
d. Front door glass.
e. Front door module panel.
f. Front door latch and lock actuator.
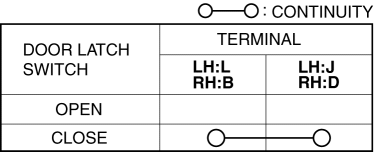
4. Verify that the continuity is as indicated in the table.

-
If not as indicated in the table, replace the front door latch and lock actuator.

NOTE:
-
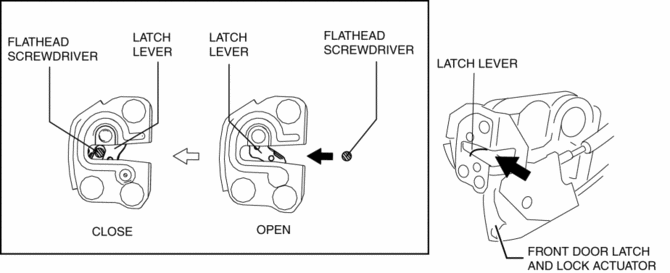
When inspecting the close condition of the front door latch switch, press in the latch lever using a flathead screwdriver.

 Front Door Latch And Lock Actuator Removal/Installation
1. To access the glass installation bolt, position the front door glass so that
the distance from the top of the front door glass to the upper part of the front
beltline molding is approx. 80 mm { ...
 Front Door Module Panel Removal/Installation
1. To access the glass installation bolt, position the front door glass so that
the distance from the top of the front door glass to the upper part of the front
beltline molding is approx. 80 mm { ...
Other materials:
Starter Disassembly/Assembly [Mzr 2.0, Mzr 2.5]
1. Disassemble in the order indicated in the table.
2. Assemble in the reverse order of disassembly.
1
Magnetic switch
2
Adjustment washer
3
Rear housing
4
Brush and brush holder
...
Refrigerant Pressure Sensor Removal/Installation [Full Auto Air Conditioner]
1. Disconnect the negative battery cable..
2. Discharge the refrigerant..
3. Disconnect the refrigerant pressure sensor connector.
CAUTION:
If moisture or foreign material enters the refrigeration cycle, cooling ability
will be lowered and abnormal noise will occur. Always immediate ...
Water Pump Removal/Installation [Mzr 2.0, Mzr 2.5]
WARNING:
Never remove the cooling system cap or loosen the radiator drain plug while
the engine is running, or when the engine and radiator are hot. Scalding engine
coolant and steam may shoot out and cause serious injury. It may also damage
the engine and cooling system.
Tu ...
