Mazda 3 Service Manual: Front Door Removal/Installation
WARNING:
-
Removing the front door without supporting it could cause the front door to fall and cause serious injury. Always perform the procedure with at least another person to prevent the front door from falling.
1. Disconnect the negative battery cable..
2. Remove in the order indicated in the table.

|
1 |
Bolt A |
|
2 |
Connector (See Connector Removal Note.) |
|
3 |
Bolt B |
|
4 |
Front door |
3. Install in the reverse order of removal.
4. Adjust the front door..
Connector Removal Note
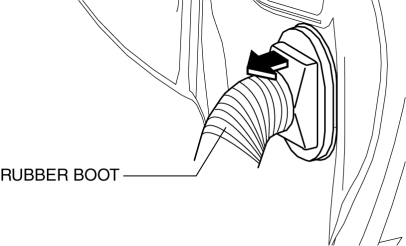
1. Pull the rubber boot outward.
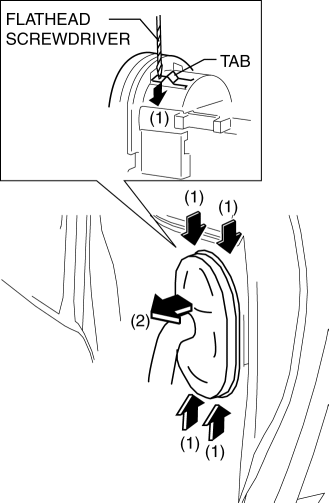
2. Press the tab in the direction of arrow (1) shown in the figure using a tape-wrapped flathead screwdriver, and remove the connector from the body in the direction of arrow (2) shown in the figure.
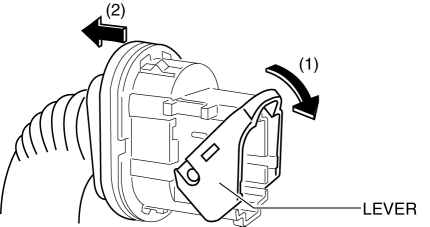
3. Lower the lever in the direction of arrow (1), and disconnect the connector in the direction of arrow (2).
 Front Door Module Panel Removal/Installation
1. To access the glass installation bolt, position the front door glass so that
the distance from the top of the front door glass to the upper part of the front
beltline molding is approx. 80 mm { ...
 Front Outer Handle Removal/Installation
1. To access the glass installation bolt, position the front door glass so that
the distance from the top of the front door glass to the upper part of the front
beltline molding is approx. 80 mm { ...
Other materials:
Warm Up Three Way Catalytic Converter (Wu Twc) Inspection [Mzr 2.0, Mzr 2.5]
CAUTION:
Perform the following procedures, DTC P0421:00 is indicated only.
1. Connect the M-MDS to the DLC-2.
2. Start the engine and warm it up to normal operating temperature.
3. Turn off the engine.
4. Verify that the engine compression is within the specification..
...
Event Data Recorder
This vehicle is equipped with an event data recorder (EDR). The main purpose
of an EDR
is to record, in certain crash or near crash-like situations, such as an air bag
deployment
or hitting a road obstacle, data that will assist in understanding how a
vehicle’s systems
performed. The EDR ...
Rear Door Module Panel Removal/Installation
1. Fully open the rear door glass.
2. Disconnect the negative battery cable..
3. Remove the following parts:
a. Rear door trim.
b. Rear door speaker.
c. Rear power window motor.
d. Rear door quarter glass.
e. Rear door glass.
4. Remove the clips securing the rear door wiring harness ...
