Mazda 3 Service Manual: Front Seat Back Trim Removal/Installation
WARNING:
-
Handling a front seat (with built-in side air bag) improperly can accidentally operate (deploy) the air bag, which may seriously injure you. Read the service warnings before handling a front seat (with built-in side air bag)..
CAUTION:
-
After removing a front seat, do not operate the slider lever. If the slider lever is operated, the left and right slide positions will deviate, and the slide adjuster may be damaged after the front seat is installed.
-
Verify that there are no malfunctions in the sliding mechanism after installing a front seat.
-
When performing the procedure with a front seat removed from the vehicle, perform the procedure on a clean rag so as not to damage or soil the seat.
-
When the passenger's seat is removed, perform the seat weight sensor inspection using the M-MDS after installing the passenger's seat..
-
When the passenger's seat is replaced with a new one, perform the seat weight sensor calibration using the M-MDS..
Removal
1. Switch the ignition to off.
2. Remove the battery cover..
3. Disconnect the negative battery cable and wait 1 min or more
.
4. Remove the front seat..
5. Remove the headrest.
6. Cut the band securing the wiring harness.
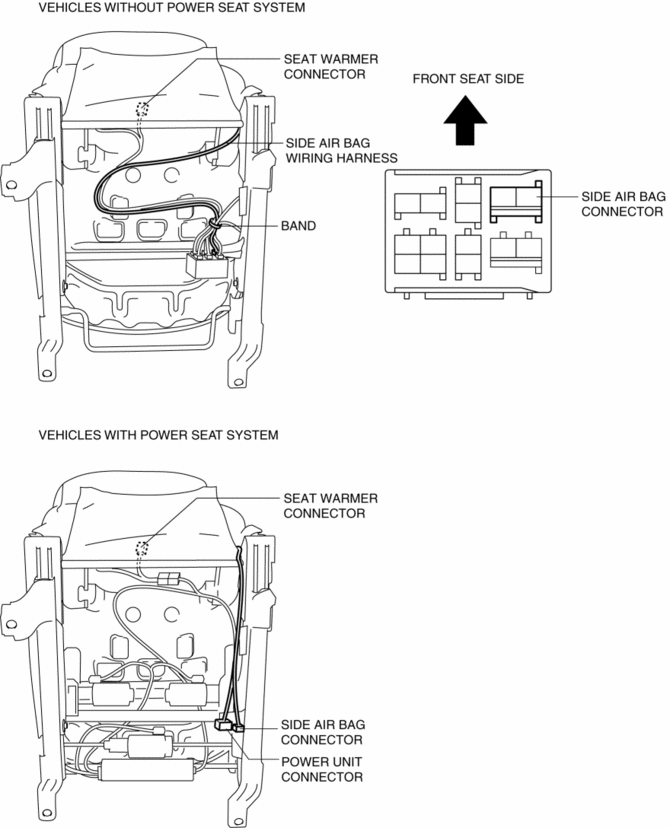
7. Disconnect the side air bag connector and seat warmer connector (Vehicles with power seat system).
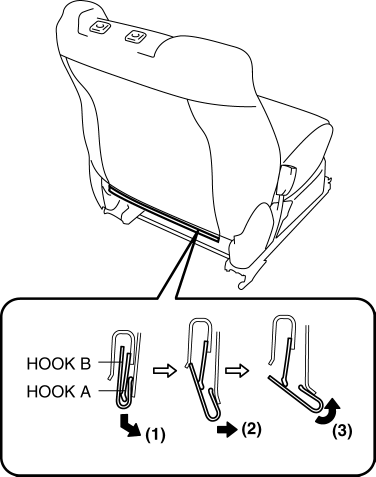
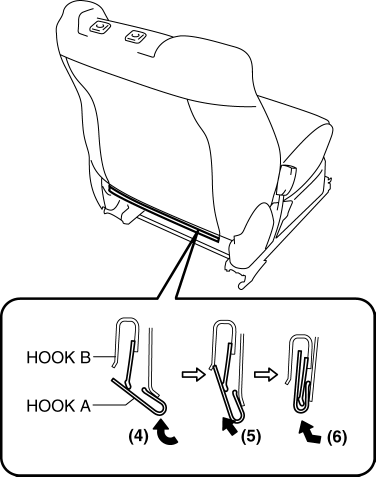
8. Slide hook A in the order shown in the figure to detach it from hook B.
9. Open the fastener.

10. Partially peal back the front seat back trim, release the pole guide tabs in the direction of arrow (4) shown in the figure, then pull the pole guide out in the direction of arrow (5).
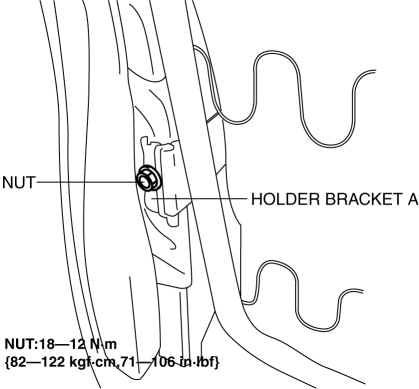
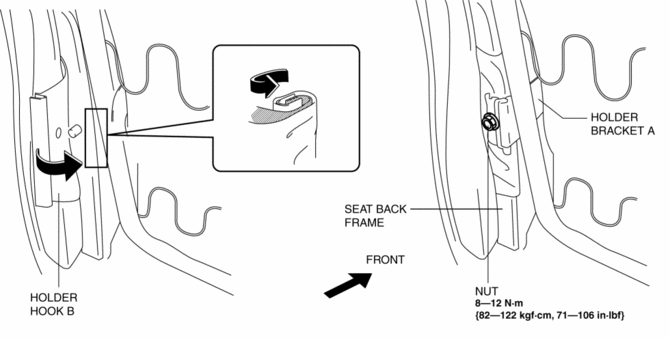
11. Remove the nut and remove the holder bracket A.
12. Remove the holder hook B in the order of (6), (7) as shown in the figure.

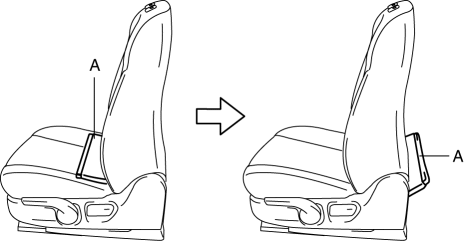
13. Pull out part A shown in the figure to the front.

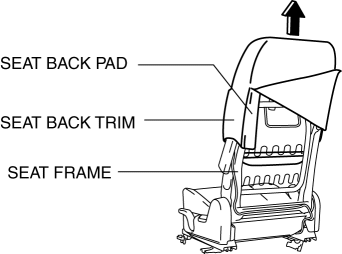
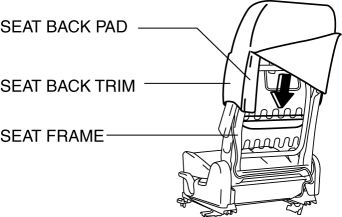
14. Remove the seat back trim and the seat back pad as a single unit from the seat frame by pulling them in the direction of the arrow.
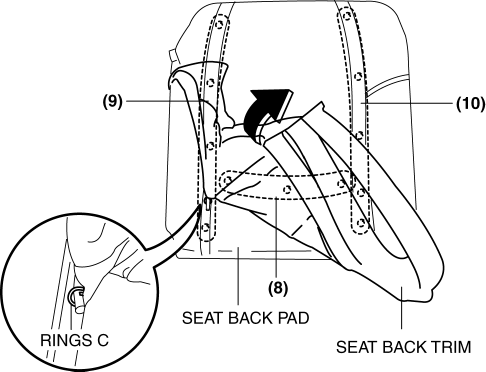
15. Partially peal back the seat back trim from the seat back pad, remove rings C in the order of (8), (9), (10) shown in the figure, then remove the seat back trim.
Installation
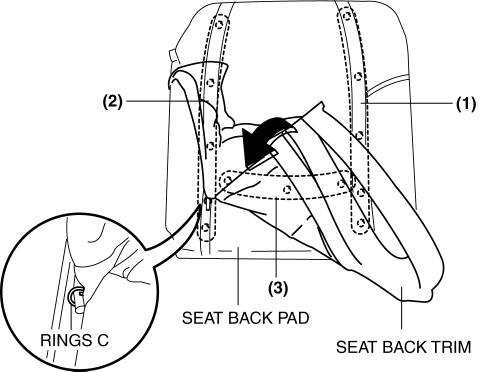
1. Install the seat back trim to the front seat back pad, install the rings C in the order of (1), (2), (3) shown in the figure, then install the seat back trim.
2. Install the seat back trim and the seat back pad as a single unit from the seat frame by pushing them in the direction of the arrow
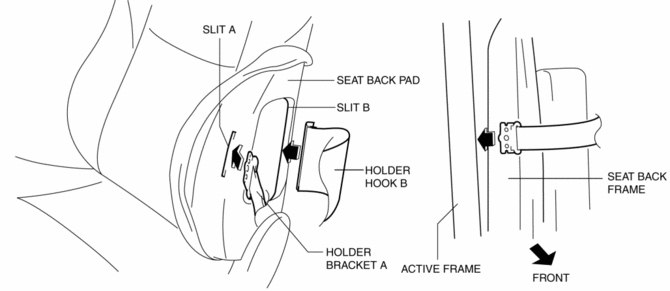
3. Pass holder bracket A through slit A, holder hook B through slit B of the seat back pad.
CAUTION:
-
Install it without twisting the sleeve.
-
Get the holder bracket through between active frame and seat back frame.
4. Push the part A shown in the figure to the rear.
5. Assemble the holder bracket A to the seat back frame and install the nut shown in the figure.
6. Install the pole guide in the direction of arrow shown in the figure.
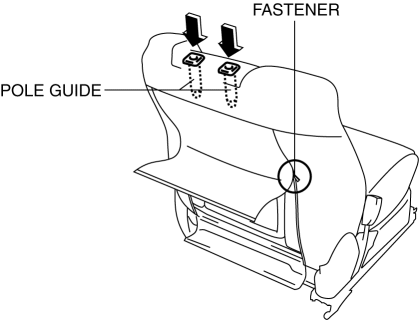
7. Shut the fastener.
8. Slide hook A in the order of (4), (5), (6) shown in the figure to install it to hook B
9. Install the band, while tighten the wiring harness.
10. Connect the negative battery cable..
11. Install the battery cover..
 Front Seat Back Component [Vehicles Without Power Seat System] Removal/Installation
WARNING:
Handling a front seat (with built-in side air bag) improperly can accidentally
operate (deploy) the air bag, which may seriously injure you. Read the service
warnings before han ...
 Front Seat Cover Removal/Installation [Vehicles With Power Seat System]
WARNING:
Handling a front seat (with built-in side air bag) improperly can accidentally
operate (deploy) the air bag, which may seriously injure you. Read the service
warnings before han ...
Other materials:
Glass Panel Removal/Installation
1. Fully close the glass panel.
2. Fully open the sunshade.
3. Remove the screws, and then remove the glass panel.
4. Peel the weatherstrip off the glass panel.
5. Install in the reverse order of removal.
6. Adjust the glass panel.. ...
Sunroof Motor Inspection
1. Disconnect the negative battery cable..
2. Remove the rain sensor cover. (Vehicles with auto light/wiper system).
3. Disconnect the rain sensor connector. (Vehicles with auto light/wiper system)
4. Partially peel back the seaming welts.
5. Remove the following parts:
a. Sunroof seaming ...
Ignition Switch Removal/Installation [Without Advanced Keyless Entry And Push
Button Start System]
1. Disconnect the negative battery cable..
2. Remove the column cover..
3. Detach the tab.
4. Pull the pin in the direction of the arrow shown in the figure and release
the lock.
5. Disconnect the ignition switch connector and key interlock solenoid connector.
6. Remove the ...
