Mazda 3 Service Manual: Front Seat Belt Removal/Installation [Two Step Deployment Control System]
WARNING:
-
Handling the front seat belt (pre-tensioner seat belt) improperly can accidentally deploy the pre-tensioner seat belt, which may seriously injure you. Read the air bag system service warnings and cautions before handling the front seat belt..
WARNING:
-
The side air bag sensor is attached to the lower part of the B-pillar. When working around the B-pillar, disconnect the negative battery cable avoiding excessive impact to the lower part of the B-pillar.
CAUTION:
-
The ELR (emergency locking retractor) has a spring that will unwind if the retractor cover is removed. The spring cannot be rewound by hand. If this occurs, the ELR will not work properly. Therefore, do not disassemble the retractor.
Driver-side
1. Switch the ignition to off.
2. Disconnect the negative battery cable and wait for 1min or more
..
3. Remove the front scuff plate..
4. Remove the rear scuff plate..
5. Remove the B-pillar lower trim..
6. Remove the fastener.
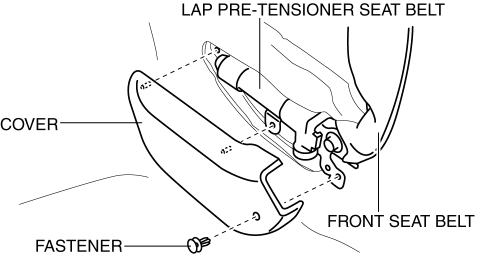
7. Remove the cover.
8. Remove the bolt A.
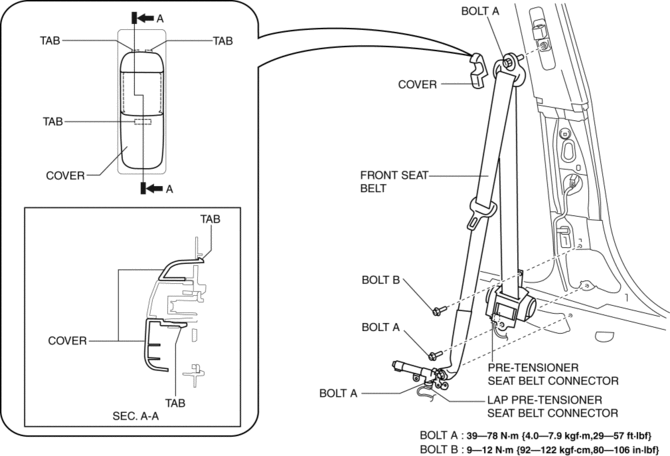
9. Remove the bolt B.
10. Remove the front seat belt.
11. Using a flathead screwdriver, lift the locking device carefully, however do not remove it.
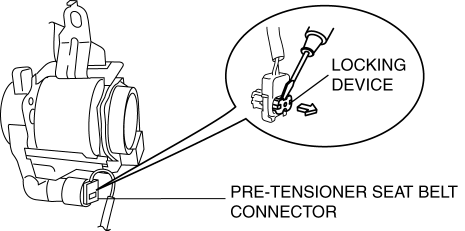
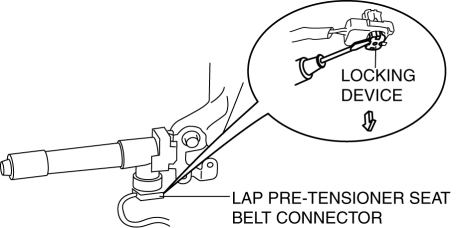
12. Disconnect the pre-tensioner seat belt connector.
13. Disconnect the lap pre-tensioner seat belt connector.
14. Install in the reverse order of removal.
15. Switch the ignition to ON.
16. Verify that the air bag system warning light illuminates for approx. 6 s
and goes out.
-
If the air bag system warning light does not operate, refer to the on-board diagnostic system (air bag system) and perform inspection of the system..
Passenger-side
1. Switch the ignition to off.
2. Disconnect the negative battery cable and wait for 1min or more
..
3. Remove the front scuff plate..
4. Remove the rear scuff plate..
5. Remove the B-pillar lower trim..
6. Remove the cover.
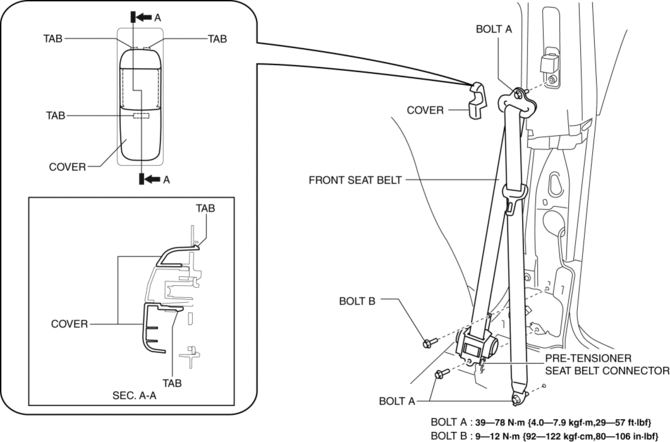
7. Remove the bolt A.
8. Remove the bolt B.
9. Remove the front seat belt.
10. Using a flathead screwdriver, lift the locking device carefully, however do not remove it.

11. Disconnect the pre-tensioner seat belt connector.
12. Install in the reverse order of removal.
13. Switch the ignition to ON.
14. Verify that the air bag system warning light illuminates for approx. 6 s
and goes out.
-
If the air bag system warning light does not operate, refer to the on-board diagnostic system (air bag system) and perform inspection of the system..
 Front Seat Belt Removal/Installation [Standard Deployment Control System]
WARNING:
Handling the front seat belt (pre-tensioner seat belt) improperly can accidentally
deploy the pre-tensioner seat belt, which may seriously injure you. Read the
air bag system ...
 Rear Buckle Removal/Installation
Rear Buckle (RH) and Rear Buckle (Center)
1. Remove the rear seat cushion..
2. Remove the bolt.
3. Remove the rear buckle (RH) and rear buckle (center).
4. Install in the reverse order of ...
Other materials:
Inner Garnish Removal/Installation
1. Disconnect the negative battery cable..
2. Pull the inner garnish in the direction of the arrow shown in the figure and
remove it while detaching clips and tab.
CAUTION:
When pulling out the inner garnish, be careful not to damage the tab.
3. Disconnect the front tweeter c ...
Spark Plug Inspection [Mzr 2.0, Mzr 2.5]
Specification
Spark plug type
LFJD-18110, L3Y2-18110
Plug Gap Inspection
CAUTION:
To avoid possible damage to the tip, do not adjust the spark plug gap. (L3Y2-18110)
To prevent damaging the tip, use a wire type plug gap gauge when inspecting
the spark plug gap. (L3 ...
Plastic Part Maintenance
When cleaning the plastic lenses of the
lights, do not use gasoline, kerosene,
rectified spirit, paint, thinner, highly
acidic detergents, or strongly alkaline
detergents. Otherwise, these chemical
agents can discolor or damage the
surfaces resulting in a significant loss
in functio ...
