Mazda 3 Owners Manual: HomeLink Wireless Control System*
NOTE HomeLink and HomeLink house are registered trademarks of Johnson Controls.
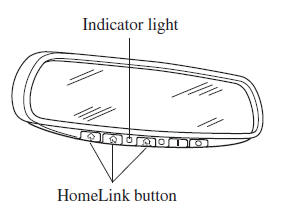
The HomeLink system replaces up to 3 hand-held transmitters with a single built-in component in the auto-dimming mirror. Pressing the HomeLink button on the auto-dimming mirror activates garage doors, gates and other devices surrounding your home.
| WARNING
Do not use the HomeLink system with
any garage door opener that lacks the
safety stop and reverse feature:
Using the HomeLink system with any
garage door opener that lacks the
safety stop and reverse feature as
required by federal safety standards
is dangerous. (This includes garage
doors manufactured before April 1,
1982.)
Using these garage door openers can
increase the risk of serious injury or
death. For further information, contact
HomeLink at 1-800-355-3515 or www. Homelink.com or an Authorized Mazda Dealer. Always check the areas surrounding garage doors and gates for people or obstructions before programming or during operation of the HomeLink system: Programming or operating the HomeLink system without verifying the safety of areas surrounding garage doors and gates is dangerous and could result in an unexpected accident and serious injury if someone were to be hit. |
NOTE The programming will not be erased even if the battery is disconnected.
 Hazard Warning Flasher
The hazard warning lights should always
be used when you stop on or near a
roadway in an emergency.
The hazard warning lights warn other
drivers that your vehicle is a traffic hazard
and that ...
 Pre-programming the HomeLink
System
Pre-programming the HomeLink
System
NOTE
It is recommended that a new battery be
placed in the hand-held transmitter of the
device being programmed to HomeLink
for quicker training and accurate
transmission of the radio-frequency s ...
Other materials:
Automatic Transaxle Fluid (ATF) Inspection [Fw6 A EL]
CAUTION:
If the ATF level is not within the specification or ATF is not adhering to
the dipstick after warming up the engine, do not drive the vehicle. Otherwise,
the transaxle could be damaged.
ATF Level Inspection
1. Remove aerodynamic undercover No.2..
2. Remove the dipstic ...
Ion Sensor Inspection [Skyactiv G 2.0]
DTC Inspection
NOTE:
Because the ion sensor is integrated in the ignition coil, replacing the
ion sensor includes replacement of the ignition coil/ion sensor.
1. Connect the M-MDS to the DLC-2.
2. Perform the DTC inspection using the M-MDS..
If any DTC related to the ...
A Pillar Trim Removal/Installation
1. Partially peel back the seaming welt.
2. Pull the upper end of the A-pillar trim in the direction of the arrow shown
in the figure and remove clip A and B.
3. Cut the lead wire connecting clip B and grommet using a nipper and pull out
the A-pillar trim in the direction of the arrow sh ...
