Mazda 3 Owners Manual: Lane Departure Warning System (LDWS)
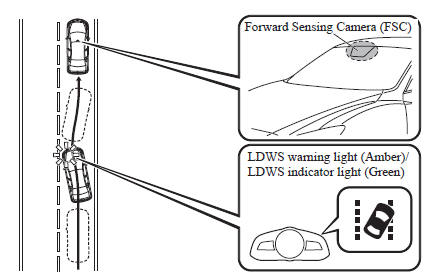
The LDWS notifies the driver that the vehicle may be deviating from its lane.
The system detects the white or yellow lines on the traffic lane using the Forward Sensing Camera (FSC). If it determines that the vehicle may be deviating from its lane, it notifies the driver by flashing the LDWS indicator light (green) and operating the LDWS warning sound.
Refer to Forward Sensing Camera on .
Use the LDWS when you drive the vehicle on roads with white or yellow lines.
The warning light flashes when the system has a malfunction.
Refer to Warning Lights on .]
WARNING
Do not use the LDWS under the following conditions:
The system may not operate adequately according to the actual driving
conditions,
resulting in an accident.
The functions of the LDWS have limitations: Always stay on course using the steering wheel and drive with care. The system is not designed to compensate for a driver’s lack of caution and if you rely too much on the LDWS it could lead to an accident. The driver is responsible for assuring lane changes and other maneuvers. Always pay attention to the direction in which the vehicle is traveling and the vehicle’s surroundings. |
| CAUTION Do not modify the suspension. If the vehicle height or the damping force of the suspensions is changed, the LDWS may not operate correctly. |
NOTE
- If your vehicle deviates from its traffic lane, the LDWS operates (warning sound and indicator light). Steer the vehicle adequately to drive the vehicle to the center of the lane.
- When the turn signal lever is operated for a lane change, the LDWS warning is automatically canceled. The LDWS warning becomes operable when the turn signal lever is returned and the system detects the white or yellow lines.
- If the steering wheel, accelerator pedal, or brake pedal is operated abruptly and the vehicle moves close to a white or yellow line, the system determines that the driver is making a lane change and the LDWS warning is automatically canceled.
- The LDWS may not operate during the period immediately after the vehicle has deviated from its lane and the LDWS has operated, or the vehicle deviates from its lane repeatedly within a short period of time.
- The LDWS does not operate if it does not detect the white or yellow lines of the traffic lane.
- Under the following conditions, the LDWS may not be able to detect white or yellow lines correctly and the LDWS may not operate correctly.
- If an object placed on the dashboard is reflected in the windshield and picked up by the camera.
- Heavy luggage is loaded in the luggage compartment or on the rear seat and the vehicle is inclined.
- The tire pressures are not adjusted to the specified pressure.
- When the vehicle is driven on the entry and exit to or from the rest area or tollgate of a highway.
- The white or yellow lines are less visible because of dirt or paint flaking.
- The vehicle ahead is running near a white or yellow line and the line is less visible.
- A white or yellow line is less visible because of bad weather (rain, fog, or snow).
- The vehicle is driven on a temporary lane or section with a closed lane due to construction.
- A misleading line is picked up on the road such as a temporary line for construction, or because of shade, lingering snow, or grooves filled with water.
- The surrounding brightness suddenly changes such as when entering or exiting a tunnel.
- The illumination of the headlights is weakened because of dirt or the optical axis is deviated.
- The windshield is dirty or foggy.
- Back-light is reflecting from the road surface.
- The road surface is wet and shiny after rain, or there are puddles on the road.
- The shade of a guardrail parallel to a white or yellow line is on the road.
- The width of a lane is excessively narrow or wide.
- The road is excessively uneven.
- The vehicle is shaken after hitting a road bump.
- There are two or more adjacent white or yellow lines.
- There are various road markings or lane markings of various shapes near an intersection.
When the System Operates
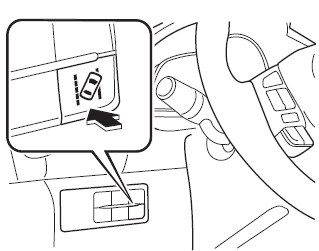
- Press the LDWS switch. The LDWS
goes on stand-by and the LDWS
warning light (amber) illuminates.
The lane indication (bordered line) is indicated in the active driving display (Type A instrument cluster *1 ) or the multi information display (Type B instrument cluster *1 ).
*1 To determine which instrument cluster is equipped on your Mazda, Refer to Meters and Gauges on .
Indication on display
- Drive the vehicle near the center of the lane and the LDWS indicator light (green) illuminates in the instrument cluster when all of the following conditions are met.
- The vehicle is driven near the center of the lane with the white or yellow line on the left and right sides, or on either side.
- The vehicle speed is about 70 km/h (44 mph) or more
- The vehicle is driven on a straight road or road with gentle curves The lane indication is indicated in the active driving display (Type A instrument cluster *1 ) or the multi information display (Type B instrument cluster *1 ).
*1 To determine which instrument cluster is equipped on your Mazda, Refer to Meters and Gauges on .
Indication on display

NOTE
- The LDWS remains on stand-by until it detects white or yellow lines on both the left and right sides, or on either side.
- When the system detects a white or yellow line on one side only, the system will operate the warning only when the vehicle deviates to the side the white or yellow line detected.
Auto cancel
Under the following conditions, the LDWS is automatically canceled and kept on stand-by, and the LDWS warning light (amber) in the instrument cluster illuminates.
- The system cannot detect white or yellow lines.
- The vehicle speed is less than about 65 km/h (40 mph).
- The vehicle is making a sharp turn.
- The vehicle is making a turn at an inadequate speed.
- The temperature inside the camera is high or low.
- The windshield around the camera is foggy.
- The windshield around the camera is blocked by an obstruction, causing poor forward visibility.
The lane indication (bordered line) is indicated in the active driving display (Type A instrument cluster *1 ) or the multi information display (Type B instrument cluster *1 ).
The LDWS is automatically enabled when the condition changes and the system is operable.
*1 To determine which instrument cluster is equipped on your Mazda, Refer to Meters and Gauges on .
Auto cancel of warning
Under the following conditions, the LDWS determines that the driver is making lane changes and the warning is automatically canceled.
The LDWS is automatically enabled after the operation.
- The steering wheel is operated abruptly.
- The brake pedal is depressed abruptly.
- The accelerator pedal is depressed abruptly.
- A turn signal lever is operated (after the turn signal lever is returned, the LDWS warning may not operate for about 3 seconds which is the period of time required to make a lane correction).
NOTE
- After about 5 seconds have elapsed with the turn signal lever left operating, the LDWS warning may operate if the vehicle is close to a white or yellow line.
- The sensitivity of the warning
(sensitivity with which the system
determines the driver's intentional lane
change) can be changed.
Refer to Personalization Features on
Canceling the System
To cancel the LDWS, press the LDWS switch. The LDWS indicator light (Green/ Amber) in the instrument cluster turns off.
The lane indication displayed in the active driving display (Type A instrument cluster *1 ) or the multi information display (Type B instrument cluster *1 ) turns off.
*1 To determine which instrument cluster is equipped on your Mazda, Refer to Meters and Gauges on .
LDWS Warning
If the system determines that the vehicle may be deviating from its lane while the system is operating, the LDWS warning sounds and the LDWS indicator light (green) flashes.
Refer to Lane Departure Warning System (LDWS) Warning Sound on .
In the active driving display (Type A instrument cluster *1 ) or the multi information display (Type B instrument cluster *1 ), the direction in which the system determined that the vehicle may be deviating from its lane is indicated.
Operate the steering wheel adequately and drive in the center of the lane.
*1 To determine which instrument cluster is equipped on your Mazda, Refer to Meters and Gauges on .
Indication on display

NOTE
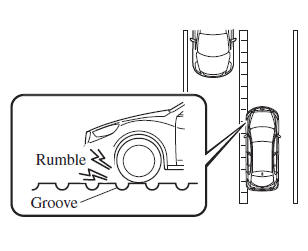
- If the LDWS warning sound is set to rumble *2 , the sound will be heard from the vehicle speaker on the side which the system determined the vehicle may be deviating from its lane.
- The LDWS warning sound may not be heard depending on the surrounding conditions such as outside noise.
- The warning timing with which the
system determines the vehicle may be
deviating from its lane can be changed.
Refer to Personalization Features on .
- The volume of the LDWS warning sound
can be changed.
Refer to Personalization Features on .
- The type of warning sound (rumble *2 /
beep) on the LDWS can be changed.
Refer to Personalization Features on .
*2 A rumble strip is a series of grooves in the road pavement surface positioned at specific intervals, and when the vehicle passes over it a vibration and rumble sound is produced which alerts the driver that the vehicle is departing from the lane.
The rumble sound is a reproduction of the sound which occurs when a vehicle passes over a rumble strip.
 High Beam Control System
(HBC)
High Beam Control System
(HBC)
The High Beam Control System (HBC) determines the conditions in front of the
vehicle
using the Forward Sensing Camera (FSC) while driving in darkness to
automatically switch
the headlights betwe ...
 Blind Spot Monitoring (BSM) System
The Blind Spot Monitoring (BSM) system is designed to assist the driver in
checking the
area to the rear of the vehicle on both sides during lane changes by alerting
the driver to the
presence o ...
Other materials:
Antenna Feeder No.1 Inspection
1. Disconnect the negative battery cable..
2. Remove the following parts:
a. Center panel.
b. Audio unit.
c. A-pillar trim (RH).
3. Disconnect antenna feeder No.2.
4. Verify that the continuity between antenna feeder No.1 terminals is as indicated
in the table.
If not a ...
Starter Interlock Switch Removal/Installation [C66 M R]
1. Remove the battery cover..
2. Disconnect the negative battery cable..
3. Disconnect the starter interlock switch connector.
4. Remove the starter interlock switch from the pedal bracket.
5. Insert a new starter interlock switch into the pedal bracket hole in the direction
indicated ...
Starter Cut Relay Removal/Installation [MTX]
Advanced Keyless Entry And Push Button Start System Only
1. Disconnect the negative battery cable..
2. Remove the following parts:
Front scuff plate (LH).
Front side trim (LH).
Side wall.
Console.
3. Set the hood release lever out of the way..
4. Remove the ...
