Mazda 3 Owners Manual: Power/Volume/Sound Controls
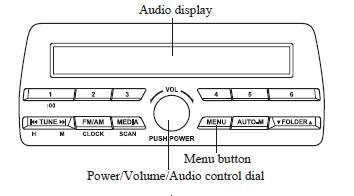
Power ON/OFF
Switch the ignition to ACC or ON. Press the power/volume dial to turn the audio system on. Press the power/volume dial again to turn the audio system off.
Volume adjustment
To adjust the volume, turn the power/ volume dial. Turn the power/volume dial clockwise to increase volume, counterclockwise to decrease it.
Audio sound adjustment
- Press the menu button (

) to select the function. The selected function will be indicated. - Turn the audio control dial to adjust the selected functions as follows:
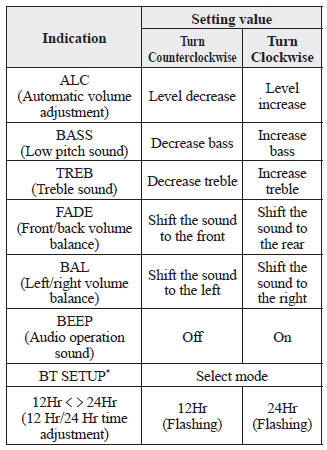
* Depending on the model, this function may not be available.
NOTE
If not operated for several seconds, the
display returns to the previous display. To
reset bass, treble, fade, and balance, press
the menu button ( ) for 2 seconds.
The unit will beep and “ CLEAR ” will be displayed.
ALC (Automatic volume adjustment) The automatic level control (ALC)
changes the audio volume automatically according to the vehicle speed. The faster the vehicle speed, the higher the volume increases. ALC has ALC OFF and ALC LEVEL 1 to 7 modes. At ALC LEVEL 7, the amount that the volume can increase is at the maximum. Select the mode according to the driving conditions.
BEEP (Audio operation sound)
The setting for the operation sound when pressing and holding a button can be changed. The initial setting is ON. Set to OFF to mute the operation sound.
BT SETUP mode *
Music and other audio such as voice data recorded on portable audio devices and mobile phones available on the market which are equipped with the Bluetooth ® transmission function can be listened to via wireless transmission over the vehicle's speakers. Using the BT SETUP mode, these devices can be programmed to the Bluetooth ® unit or changed .
12Hr  24Hr (12 Hr/24 Hr time
adjustment)
Rotating the audio control dial switches the display between 12 and 24-hour clock time .
 Audio Set (Type A)
Power/Volume/Sound Controls
Clock
Operating the Radio
Operating the Compact Disc (CD) Player
How to use Auxiliary jack/USB port
Error Indications
...
 Clock
Clock
Setting the time
The clock can be set at any time when the
ignition is switched to ACC or ON.
To adjust the time, press the clock
button ( ) for about 2 seconds
until
a beep is heard. ...
Other materials:
Oil Seal (Control Valve Body) Replacement [Fw6 A EL]
1. Remove the battery cover..
2. Disconnect the negative battery cable..
3. Remove the air cleaner component..
4. Disconnect the control valve body connector.
5. Remove the hose clamp.
6. Cut the oil seal using a utility knife as shown in the following illustration.
CAUTION: ...
Body Control Module (Bcm) Inspection
1. Remove the following parts:
a. Front scuff plate (LH).
b. Front side trim (LH).
c. Upper panel.
d. Shift knob (MTX).
e. Selector lever knob (ATX).
f. Shift panel.
g. Side wall.
h. Console.
2. Set the hood release lever out of the way..
3. Remove the lower panel. (driver-side). ...
Driving Tips
WARNING
Do not let the vehicle move in a
direction opposite to the direction
selected by the selector lever:
Do not let the vehicle move backward
with the selector lever in a forward
position, or do not let the vehicle
move forward with the selector lever
in the revers ...
