Mazda 3 Service Manual: Rear Speaker Inspection
4SD
1. Disconnect the negative battery cable..
2. Remove the following parts:
a. Rear seat cushion.
b. Rear scuff plate.
c. Tire house trim.
d. C-pillar trim.
e. Rear package trim.
f. Rear speaker.
3. Verify the resistance between the rear speaker terminals.
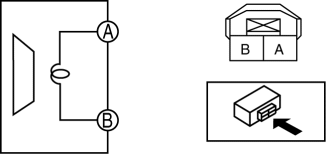
-
If not within the specification, replace the rear speaker.
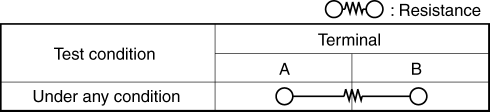
-
Resistance
-
3.24—3.96 ohms
5HB
1. Disconnect the negative battery cable..
2. Remove the following parts:
a. Rear scuff plate.
b. Tire house trim.
c. Trunk side upper trim.
d. Trunk side trim.
e. C-pillar trim.
f. Rear speaker.
3. Verify the resistance between the rear speaker terminals.
-
If not within the specification, replace the rear speaker.
-
Resistance
-
3.24—3.96 ohms
 Rear Door Speaker Removal/Installation
1. Disconnect the negative battery cable..
2. Remove the rear door trim..
3. Disconnect the connector.
Without Bose®
With Bose®
4. Remove the screw.
5. Remove the rear door speaker i ...
 Rear Speaker Removal/Installation
4SD
1. Disconnect the negative battery cable..
2. Remove the following parts:
a. Rear seat cushion.
b. Rear scuff plate.
c. Tire house trim.
d. C-pillar trim.
e. Rear package trim.
3. R ...
Other materials:
Seat Weight Sensor Control Module Removal/Installation [Two Step Deployment
Control System]
CAUTION:
When the seat weight sensor control module is replaced with a new one, perform
the seat weight sensor calibration using the M–MDS..
1. Switch the ignition to off.
2. Disconnect the negative battery cable and wait for 1 min or more..
3. Disconnect the connectors.
...
Parking Brake Cable Removal/Installation
1. Remove the following parts:
a. Upper panel.
b. Shift knob (MTX).
c. Selector lever knob (ATX).
d. Shift panel.
e. Side wall.
f. Console.
2. Remove the under cover..
3. Remove the tunnel member (rear). (MZR 2.0, MZR 2.5, MZR 2.3 DISI Turbo).
4. Remove the brace bar. (SKYACTIV-G ...
Joint Shaft Assembly [Mzr 2.0, Mzr 2.5 (MTX)]
1. Assemble in the order indicated in the table.
1
Bracket
2
Dust seal (RH)
.
3
Bearing
.
4
Dust seal (LH)
.
5
Joint shaft
.
Dust Seal ...
