Mazda 3 Service Manual: Relay Block Removal/Installation [With Advanced Keyless Entry And Push Button Start System]
1. Disconnect the negative battery cable..
2. Remove the following parts:
a. Driver-side front scuff plate.
b. Driver-side front side trim.
c. Hood release lever.
d. Upper panel.
e. Shift knob (MTX)(See MANUAL TRANSAXLE SHIFT MECHANISM REMOVAL/INSTALLATION [G66M-R].)(See MANUAL TRANSAXLE SHIFT MECHANISM REMOVAL/INSTALLATION [A26M-R].)
f. Selector lever knob (ATX)(See AUTOMATIC TRANSAXLE SHIFT MECHANISM REMOVAL/INSTALLATION.)
g. Shift panel.
h. Side wall.
i. Console.
j. Lower panel.
k. Knee bolster.
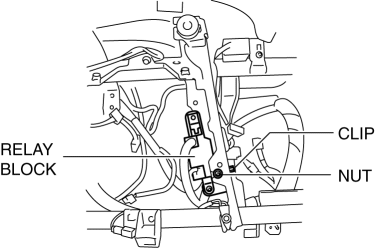
3. Remove the nut and clip.

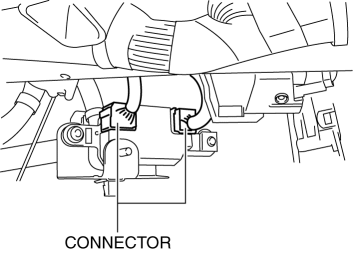
4. Disconnect the connectors.

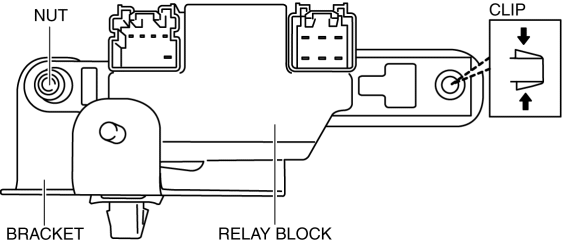
5. Remove the nut and clip.

6. Remove the relay block from the bracket.
7. Install in the reverse order of removal.
 Relay Block Inspection [With Advanced Keyless Entry And Push Button Start System]
1. Disconnect the negative battery cable..
2. Remove the following parts:
a. Driver-side front scuff plate.
b. Driver-side front side trim.
c. Hood release lever.
d. Upper panel.
e. Shift ...
 Relay Inspection [Mzr 2.0, Mzr 2.5, Mzr 2.3 Disi Turbo]
Relay Type
Connector type
Part name
Type A
Front fog light relay
Headlight relay (HI)
Headlight rel ...
Other materials:
Sae Standards
In accordance with new regulations, SAE (Society of Automotive Engineers)
standard names and abbreviations are now used in this manual. The table below
lists the names and abbreviations that have been used in Mazda manuals up to
now and their SAE equivalents.
...
Climate Control Unit Inspection [Manual Air Conditioner]
1. Remove the climate control unit with the connector connected..
2. Switch the ignition to ON.
3. Connect the negative (-) lead of the tester to the body ground.
4. By inserting the positive (+) lead of the tester into the climate control
unit connector, measure the voltage according to the ...
Front Bumper Removal/Installation
1. Disconnect the negative battery cable..
2. Remove the screw A and fasteners B.
3. Remove the screws C.
4. Remove the bolts D.
5. Remove the fasteners E, screw F and fastener G.
6. Pull the front bumper in the direction of the arrow in the order of (1), (2)
and (3), the ...
