Mazda 3 Service Manual: Relay Block Removal/Installation [With Advanced Keyless Entry And Push Button Start System]
1. Disconnect the negative battery cable..
2. Remove the following parts:
a. Driver-side front scuff plate.
b. Driver-side front side trim.
c. Hood release lever.
d. Upper panel.
e. Shift knob (MTX)(See MANUAL TRANSAXLE SHIFT MECHANISM REMOVAL/INSTALLATION [G66M-R].)(See MANUAL TRANSAXLE SHIFT MECHANISM REMOVAL/INSTALLATION [A26M-R].)
f. Selector lever knob (ATX)(See AUTOMATIC TRANSAXLE SHIFT MECHANISM REMOVAL/INSTALLATION.)
g. Shift panel.
h. Side wall.
i. Console.
j. Lower panel.
k. Knee bolster.
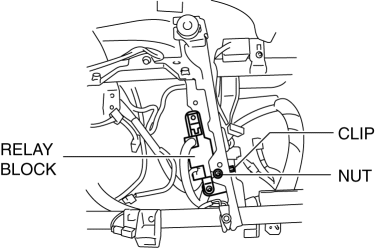
3. Remove the nut and clip.
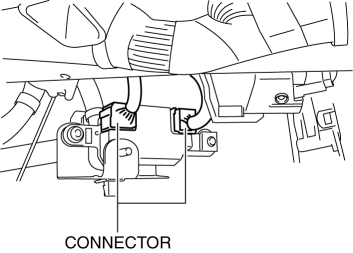
4. Disconnect the connectors.
5. Remove the nut and clip.
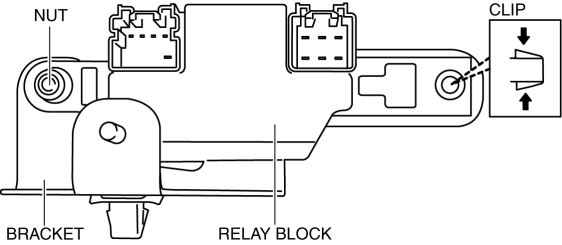
6. Remove the relay block from the bracket.
7. Install in the reverse order of removal.
 Relay Block Inspection [With Advanced Keyless Entry And Push Button Start System]
1. Disconnect the negative battery cable..
2. Remove the following parts:
a. Driver-side front scuff plate.
b. Driver-side front side trim.
c. Hood release lever.
d. Upper panel.
e. Shift ...
 Steering Wheel And Column Removal/Installation [With Advanced Keyless Entry
And Push Button Start System]
Steering Wheel And Column Removal/Installation [With Advanced Keyless Entry
And Push Button Start System]
WARNING:
Handling the air bag module improperly can accidentally operate (deploy)
the air bag module, which may seriously injure you. Read the service warnings
before handling the air ba ...
Other materials:
Gear Shift Indicator
The gear shift indicator supports you to
obtain optimum fuel economy and smooth
driving. It displays the selected gear
position in the instrument cluster as well
as notifies the driver to change to the most
suitable gear position corresponding to the
actual driving condition.
CAUTI ...
Parking/Front Side Marker/Front Turn Light Bulb Removal/Installation
1. Disconnect the negative battery cable..
2. Slightly bend back the front mudguard..
3. Rotate the parking/front side marker/front turn light socket in the direction
of the arrow shown in the figure.
4. Remove the parking/front side marker/front turn light bulb.
5. Install in the ...
Abbreviations
ABS
Antilock Brake System
ABDC
After Bottom Dead Center
ACC
Accessories
ALC
Auto Level Control
ALR
Automatic Locking Retractor
AT
Automa ...
