Mazda 3 Service Manual: Seat Weight Sensor Calibration [Two Step Deployment Control System]
CAUTION:
-
If any of the following work is performed, perform the seat weight sensor calibration using the M-MDS.
-
Replacement with a new seat weight sensor
-
Replacement with a new seat weight sensor control module
-
Replacement with new passenger-side seat parts
-
Disassembly of the passenger-side seat
-
If any of the following work is performed, perform the seat weight sensor inspection using the M-MDS..
-
Removal of the passenger-side seat
-
Loosening and retightening of passenger’s seat fixing bolts
-
Or, the vehicle is involved in a collision
NOTE:
-
When seat weight sensor calibration is performed causing the SAS control module to detect the DTC, perform the following procedure.
1. Have two 20 kg {44 lb}
weights ready to use.
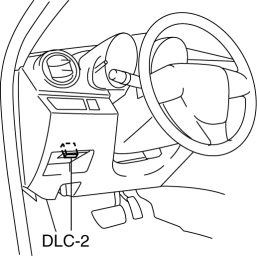
2. Connect the M-MDS (IDS) to the DLC-2.
3. After the vehicle is identified, select the following items from the initialization screen of the IDS.
a. Select “Body”.
b. Select “Restraints”.
c. Select “Passenger Seat Weight Sensor ReZero”.
4. Then, select item from the SWS Calibration screen menu in the following order.
-
Select “(1)-When you have replaced any SWS or SWS module, and/or any seat part except SWS.”
5. Perform calibration following the procedures on the M-MDS screen.
 Seat Track Position Sensor Removal/Installation [Two Step Deployment Control
System]
Seat Track Position Sensor Removal/Installation [Two Step Deployment Control
System]
1. Switch the ignition to off.
2. Disconnect the negative battery cable and wait for 1min or more..
3. Remove the front driver’s seat..
4. Remove the front seat slide adjuster..
5. Remove t ...
 Seat Weight Sensor Control Module Removal/Installation [Two Step Deployment
Control System]
Seat Weight Sensor Control Module Removal/Installation [Two Step Deployment
Control System]
CAUTION:
When the seat weight sensor control module is replaced with a new one, perform
the seat weight sensor calibration using the M–MDS..
1. Switch the ignition to off.
2. Disc ...
Other materials:
Oil Pressure Switch Inspection [FS5 A EL]
CAUTION:
Water or foreign objects entering the connector can cause a poor connection
or corrosion. Be sure not to drop water or foreign objects on the connector
when disconnecting it.
On-Vehicle Inspection
1. Perform the following procedures.
a. Remove the aerodynamic under co ...
Rear Wiper And Washer Switch Inspection
1. Disconnect the negative battery cable..
2. Remove the following parts:
a. Front scuff plate (Driver‘s side).
b. Front side trim (Driver‘s side).
c. Hood release lever.
d. Lower panel.
e. Column cover.
f. Wiper and washer switch.
3. Verify that the continuity between the rear w ...
Seat belts
Before driving your Subaru Solterra, always confirm that every occupant
is properly secured with a seat belt. Correct usage of seat belts is one of the
most critical safety measures in preventing serious injuries.
WARNING
Carefully follow the precautions below to minimize the risk of injury du ...
