Mazda 3 Service Manual: Sunroof Unit Disassembly/Assembly
NOTE:
-
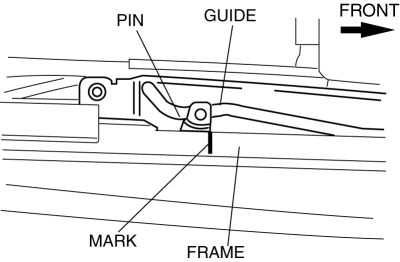
If the guide or sunroof motor is removed, the glass panel will not be positioned properly after the re-installation. To ensure proper positioning of the glass panel, place alignment marks on the guide pin and frame before removing the guide or sunroof motor.
1. Disassemble in the order indicated in the table.
2. Assemble in the reverse order of disassembly.
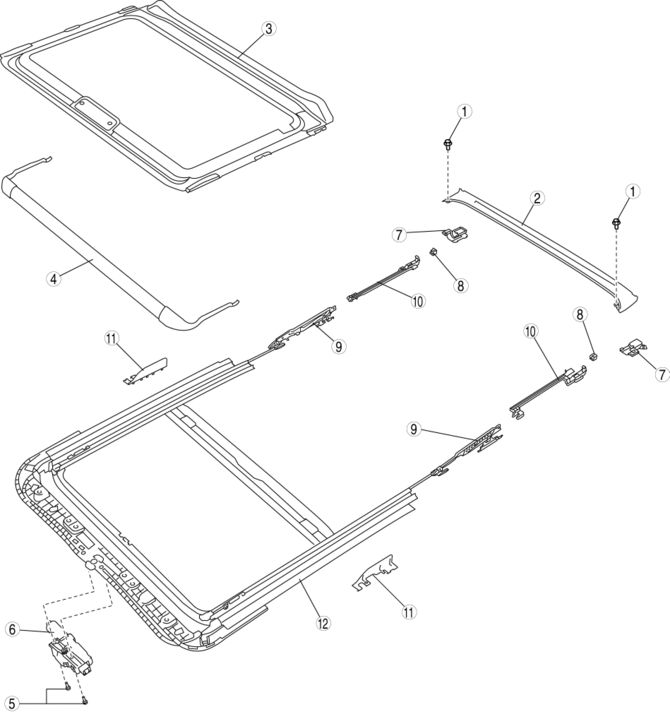
|
1 |
Screw A |
|
2 |
Drip rail |
|
3 |
Sunshade |
|
4 |
Deflector |
|
5 |
Screw C |
|
6 |
Sunroof motor (See Sunroof Motor Assembly Note.) |
|
7 |
Rear drip (See Rear Drip Assembly Note.) |
|
8 |
Guide stopper |
|
9 |
Guide (See Guide Disassembly Note.) (See Guide Assembly Note.) |
|
10 |
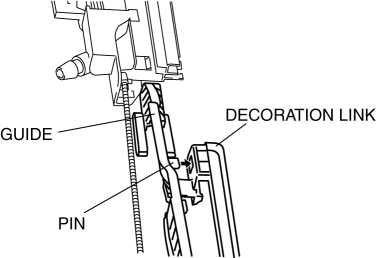
Decoration link (See Decoration Link Assembly Note.) |
|
11 |
Bracket |
|
12 |
Frame |
Sunroof Motor Assembly Note
NOTE:
-
If the guide or sunroof motor is removed, the sunroof motor initial position setting has to be performed. After installing the sunroof unit, perform the initial position setting using the following procedure.
1. The initialization mode starts after approx. 13 s
from when the tilt up switch has been pressed and held. The glass stops after it has moved approx. 30 mm {1.2 in}
towards the closed position.
NOTE:
-
Only the tilt up switch is available during the initialization mode.
-
The initialization may finish at the first inching operation depending on the glass position when the motor is installed.
-
If the glass position is between the closed and semi-tilt positions when the motor is removed, the glass moves in the tilt up direction (to the full tilt position stored in the motor). However, if the tilt up switch is pressed and held, the initialization mode starts.
2. When the tilt up switch is pressed again, the glass continues to move approx. 30 mm {1.2 in}
and stops.
3. Repeat this procedure several times so that the glass moves to the fully closed, full tilt (normal operation position), and full tilt (mechanical stopper position) positions.
4. After the glass is moved to the full tilt position (mechanical stopper position), it returns to the tilt down direction slightly and the initialization is completed.
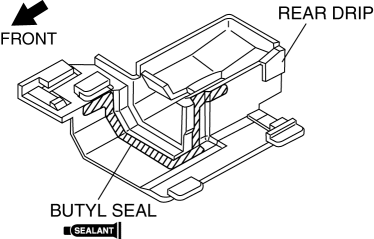
Rear Drip Assembly Note
NOTE:
-
If the rear drip is removed, butyl seal must be applied when re-installing.
1. Apply a 6.0—8.0 mm {0.24—0.31 in}
wide line of butyl seal to the area shown in the figure.
Guide Disassembly Note
1. Place an alignment mark on the guide pin and flame.
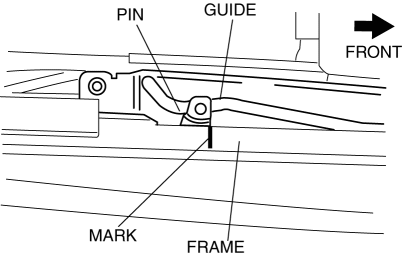
2. Slide the guide to the rear of the sunroof frame, and remove the guide and decoration link as a single unit.
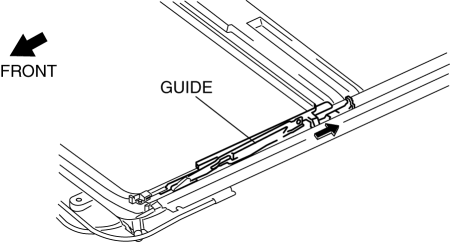
Guide Assembly Note
1. Move the pin to the position shown in the figure.
Decoration Link Assembly Note
1. Set the guide pin to the decoration link.
 Sunroof Motor Removal/Installation
1. Disconnect the negative battery cable..
2. Remove the rain sensor cover. (Vehicles with auto light/wiper system).
3. Disconnect the rain sensor connector. (Vehicles with auto light/wiper system ...
 Sunroof Unit Removal/Installation
CAUTION:
If the sunshade is forced close while the sunroof is open, the sunshade could
be damaged.
1. Disconnect the negative battery cable..
2. Remove the rain sensor cover. (Vehi ...
Other materials:
Transaxle Fluid Temperature (Tft) Sensor Inspection [FS5 A EL]
CAUTION:
Water or foreign objects entering the connector can cause a poor connection
or corrosion. Be sure not to drop water or foreign objects on the connector
when disconnecting it.
On-Vehicle Inspection
1. Perform the following procedures.
a. Remove the battery cover..
b. ...
Airflow Mode Actuator Removal/Installation [Full Auto Air Conditioner]
1. Set the air intake mode to FRESH.
2. Set the air mix mode to MAX COLD.
3. Disconnect the negative battery cable..
4. Remove the following parts:
a. Front doors.
b. Front scuff plate.
c. Front side trim.
d. Dashboard under cover.
e. Glove compartment.
f. Upper panel.
g. Shift l ...
Intermediate Sensor Removal/Installation [FS5 A EL]
CAUTION:
If foreign materials are stuck to the sensor, disturbance by magnetic flux
can cause sensor output to be abnormal and thereby negatively affect control.
Make sure that foreign materials such as iron filings are not stuck to the sensor
during installation.
1. Perform t ...
