Mazda 3 Service Manual: Supplier Identification Procedure [Audio]
Identification Using the Label or Inscribed Lettering
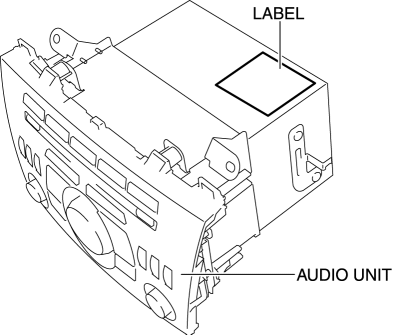
1. Disconnect the negative battery cable..
2. Remove the center panel..
3. Remove the audio unit..
4. Verify the supplier by referring to the label attached to each unit.
Verify Using the Diagnostic Assist Function
Without display
1. Switch the ignition to ACC or ON.
2. Turn the audio unit power to ON.
3. While pressing the POWER/VOLUME switch, simultaneously press the PRESET switch 5 for 3 s or more
.
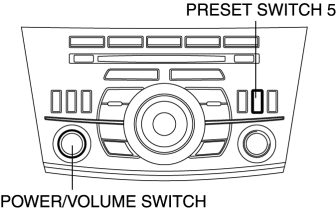
4. Identify the supplier code by referring to the information display.

|
Supplier code |
Supplier name |
|
01 |
SANYO Automedia |
|
02 |
Panasonic |
|
03 |
Clarion |
|
04 |
Pioneer |
|
05 |
VISTEON |
NOTE:
-
The supplier code can also be identified from the DTC displays screen.

5. Cancel the diagnostic assist function by either turning off the audio unit power or by switch the ignition to off.
With display
1. Switch the ignition to ACC or ON.
2. Verify that the audio is turned on. If the audio is turned off, press the POWER/VOLUME switch to turn it on.
3. Press the POWER/VOLUME switch and SEEK switch (up) simultaneously to launch the diagnostic assist function.
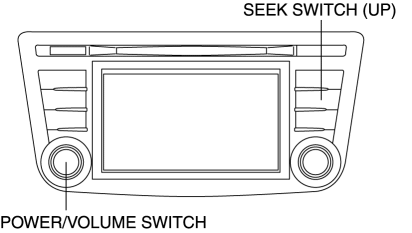
4. Verify that the launched diagnostic assist function is displayed on the screen.
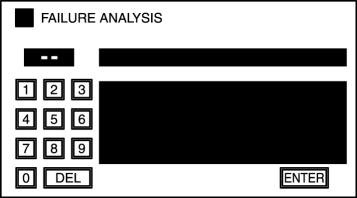
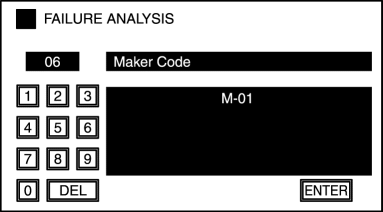
5. Input diagnostic assist code "06".
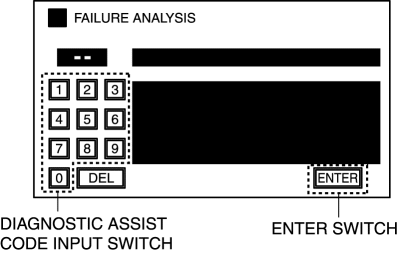
6. Select "ENTER switch".
7. Identify the supplier code by referring to the display.
|
Supplier code |
Supplier name |
|
M-01 |
SANYO Automedia |
|
M-02 |
Panasonic |
|
M-03 |
Clarion |
|
M-04 |
Pioneer |
|
M-05 |
VISTEON |
8. Press the POWER/VOLUME switch and return to the diagnostic assist screen.
9. Press the POWER/VOLUME switch and end the diagnostic assist function.
 Sirius Satellite Radio Unit Removal/Installation
1. Disconnect the negative battery cable..
2. Remove the following parts:
a. Passenger-side front scuff plate.
b. Passenger-side front side trim.
c. Dashboard under cover.
d. Grove compartme ...
 Tweeter Inspection
1. Disconnect the negative battery cable..
2. Remove the inner garnish..
3. Remove the tweeter..
4. Verify the resistance between tweeter terminals.
If not within the specification, ...
Other materials:
Back Up Light Switch Inspection
1. Disconnect the negative battery cable..
2. Remove the battery component. (ex: battery, battery tray and PCM component)
(G35-MR,G66M-R).
3. Remove the aerodynamic under cover No.2. (G35-MR,G66M-R,C66M-R).
4. Disconnect the back-up light switch connector..
5. Verify that the continuity be ...
Precaution [ABS]
1. Any one or a combination of the ABS warning and brake system warning lights
illuminates even when the system is normal.
Warning lights that may illuminate and/or flash
Cases in which the light may illuminate
Conditions in which the light will go ou ...
Manual Transaxle Removal/Installation [A26 M R]
CAUTION:
Secure the steering wheel using tape or a cable to prevent the steering shaft
from rotating after disconnecting the steering shaft. If the steering wheel
rotates after the steering shaft and the steering gear and linkage are disconnected,
the internal parts of the clock spr ...
