Mazda 3 Service Manual: Vacuum Pump Removal/Installation [Skyactiv G 2.0]
1. Remove the plug hole plate..
2. Remove the battery and battery tray..
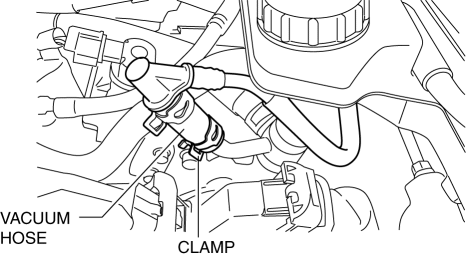
3. Pinch open the clamp using pliers and disconnect the vacuum hose from the vacuum pump.
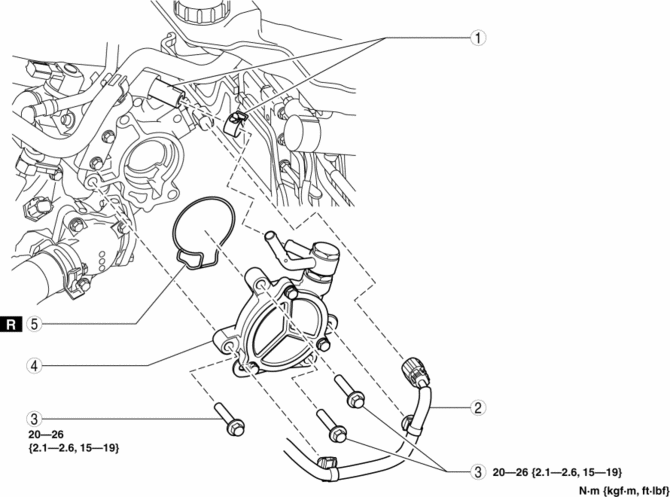
4. Remove in the order shown in the table.
5. Install in the reverse order of removal.
|
1 |
Vacuum hose, clamp |
|
2 |
Exhaust CMP sensor connector, wiring harness |
|
3 |
Bolt |
|
4 |
Vacuum pump (See Vacuum Pump Removal Note.) (See Vacuum Pump and O-ring Installation Note.) |
|
5 |
O-ring (See Vacuum Pump and O-ring Installation Note.) |
Vacuum Pump Removal Note
1. When removing the vacuum pump, place a rag under the installation surface of the vacuum pump so that engine oil does not get on other parts.
2. Remove the vacuum pump.
Vacuum Pump and O-ring Installation Note
1. Rotate the vacuum pump by hand to drain the remainder of the engine oil in the vacuum pump.
2. Degrease the O-ring installation groove and installation surface.
3. Install the new O-ring to the vacuum pump.
4. Install the vacuum pump.
 Vacuum Pump Inspection [Skyactiv G 2.0]
1. Pinch open the clamp using pliers and disconnect the vacuum hose from the
vacuum pump.
2. Install the vacuum gauge as shown in the figure, then check the vacuum.
3. Warn up the engin ...

Other materials:
Cowl Panel Removal/Installation
1. Disconnect th negative battery cable..
2. Remove the windshield wiper arm and blade..
3. Remove the front fender molding..
4. Remove the cowl grille..
5. Remove the washer hose grommet from the cowl panel and disconnect the front
washer hose.
6. Remove the windshield wiper motor..
7 ...
On Board Diagnostic System PID/Data Monitor Inspection [FS5 A EL]
NOTE:
The PID data screen function is used for monitoring the calculated value
of input/output signals in the module. Therefore, if the monitored value of
the output parts is not within the specification, it is necessary to inspect
the monitored value of input parts corresponding to ...
Oil Seal (Control Valve Body) Replacement [Fw6 A EL]
1. Remove the battery cover..
2. Disconnect the negative battery cable..
3. Remove the air cleaner component..
4. Disconnect the control valve body connector.
5. Remove the hose clamp.
6. Cut the oil seal using a utility knife as shown in the following illustration.
CAUTION: ...
