
Mazda 3 Service Manual: Brake Hose (Front) Removal/Installation [Mzr 2.3 Disi Turbo]
1. Remove in the order indicated in the table.
2. Install in the reverse order of removal.
3. Add brake fluid, bleed the brakes, and inspect for leakage after the installation has been completed..
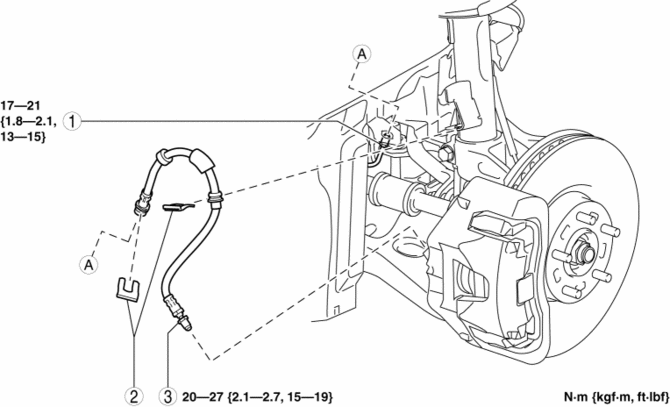
|
1 |
Brake pipe |
|
2 |
Clip |
|
3 |
Brake hose (See Brake Hose Installation Note.) |
Brake Hose Installation Note
1. Install the brake hose to the caliper.
2. Tighten the flare nut while holding the brake hose at point A with a spanner or equivalent.
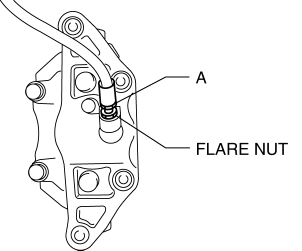
3. Verify that the brake hose is not twisted.
 Brake Hose (Front) Removal/Installation [Mzr 2.0, Skyactiv G 2.0, Mzr 2.5]
1. Remove in the order indicated in the table.
2. Install in the reverse order of removal.
3. Add brake fluid, bleed the brakes, and inspect for leakage after the installation
has been completed ...
 Brake Hose (Rear) Removal/Installation [Mzr 2.0, Skyactiv G 2.0]
CAUTION:
If the brake hose is installed to the caliper on the vehicle, the tool cannot
be installed correctly resulting in brake fluid leakage due to improper installation.
Therefore, re ...
Other materials:
Driving the vehicle
To ensure safe, smooth, and efficient operation of the Subaru Solterra,
it is essential to follow the recommended driving procedures and precautions outlined
below.
Driving procedure
■ Before starting the EV system
Before activating the Subaru Solterra EV system, always confirm that the cha ...
Flashing the Headlights
To flash the headlights, pull the lever fully
towards you (the headlight switch does not
need to be on).
The headlight high-beam indicator light
in the instrument cluster illuminates
simultaneously. The lever will return to the
normal position when released.
...
Rear ABS Wheel Speed Sensor Inspection
Installation Visual Inspection
1. Inspect for the following:
If there is any malfunction, replace the part.
a. Excessive looseness or play of the rear ABS wheel-speed sensor
b. Deformation of the rear ABS wheel-speed sensor
c. Deformation or damage of the rear ABS sensor rotor
C ...
