Mazda 3 Service Manual: Passenger Compartment Temperature Sensor Removal/Installation [Full Auto Air Conditioner]
1. Disconnect the negative battery cable..
2. Remove the following parts:
a. Front scuff plate.
b. Front side trim.
c. Dashboard under cover.
d. Upper panel.
e. Shift lever knob (MTX).
f. Selector lever knob (ATX).
g. Shift panel.
h. Side wall.
i. Console.
j. Hood release lever.
k. Lower panel (driver-side).
3. Disconnect the passenger compartment temperature sensor connector.
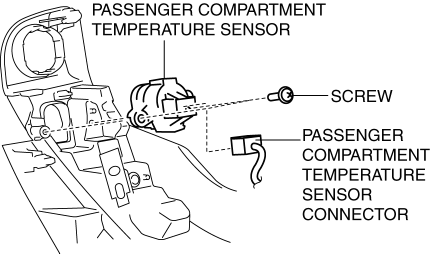
4. Remove the screw.
5. Remove the passenger compartment temperature sensor.
6. Install in the reverse order of removal.
 Passenger Compartment Temperature Sensor Inspection [Full Auto Air Conditioner]
1. Measure the temperature around the passenger compartment temperature sensor
and measure the resistance between passenger compartment temperature sensor terminals
B and D.
If the cha ...
 Power Metal Oxide Semiconductor Field Effect Transistor (Power Mos Fet) Inspection
[Full Auto Air Conditioner]
Power Metal Oxide Semiconductor Field Effect Transistor (Power Mos Fet) Inspection
[Full Auto Air Conditioner]
1. Verify that the continuity between the power MOS FET terminals is as indicated
in the table.
If there is any malfunction, replace the power MOS FET.
If the blower motor operat ...
Other materials:
Electric Power Steering Oil Pump Component Disassembly/Assembly
CAUTION:
The internal parts of the EHPAS control module and motor could be damaged
if they receive an impact. Be careful when handling the EHPAS control module
and motor to prevent the component from getting hit. Replace the electric power
steering oil pump component if it has recei ...
Washer Tank Removal/Installation
Vehicles with the washer fluid-level sensor
1. Disconnect the negative battery cable..
2. Remove the front bumper..
3. Remove in the order indicated in the table.
1
Washer motor connector
2
Windshield washer hose
3
...
Sunvisor Removal/Installation
1. Disconnect the negative battery cable..
2. Remove the screw.
3. Rotate the sunvisor in the direction of the arrow.
4. Unhook and remove the sunvisor.
5. Disconnect the vanity mirror illumination connector. (Vehicles with vanity
mirror illumination)
6. Press the center adaptor tabs ...
