
Mazda 3 Owners Manual: Specifications
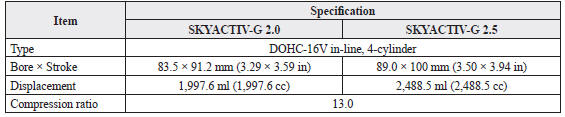
Engine
Electrical System

*1 Q-85 is designed for i-ELOOP system. Only Q-85 should be used to ensure correct operation of i-ELOOP system. Consult an Authorized Mazda Dealer for details.
*2 Not for i-ELOOP system.
*3 This spark plug provides the SKYACTIV-G engine with optimum performance. Contact an Authorized Mazda Dealer for details.
| CAUTION When cleaning the iridium plugs, do not use a wire brush. The fi ne particulate coating on the iridium alloy and platinum tips could be damaged. |
Lubricant Quality
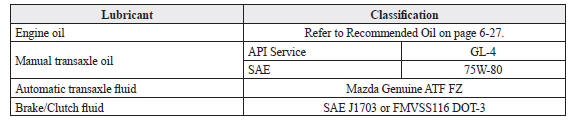
NOTE Refer to Introduction on for owner's responsibility in protecting your investment.
Capacities
(Approximate Quantities)
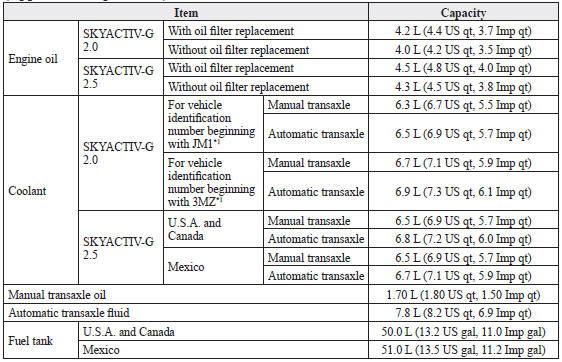
Check oil and fluid levels with dipsticks or reservoir gauges.
*1 Check the vehicle identification number on the vehicle identification number plate. Refer to Vehicle Identification Number on .
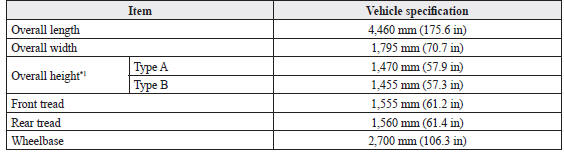
Dimensions
4-Door
(U.S.A. and Canada)
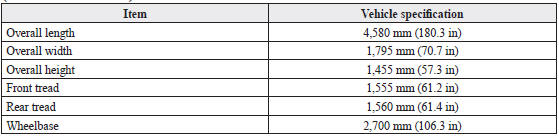
(Mexico)
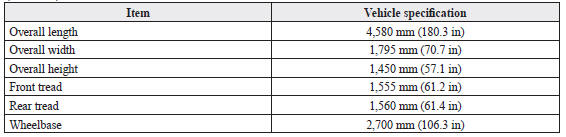
5-Door
(U.S.A. and Canada)
(Mexico)
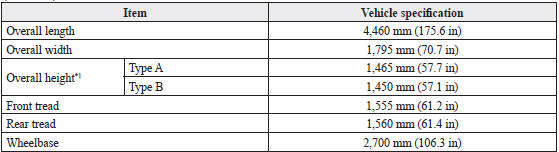
*1 The overall height is categorized according to the antenna type as follows:
Type A
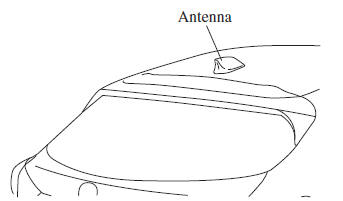
Type B
Except above.
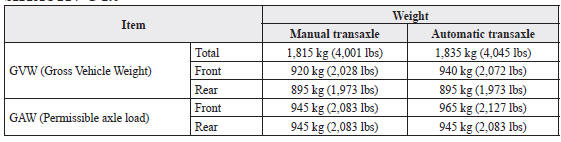
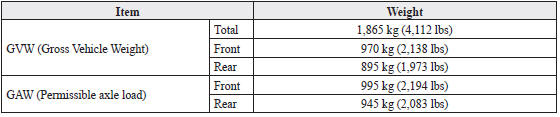
Weights
U.S.A. and Canada
SKYACTIV-G 2.0

SKYACTIV-G 2.5

Mexico
SKYACTIV-G 2.0
SKYACTIV-G 2.5
Air Conditioner
The type of refrigerant used is indicated on a label attached to the inside of the engine compartment. Check the label before recharging the refrigerant. Refer to Climate Control System on .

Light Bulbs
Exterior light
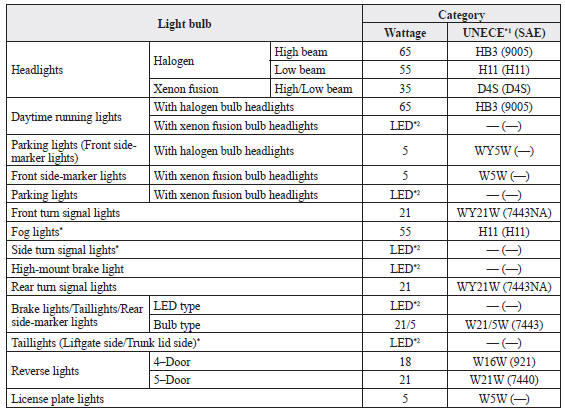
*1 UNECE stands for United Nations Economic Commission for Europe.
*2 LED is the abbreviation for Light Emitting Diode.
Interior light
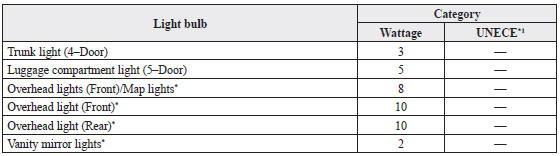
*1 UNECE stands for United Nations Economic Commission for Europe.
Tires
NOTE The tires have been optimally matched with the chassis of your vehicle.
When replacing tires, Mazda recommends that you replace tires of the same type originally fitted to your vehicle. For details, contact an Authorized Mazda Dealer.
Check the tire pressure label for tire size and inflation pressure.
Refer to Tire Inflation Pressure on .
After adjusting the tire pressure, initialization of the tire pressure monitoring system is necessary to make the system operates normally.
Refer to Tire Pressure Monitoring System Initialization on .
Standard tire
(U.S.A. and Canada)

(Mexico)
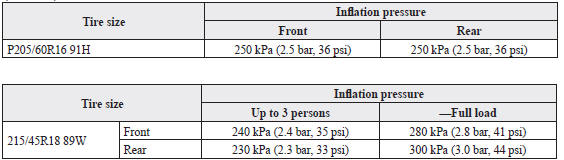
1 person's weight: About 75 kg
Temporary spare tire

Lug nut tightening torque
When installing a tire, tighten the lug nut to the following torque.
108—147 N•m (12—14 kgf•m, 80—108 ft•lbf)
Fuses
Refer to Fuses on
 Identification Numbers
Vehicle Identification Number
The vehicle identification number legally
identifies your vehicle. The number is on a
plate attached to the cowl panel located on
the left corner of the dashboard. Th ...
 Personalization Features
The following personalization features can be set or changed by an Authorized
Mazda
Dealer. Consult an Authorized Mazda Dealer for details.
Additionally, some of the personalization features can ...
Other materials:
Back Up Light Switch Removal/Installation [A26 M R]
1. Disconnect the negative battery cable.
2. Disconnect the back-up light switch connector.
3. Remove the aerodynamic under cover No.2..
4. Remove the back-up light switch with the gasket.
5. Install a new gasket and the back-up light switch to the transaxle case.
Tightening torque ...
Air Bag Module And Pre Tensioner Seat Belt Deployment Procedures [Two Step Deployment
Control System]
WARNING:
A live (undeployed) air bag module or pre-tensioner seat belt may accidentally
operate (deploy) when it is disposed of and cause serious injury. Do not dispose
of a live (undeployed) air bag module and pre-tensioner seat belt. If the SSTs
(Deployment tool and Adapter harn ...
How to use AUX mode (Type B)
Select the icon on the home screen to display the Entertainment screen.
Select to switch to the AUX mode. The following icons are
displayed in the lower
part of the center display.
Icon
Function
Displays the Entertainment menu. Use to switch to a diffe ...
