Mazda 3 Owners Manual: Split/One-piece Folding the Seatback
By lowering the rear seatback(s) the luggage compartment space can be expanded.
| WARNING
Do not drive the vehicle with occupants
on folded down seatback(s) or in the
luggage compartment. Putting occupants in the luggage compartment is dangerous because seat belts cannot be fastened which could lead to serious injury or death during sudden braking or a collision. Do not allow children to play inside the vehicle with the seatback(s) lowered. Allowing children to play in the vehicle with the seatback(s) folded down is dangerous. If a child enters the luggage compartment and the seatback(s) were raised back up, the child may become trapped in the luggage compartment which could lead to an accident. Tightly secure cargo in the luggage compartment when it is transported with the seatback(s) folded down. Driving without tightly securing cargo and luggage is dangerous as it could move and become an obstruction to driving during emergency braking or a collision resulting in an unexpected accident. When transporting cargo, do not allow the cargo to exceed the height of the seatback(s). Transporting cargo stacked higher than the seatback(s) is dangerous as visibility to the rear and sides of the vehicle is reduced which could interfere with driving operations and lead to an accident. |
Lowering the seatback(s)
| CAUTION
Check the position of a front seat
before folding a rear seatback. Depending on the position of a front seat, it may not be possible to fold a rear seatback all the way down because it may hit the seatback of the front seat which could scratch or damage the front seat or its pocket. Lower or remove the head restraint on the rear outboard seat if necessary. |
(4–Door)
1. (Split-folding type seat) Open the trunk lid and pull the lever of the seatback you want to fold down.
(One-piece folding type seat) Open the trunk lid and pull the lever of the seatback.

2. Open a rear door and fold the rear seat forward.
(5–Door)
Press the push knob to fold down the seatback.
To return the seatback to its upright position:
| WARNING
When returning a seatback to its
upright position, make sure the 3-point
seat belt is not caught in the seatback
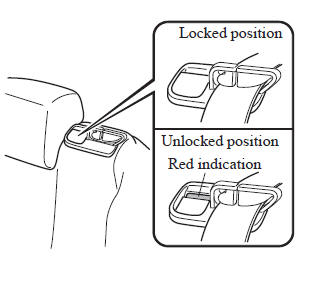
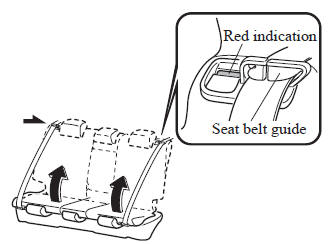
and the 3-point seat belt is not twisted. If the seat belt is used while it is twisted and caught in the seatback, the seat belt cannot function at its full capacity, which could cause serious injury or death. When returning a seatback to its upright position, make sure that it is fi rmly locked and the red indication is not visible (5–Door). If the red indication is visible behind the push knob, it means the seatback is not locked. If the vehicle is driven without the seatback locked, it could fold down suddenly and cause an accident. |
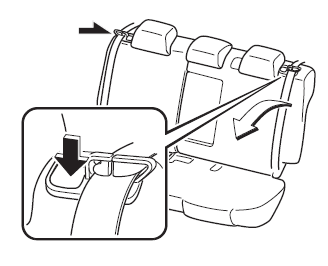
1. Make sure that the seat belt passes through the seat belt guide correctly and it is not twisted, then raise the seatback while preventing the seat belt from being caught in the seatback.
(4–Door)

(5–Door)
2. Press the seatback rearward and lock it in place. After returning the seatback to its upright position, make sure it is securely locked.
 Rear Seat
...
 Armrest
The rear armrest in the center of the rear
seatback can be used (no occupant in the
center seat) or placed upright.
WARNING
Never put your hands and fi ngers
around the moving part ...
Other materials:
Engine Coolant Temperature (ECT) Sensor Removal/Installation [Mzr 2.0, Mzr 2.5]
WARNING:
When the engine is hot, it can badly burn. Turn off the engine and wait until
it is cool before removing the ECT sensor.
ECT Sensor No.1
1. Remove the battery cover..
2. Disconnect the negative battery cable..
3. Drain the engine coolant..
4. Remove the battery and b ...
Battery Replacement
If the buttons on the transmitter are
inoperable and the operation indicator
light does not flash, the battery may be
dead.
Replace with a new battery before the
transmitter becomes unusable.
CAUTION
Make sure the battery is installed
correctly. Battery leakage could occur if ...
Fuel Pump Unit Disassembly/Assembly [Mzr 2.0, Mzr 2.5]
WARNING:
Fuel is very flammable liquid. If fuel spills or leaks from the pressurized
fuel system, it will cause serious injury or death and facility breakage. Fuel
can also irritate skin and eyes. To prevent this, always complete the “Fuel
Line Safety Procedure”, while referring ...
