Mazda 3 Service Manual: Trunk Lid Opener Switch Inspection
1. Disconnect the negative battery cable..
2. Remove the trunk lid trim..
3. Remove the high-mount brake light..
4. Remove the trunk lid opener switch..
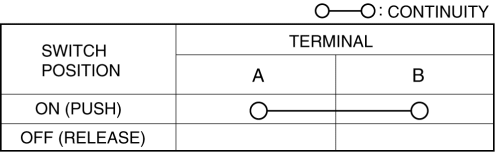
5. Verify the continuity of trunk lid opener switch terminals A and B.
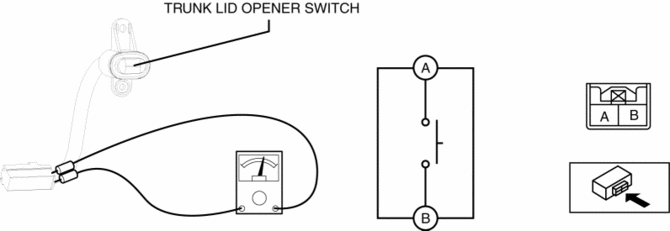
6. Verify that the continuity is as indicated in the table.
-
If the operation cannot be verified, replace the trunk lid opener switch.
 Trunk Side Upper Trim Removal/Installation
1. Remove the rear seat cushion..
2. Remove the rear scuff plate..
3. Remove the tire house trim..
4. Open the cap.
5. Remove the screw.
6. Remove the fasteners.
7. Pull the trunk side upp ...
 Trunk Lid Opener Switch Removal/Installation
1. Disconnect the negative battery cable..
2. Remove the trunk lid trim..
3. Remove the high-mount brake light..
4. Remove the screw.
5. Install in the reverse order of removal. ...
Other materials:
Antenna Feeder No.6 Inspection
1. Disconnect the negative battery cable..
2. Remove the following parts:
a. Upper panel.
b. Shift knob (MTX).
c. Selector lever knob (ATX).
d. Shift panel.
e. Side wall.
f. Console.
g. Car-navigation unit.
3. Verify that the continuity between antenna feeder No.6 terminals is as i ...
Car Navigation Unit
Purpose
Reads the SD card data inserted into the car-navigation unit and sends the
read data to the audio unit.
Function
The car-navigation unit has the following functions:
TomTom Home
By connecting the SD card to your computer at home, the map data or software ...
Shift Lock System Inspection
Shift-Lock System Inspection
1. Switch the ignition to ON.
2. Shift the selector lever to the P position.
3. Perform the following procedures to inspect the shift-lock system.
If there is any malfunction, inspect the shift-lock solenoid and P position
switch..
a. Verify that th ...
