Subaru Solterra 2023-2026 Owner's Manual: Before driving
Before operating your Subaru Solterra, carefully follow the recommendations below to ensure maximum safety, proper vehicle control, and a confident driving experience in all conditions.
Installing floor mats
Always use floor mats that are specifically engineered for the Subaru Solterra, matching both the model and production year. Properly fitted mats are essential for maintaining safe pedal operation and preventing unwanted movement during driving. Secure installation ensures that your Subaru Solterra remains safe and responsive at all times.
1. Insert the retaining hooks (clips) into the designated eyelets on the floor mat.
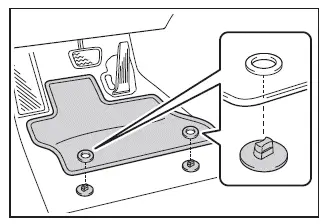
2. Rotate the upper knob of each retaining hook (clip) to firmly lock the floor mats in place and prevent shifting.
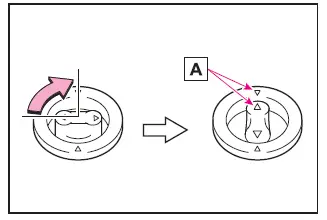
Always ensure proper alignment of the
 marks A to guarantee correct positioning of the floor mats in your Subaru Solterra.
Please note that depending on the configuration of your Subaru Solterra, the design and shape of the retaining hooks (clips) may vary slightly from those illustrated.
WARNING
Strictly observe the following precautions when using floor mats in your Subaru Solterra.
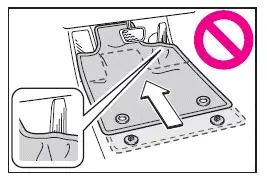
Failure to properly secure the driver’s floor mat may result in it sliding forward and interfering with pedal operation. This can cause unintended acceleration or hinder braking performance, significantly increasing the risk of a serious accident.
Such situations can lead to loss of control and may result in severe injury or fatal consequences.
■ When installing the driver's floor mat
- Never install floor mats designed for other Subaru models or different model years, even if they are genuine Subaru products.
- Use only floor mats specifically intended for the driver's position in the Subaru Solterra.
- Always secure the mat using all provided retaining hooks (clips) to prevent movement.
- Do not stack multiple floor mats on top of each other.
- Never install a floor mat upside-down or reversed.
■ Before driving
- Verify that the floor mat is correctly positioned and securely fastened using all retaining clips, especially after cleaning or repositioning it.
- With the EV system turned off and the shift position set to P, fully press each pedal to confirm there is no interference from the floor mat.
 For safe use
...
 For safe driving
For optimal safety in your Subaru Solterra, always adjust your seating
position, mirrors, and driving posture correctly before starting your journey.
Correct driving posture
Adjust the se ...
Other materials:
No.1 Car Navigation System Does Not Start Operation [Car Navigation System]
1
Even if the NAVI mode is selected, the car-navigation system screen does
not display.
Possible DTC
—
POSSIBLE CAUSE
NAVI button malfunction
Power supply fuse (+B, ACC) burnt out ...
Fastening the Seat Belt
Pull the seat belt tongue to the desired
length.
Insert it into the seat belt buckle until
you hear a click sound.
Adjust the belt length.
To lengthen the belt, hold the seat belt
tongue at a right angle to the webbing
and pull. To shorten, pull the loose end
of the webbin ...
Locking, Unlocking with Door-
Lock Knob
Operation from inside
To lock any door from the inside, press the
door-lock knob.
To unlock, pull it outward.
This does not operate the other door locks.
NOTE
The red indication can be seen when the
door-lock knob is unlocked.
Operation from outside
To lock the rear and front pa ...
