Mazda 3 Service Manual: Antenna Feeder No.2 Inspection
1. Disconnect the negative battery cable..
2. Remove the following parts:
a. A-pillar trim (RH).
b. Rear seat cushion (4SD).
c. Rear scuff plate (RH).
d. Tire house trim (RH).
e. Trunk side upper trim (5HB, RH).
f. Trunk side trim (5HB, RH).
g. C–pillar trim (RH).
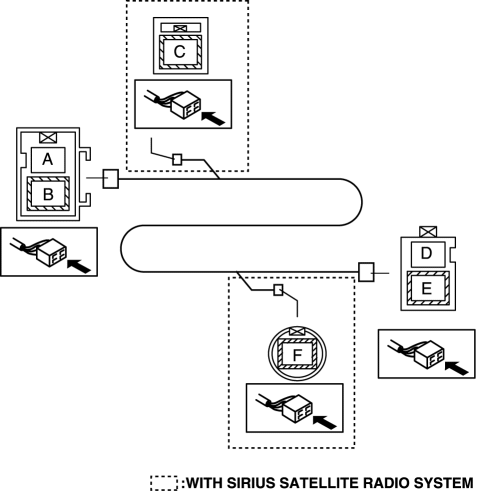
3. Disconnect the antenna feeder No.1.
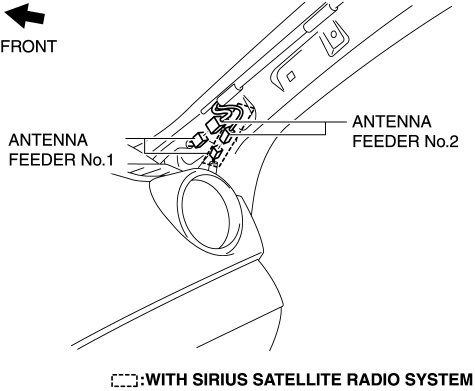
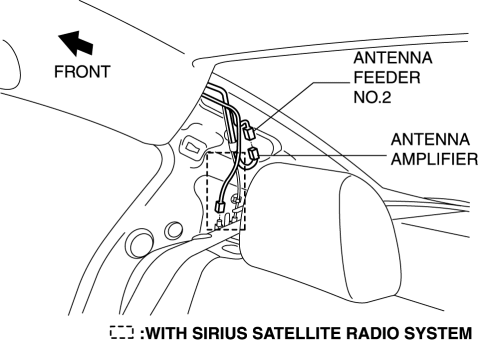
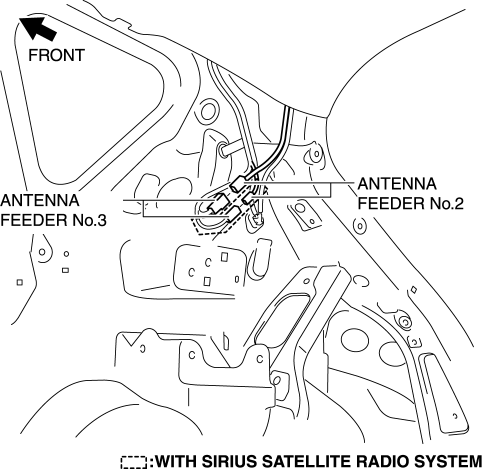
4. Disconnect the antenna amplifier (4SD)/ antenna feeder No.3 (5HB).
4SD
5HB
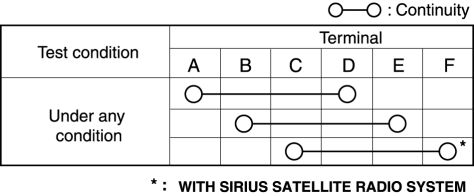
5. Verify that the continuity between antenna feeder No.2 terminals is as indicated in the table.
With audio unit (without display)
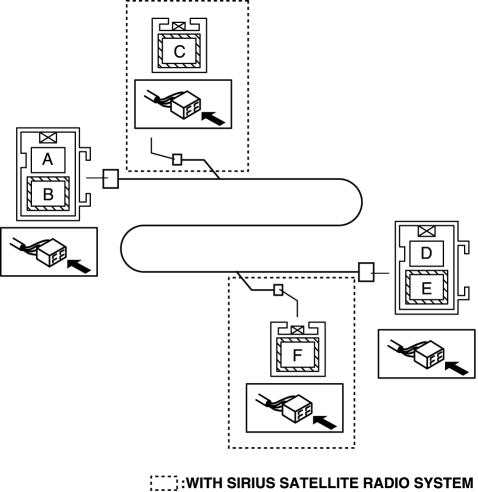
4SD (with audio unit (with display))
5HB (with audio unit (with display))

-
If not as indicated in the table, replace antenna feeder No.2.
 Antenna Feeder No.1 Removal/Installation
1. Disconnect the negative battery cable..
2. Remove the following parts:
a. Front scuff plate.
b. Front side trim.
c. Upper panel.
d. Shift lever knob (MTX).
e. Selector lever knob (ATX). ...
 Antenna Feeder No.2 Removal/Installation
1. Disconnect the negative battery cable..
2. Remove the rain sensor cover. (Vehicles with auto light/wiper system).
3. Disconnect the rain sensor connector. (Vehicles with auto light/wiper system ...
Other materials:
Picture Quality Adjustment
WARNING
Always adjust the picture quality of the rear view monitor while the
vehicle is stopped:
Do not adjust the picture quality of the rear view monitor while driving
the vehicle.
Adjusting the picture quality of the rear view monitor such as
brightness, contrast, colo ...
Antenna Amplifier Removal/Installation
With Audio Unit (Without Display)
1. Disconnect the negative battery cable..
2. Remove the rain sensor cover. (Vehicles with auto light/wiper system).
3. Disconnect the rain sensor connector. (Vehicles with auto light/wiper system)
4. Partially peel back the seaming welts.
5. Remove the fo ...
Drive Belt Auto Tensioner Inspection [Mzr 2.0, Mzr 2.5]
MZR 2.0
1. Remove the generator drive belt with the A/C drive belt still installed and
set it out of the way..
2. Verify that the drive belt auto tensioner moves smoothly in the operational
direction.
If it does not move smoothly, replace the drive belt auto tensioner..
3. T ...
