
Mazda 3 Owners Manual: Bluetooth® Audio (Type A)
Applicable Bluetooth ® specification (Recommended)
Ver. 2.0
Response profile
- A2DP (Advanced Audio Distribution Profile) Ver. 1.0/1.2
- AVRCP (Audio/Video Remote Control Profile) Ver. 1.0/1.3
A2DP is a profile which transmits only audio to the Bluetooth ® unit. If your Bluetooth ® audio device corresponds only to A2DP, but not AVRCP, you cannot operate it using the control panel of the vehicle's audio system. In this case, only the operations on the mobile device are available the same as when a portable audio device for a non-compliant Bluetooth ® device is connected to the AUX terminal.
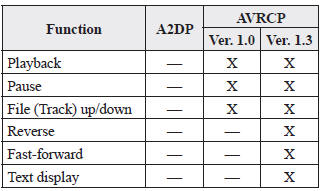
X: Available
—: Not available
NOTE
- The battery consumption of Bluetooth ® audio devices increases while Bluetooth ® is connected.
- If a general mobile phone device is
USB connected during music playback
over the Bluetooth ® connection, the
Bluetooth ® connection is disconnected.
For this reason, you cannot have music playback over a Bluetooth ® connection and music playback using a USB connection at the same time.
- The system may not operate normally depending on the Bluetooth ® audio device
 Communication Settings
Select the icon on the home
screen to display the Communication screen.
Select to change the setting.
*1 Depending on the device, it may be necessary to acquire download
permission on th ...
 How to Use the Bluetooth ® Audio
System
How to Use the Bluetooth ® Audio
System
Switching to Bluetooth ® audio mode
To listen to music or voice audio recorded
to a Bluetooth ® audio device, switch to
the Bluetooth ® audio mode to operate
the audio device using the audio sy ...
Other materials:
Seat Weight Sensor Inspection [Two Step Deployment Control System]
CAUTION:
If any of the following work is performed, perform the seat weight sensor
inspection using the M-MDS.
Removal of the passenger-side seat
Loosening and retightening of passenger’s seat fixing bolts
Or, the vehicle is involved in a collision
...
Manual Transaxle Shift Mechanism Removal/Installation [G35 M R]
1. Remove the battery cover..
2. Disconnect the negative battery cable.
3. Remove the battery component. (ex: battery, battery tray and PCM component).
4. Remove the air cleaner component..
5. Remove the aerodynamic under cover NO.2..
6. Remove the tunnel member (rear)..
7. Remove the u ...
Warning Lights
These lights turn on or flash to notify the user of the system operation
status or a system
malfunction.
Signal
Warning Lights
Master Warning Light *1
Brake System Warning Light *1*2
ABS Warning Light *1
Charging System Warnin ...
