Mazda 3 Owners Manual: How to Use the Bluetooth ® Audio System
Switching to Bluetooth ® audio mode
To listen to music or voice audio recorded to a Bluetooth ® audio device, switch to the Bluetooth ® audio mode to operate the audio device using the audio system control panel. Any Bluetooth ® audio device must be paired to the vehicle's Bluetooth ® unit before it can be used.
Refer to Bluetooth ® Preparation (Type A) on .
- Turn on the Bluetooth ® audio device's power.
- Switch the ignition to ACC or ON.
Make sure that the “
 ” symbol
is displayed in the audio display. The symbol is not displayed if an un-paired Bluetooth ® audio device is being used or the vehicle's Bluetooth ® unit has a malfunction.
NOTE
Some Bluetooth ® audio devices need a
certain amount of time before the “
 ”
”
symbol is displayed.
- Press the media button (
 )
)
to switch to the Bluetooth ® audio mode and start playback.
If the current device version is lower than AVRCP Ver. 1.3: “ BT Audio ” is displayed.
If the current device is AVRCP Ver. 1.3: The playback time is displayed.
NOTE
- If the Bluetooth ® audio device does not begin playback, press the Play/Pause button (4).
- If a call is received on a hands-free mobile phone during playback from the Bluetooth ® audio device, the playback is stopped. Playback from the Bluetooth ® audio device resumes after the call ends.
Playback
- To listen to a Bluetooth ® audio device over the vehicle's speaker system, switch the mode to Bluetooth ® audio mode. (Refer to “Switching to Bluetooth ® audio mode”)
- To stop playback, press the Play/Pause button (4).
- Press the button again to resume playback.
Selecting a file (track)
Selects the next file (track)
Short-press the track up button (
 ).
).
Selects the beginning of the current file (track)
Short-press the track down button (
 ).
).
Fast-forward/Reverse (AVRCP Ver. 1.3)
Fast-forward
Press and hold the fast-forward button
( ).
Reverse
Press and hold the reverse down button
( ).
Switching the display (only AVRCP Ver.
1.3)
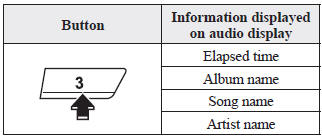
The information displayed on the audio display changes as follows each time the text button ( 3 ) is pressed during playback.
NOTE
- If title information is not available, “ NO TITLE ” is displayed.
- This unit cannot display some
characters. Characters which cannot be
displayed are indicated by an asterisk
(
 ).
).
Display scroll
Only 13 characters can be displayed at one time. To display the rest of the characters of a long title, press and hold the text button (3). The display scrolls the next 13 characters. Press and hold the text button (3) again after the last 13 characters have been displayed to return to the beginning of the title.
 Bluetooth® Audio (Type A)
Applicable Bluetooth ® specification
(Recommended)
Ver. 2.0
Response profile
A2DP (Advanced Audio Distribution
Profile) Ver. 1.0/1.2
AVRCP (Audio/Video Remote Control
Profile) Ver. 1.0/1 ...
 Bluetooth ® Audio Device Information Display
If a Bluetooth ® audio device is connected,
the following information is displayed in
the audio display.
X: Available
—: Not available
NOTE
Some information may not display
depending on ...
Other materials:
Light Bulbs
WARNING
Do not replace the xenon fusion bulbs
yourself:
Replacing the xenon fusion bulbs
yourself is dangerous. Because the
xenon fusion bulbs require high
voltage, you could receive an electric
shock if the bulbs are handled
incorrectly. Consult an Authorized
...
Front Fender Panel Removal/Installation
1. Disconnect the negative battery cable..
2. Remove the following parts:
a. Front bumper.
b. Front combination light.
c. Front fender molding.
d. Side step molding.
3. Remove fasteners and bolts, then remove the front fender panel in the direction
of the arrow shown in the figure.
...
Automatic Transaxle Shift Mechanism Removal/Installation
Selector Lever Removal/Installation
1. Remove the battery cover..
2. Disconnect the negative battery cable..
3. Remove in the order indicated in the table.
4. Install in the reverse order of removal.
1
Upper panel
(See UPPER PANEL REMOVAL/INSTALLATION.)
...
