Mazda 3 Service Manual: Climate Control Unit Removal/Installation [Manual Air Conditioner]
1. Disconnect the negative battery cable..
2. Remove the following parts:
a. Upper panel.
b. Shift lever knob (MTX).
c. Selector lever knob (ATX).
d. Shift panel.
e. Side wall.
f. Console.
g. Front scuff plate.
h. Front side trim.
i. Dashboard under cover.
j. Glove compartment.
k. Hood release lever.
l. Lower panel.
m. Center panel.
n. Audio unit.
o. Shower duct (driver-side).
3. Remove in the order indicated in the table.
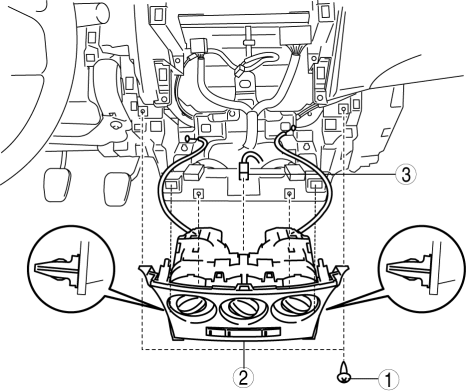
|
1 |
Screw |
|
2 |
Climate control unit (See Climate Control Unit Removal Note.) (See Climate Control Unit Installation Note.) |
|
3 |
Connector |
4. Install in the reverse order of removal.
Climate Control Unit Removal Note
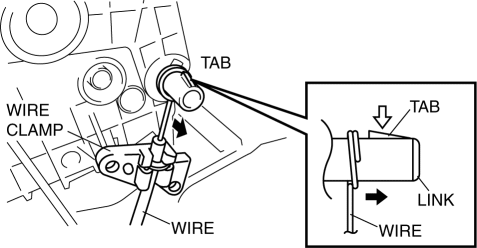
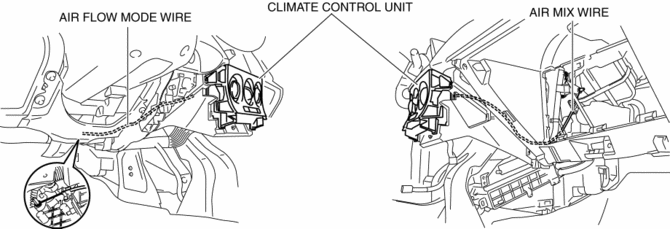
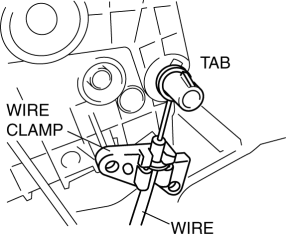
1. Disconnect each wire to links and remove it to the wire clamps.
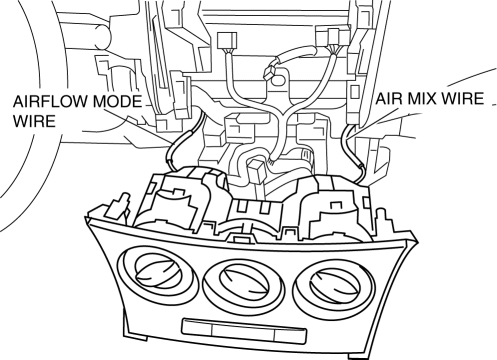
2. Pull out the air mix wire and airflow mode wire from the dashboard.
Climate Control Unit Installation Note
1. Pass each wire through the hole on the dashboard as shown in the figure.
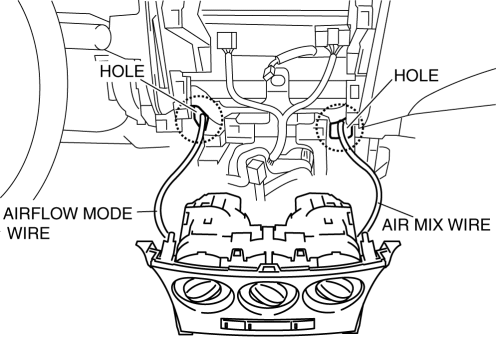
2. Route each wire as shown in the figure.
3. Connect the climate control unit connector.
4. Connect each wire to links and install it to the wire clamps.
5. Verify that the dial is turned fully from one end to the other.
 Climate Control Unit Removal/Installation [Full Auto Air Conditioner]
1. Disconnect the negative battery cable..
2. Remove the following parts:
a. Upper panel.
b. Shift lever knob (MTX).
c. Selector lever knob (ATX).
d. Shift panel.
e. Side wall.
f. Consol ...
 Condenser Inspection
1. Inspect the condenser for cracks, damage, and oil leakage.
If there is any malfunction, replace the condenser.
2. Visually inspect the fins for clogging of foreign material.
I ...
Other materials:
Front Seat Back Component [Vehicles Without Power Seat System] Removal/Installation
WARNING:
Handling a front seat (with built-in side air bag) improperly can accidentally
operate (deploy) the air bag, which may seriously injure you. Read the service
warnings before handling a front seat (with built-in side air bag)..
CAUTION:
After removing a front seat ...
Clock Switch Inspection
NOTE:
Clock switch built with the hazard warning switch.
1. Disconnect the negative battery cable..
2. Remove the clock switch..
3. Verify resistance between the clock switch terminals.
If the resistance is not as specified, replace the clock switch.
Between t ...
Mass Air Flow (MAF) Sensor/Intake Air Temperature (Iat) Sensor No.1 Removal/Installation
[Skyactiv G 2.0]
CAUTION:
Be careful not to hit the sensor element or allow foreign matter to get on
it during sensor removal/installation. If the sensor element is hit or foreign
matter gets on it, an error may occur in the sensor output signal resulting
in deterioration in the engine control.
...
