
Mazda 3 Service Manual: Dashboard Disassembly/Assembly
1. Remove the ventilator grilles..
2. Remove the Passenger-side air bag module..
3. Disassemble in the order indicated in the table.
4. Assemble in the reverse order of disassembly.
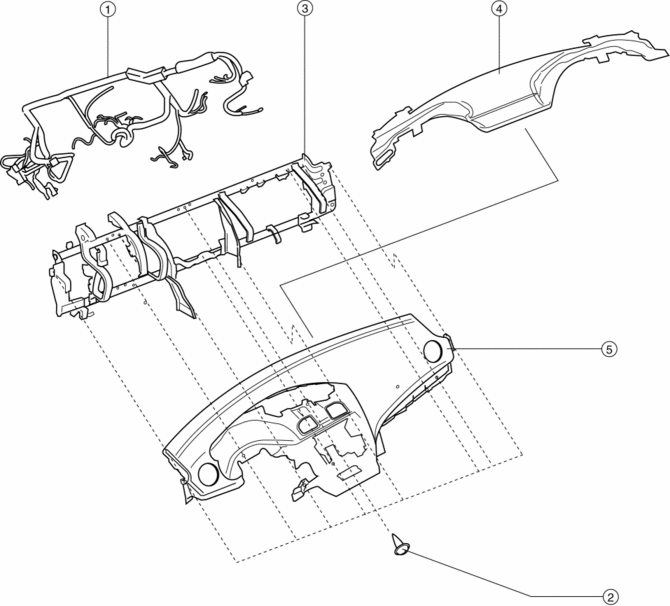
|
1 |
Wiring harness |
|
2 |
Screw |
|
3 |
Dashboard frame |
|
4 |
Center duct |
|
5 |
Dashboard |
 Column Cover Removal/Installation
1. Pull down the steering wheel.
2. Pull the upper column cover in the direction of the arrow in the order of
(1) and (2), then remove the upper column cover while detaching the hooks and pins.
...
 Dashboard Removal/Installation
1. Set the air intake mode to FRESH.
2. Set the air mix mode to MAX COLD.
3. Disconnect the negative battery cable..
4. Remove the following parts:
a. Front doors.
b. Front scuff plate.
c. ...
Other materials:
On/Off Solenoid Removal/Installation [Fw6 A EL]
WARNING:
A hot transaxle and ATF can cause severe burns. Turn off the engine and wait
until they are cool.
Always wear protective eye wear when using the air compressor. If the air
compressor is used, any particles of dirt or soiling could spatter and get into
the eyes.
...
Voice Recognition Learning
Function (Speaker Enrollment)
(Type A)
The voice recognition learning function enables voice recognition appropriate
to the characteristics of the user's voice. If the recognition of the voice
input commands to the system is not adequate, this function can largely improve
the system's voice recognition of the user. If your voice ca ...
Transaxle Oil Replacement [G66 M R]
1. Park the vehicle on level ground.
2. Remove the aerodynamic under cover No.2..
3. Remove the drain plug and washer.
4. Drain the oil into a suitable container.
5. Install a new washer and the drain plug.
Tightening torque
39—59 N·m {4.0—6.0 kgf·m, 29—43 ft·lbf}
...
