Mazda 3 Service Manual: Drive Belt Removal/Installation [Mzr 2.3 Disi Turbo]
1. Remove the aerodynamic under cover No.2 and splash shield as a single unit..
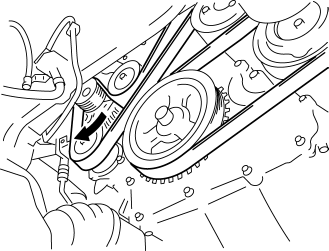
2. Rotate the drive belt auto tensioner in the direction shown in the figure and remove the drive belt.
3. Install the drive belt.
4. Verify that the drive belt auto tensioner indicator mark does not exceed the limit..
5. Install the aerodynamic under cover No.2 and splash shield as a single unit..
 Drive Belt Removal/Installation [Mzr 2.0, Mzr 2.5]
MZR 2.0
A/C drive belt removal
1. Remove the aerodynamic under cover No.2 and splash shield as a single unit..
2. Remove the nut shown in the figure and set the power steering pipe component
ou ...
 Drive Belt Removal/Installation [Skyactiv G 2.0]
WARNING:
A hot engine can cause severe burns. Turn off the engine and wait until it
is cool before servicing.
NOTE:
Remove/install the drive belt from the underside of the veh ...
Other materials:
Magnetic Clutch Inspection [Full Auto Air Conditioner]
1. Connect battery to terminal A of magnetic clutch and ground to A/C compressor
body.
SKYACTIV-G 2.0
MZR 2.3 DISI Turbo, MZR 2.5
2. Verify that the magnetic clutch operates.
If there is any malfunction, replace the magnetic clutch.
...
Control Switches
Temperature control dial
This dial controls temperature. Turn it
clockwise for hot and counterclockwise
for cold.
Fan control dial
The fan has seven speeds.
AUTO position
The amount of airflow will be
automatically controlled in accordance
with the set temperature.
Except AUTO position
Th ...
No.27 Fuel Refill Concerns [Mzr 2.0, Mzr 2.5]
27
FUEL REFILL CONCERNS
DESCRIPTION
Fuel tank does not fill smoothly.
POSSIBLE CAUSE
PCM DTC is stored
Nonreturn valve malfunction
Improper use of fuel ...
