
Mazda 3 Service Manual: Engine Coolant Protection Inspection [Mzr 2.0, Mzr 2.5]
1. Measure the engine coolant temperature and specific gravity using a thermometer and a hydrometer.
CAUTION:
-
Use engine coolant at a concentration that meets the environmental conditions in which the vehicle is driven, otherwise engine damage could occur.
-
The engine has aluminum parts and must be protected by an ethylene-glycol-based coolant to prevent corrosion and freezing.
-
Do not use coolants containing Alcohol, Methanol, Borate or Silicate. These coolants could damage the cooling system.
-
Use only soft (demineralized) water in the coolant mixture. Water that contains minerals will cut down on the coolant’s effectiveness.
-
Engine coolant damages paint. If engine coolant does get on a painted surface, rinse it off quickly.
NOTE:
-
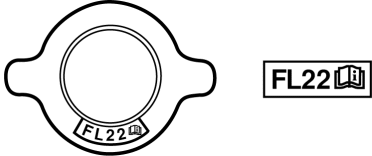
If the “FL22” mark is shown on or near the cooling system cap, use Mazda Genuine FL22 engine coolant.
-
FL22 type engine coolant is shipped as a diluted solution. Use the solution as is when replacing coolant.
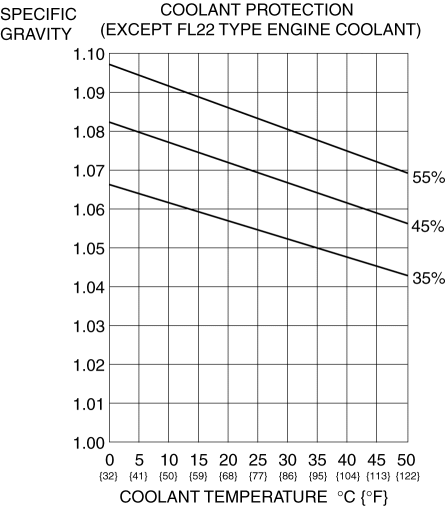
2. Determine the engine coolant protection level by referring to the graph shown in the figure.
-
If the engine coolant protection level is not correct, add water or engine coolant.
 Engine Coolant Level Inspection [Mzr 2.0, Mzr 2.5]
WARNING:
Never remove the cooling system cap or loosen the radiator drain plug while
the engine is running, or when the engine and radiator are hot. Scalding engine
coolant and steam may ...
 Engine Coolant Replacement [Mzr 2.0, Mzr 2.5]
WARNING:
Never remove the cooling system cap or loosen the radiator drain plug while
the engine is running, or when the engine and radiator are hot. Scalding engine
coolant and steam may ...
Other materials:
Torque Converter Clutch (TCC) Non Operation [Fw6 A EL]
TROUBLESHOOTING ITEM
Torque converter clutch (TCC) non-operation
DESCRIPTION
TCC does not operate when vehicle reaches TCC operation range.
POSSIBLE CAUSE
Signal malfunction
...
Antenna Feeder No.7 Removal/Installation
1. Disconnect the negative battery cable..
2. Remove the liftgate upper trim..
3. Disconnect the connector A.
4. Disconnect the connector B..
5. Remove the bolt.
6. Remove the antenna feeder No.7.
7. Install in the reverse order of removal.
Connector B Removal Note
1. Remove the c ...
Recommendations for Shifting (for
Vehicles without Gear Shift
Indication)
Upshifting
For normal acceleration, Mazda
recommends these shift points:
(U.S.A. and Canada)
For cruising, Mazda recommends these
shift points:
(U.S.A. and Canada)
Downshifting
When you must slow down in heavy traffic
or on a steep upgrade , downshift before
the engine starts to ov ...
