Mazda 3 Service Manual: Entertainment Personalization Features Setting Procedure
Welcome Mode ON/OFF Setting
NOTE:
-
WELCOME mode is controlled by the instrument cluster. Refer to the instrument cluster description.
1. Refer to INSTRUMENTATION/DRIVER INFO. PERSONALIZATION FEATURES SETTING PROCEDURE.
Welcome Sound ON/OFF Setting
1. Switch the ignition to ACC or ON.
2. Turn the audio unit power to ON.
3. Press the AUDIO CONT switch.
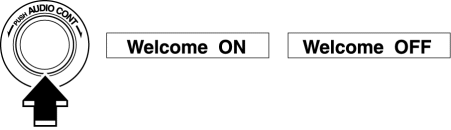
4. Select “Welcome ON” or “Welcome OFF”.
5. Press the AUDIO CONT switch.
6. Select “ON” or “OFF”.

Action Illumination ON/OFF Setting
1. Switch the ignition to ACC or ON.
2. Turn the audio unit power to ON.
3. Press the AUDIO CONT switch.
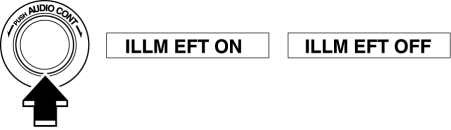
4. Select “ILLM EFT ON” or “ILLM EFT OFF”.
5. Press the AUDIO CONT switch.
6. Select “ON” or “OFF”.

Switching between SIRIUS satellite radio unit equipped/not equipped
NOTE:
-
Do not operate the command for the Sirius radio because it is used for the factory inspection.
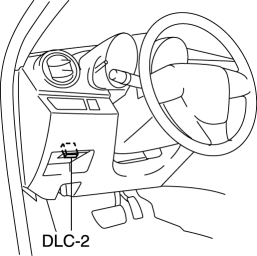
1. Connect the M-MDS (IDS) to the DLC-2.
2. After the vehicle is identified, select the following items from the initial screen of the M-MDS.
-
Select the “Module Programming”.
3. Then, select items from the screen menu in the following order.
-
Select “Programmable Parameters”.
-
Select “Audio Configure”.
|
M-MDS display |
Function |
Setting |
||
|
Sirius radio |
Perform a write on the instrument cluster for whether or not a SIRIUS satellite radio unit is equipped. |
NOTE:
|
||
 Confirmation Step 3: Antenna System Simple Inspection [Radio]
Because the antenna system is equipped with a capacitor, the continuity cannot
be checked. Therefore proceed the following simple inspection.
Turn the AM radio on.
Tun ...
 Entertainment System
Outline
Auxiliary jack/USB port has been adopted.
USB adapter has been adopted.
An audio unit which supports USB devices such as USB memory or iPods has
been adopted.
...
Other materials:
Valve Clearance Inspection [Mzr 2.0, Mzr 2.5]
1. Remove the battery cover..
2. Disconnect the negative battery cable..
3. Remove the plug hole plate..
4. Disconnect the wiring harness.
5. Remove the ignition coils..
6. Remove the spark plugs..
7. Remove the ventilation hose.
8. Remove the oil level gauge.
9. Remove the cylinder ...
Automatic Transaxle Fluid (ATF) Inspection [FS5 A EL]
Automatic Transaxle Fluid (ATF) Condition Inspection
1. One way of determining whether the transaxle should be disassembled is by
noting:
If the ATF is muddy or varnished.
If the ATF smells strange or unusual.
ATF Condition
Possible cause
...
Electro Hydraulic Power Assist Steering (EHPAS) Control Module Configuration
CAUTION:
If the EHPAS CM configuration is not completed, the EHPAS will not operate
properly. If the EHPAS CM is replaced, always carry out the EHPAS CM configuration
so that the EHPAS operates properly.
1. Connect the M-MDS (IDS) to the DLC-2.
2. After the vehicle is ident ...
