Mazda 3 Service Manual: Front Crossmember Removal/Installation
CAUTION:
-
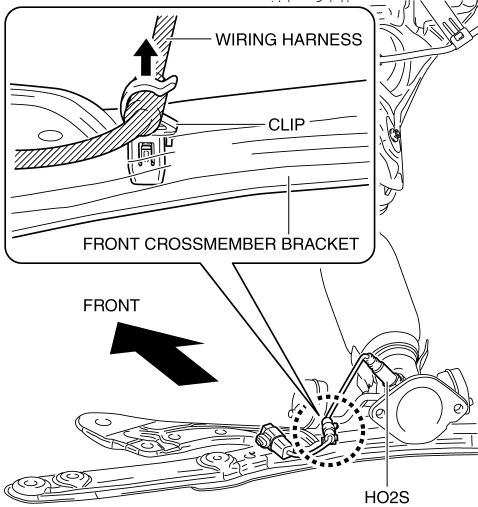
Performing the following procedures without first removing the ABS wheel-speed sensor may possibly cause an open circuit in the wiring harness if it is pulled by mistake. Before performing the following procedures, disconnect the ABS wheel-speed sensor wiring harness connector (axle side) and fix the wiring harness to an appropriate place where it will not be pulled by mistake while servicing the vehicle.
-
Secure the steering wheel using tape or a cable to prevent the steering shaft from rotating after disconnecting the steering shaft. If the steering wheel rotates after the steering shaft and the steering gear and linkage are disconnected, the internal parts of the clock spring could be damaged.
1. Remove the joint cover..
2. Disconnect the steering shaft from the steering gear and linkage..
3. Remove in the order indicated in the table.
4. Install in the reverse order of removal.
5. Inspect the wheel alignment and adjust it if necessary..
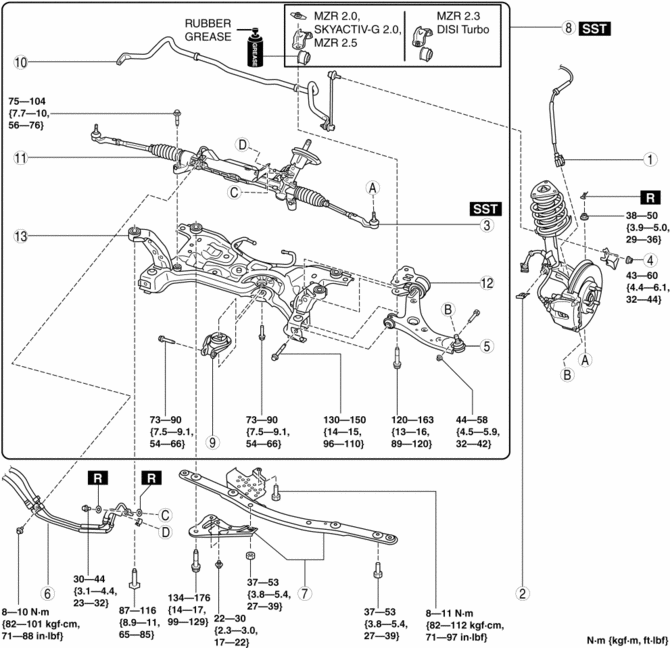
|
1 |
Front ABS wheel-speed sensor wiring harness connector (See FRONT ABS WHEEL-SPEED SENSOR REMOVAL/INSTALLATION.) |
|
2 |
Brake hose clip |
|
3 |
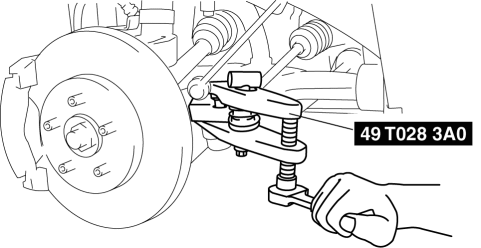
Tie-rod end ball joint (See Tie-rod End Ball Joint Removal Note.) |
|
4 |
Front stabilizer control link upper nut |
|
5 |
Front lower arm ball joint (See Front Lower Arm Ball Joint Installation Note.) |
|
6 |
Power steering pipe component |
|
7 |
Front crossmember bracket (See Front Crossmember Bracket Removal Note (SKYACTIV-G 2.0).) |
|
8 |
Front crossmember component (See Front Crossmember Component Removal Note.) (See No. 1 Engine Mount Rubber and Front Crossmember Component Installation Note.) |
|
9 |
No.1 engine mount rubber (See No. 1 Engine Mount Rubber and Front Crossmember Component Installation Note.) |
|
10 |
Front stabilizer (See FRONT STABILIZER REMOVAL/INSTALLATION [MZR 2.0, SKYACTIV-G 2.0, MZR 2.5].) (See FRONT STABILIZER REMOVAL/INSTALLATION [MZR 2.3 DISI Turbo].) |
|
11 |
Steering gear and linkage (See STEERING GEAR AND LINKAGE REMOVAL/INSTALLATION.) |
|
12 |
Front lower arm (See FRONT LOWER ARM REMOVAL/INSTALLATION.) |
|
13 |
Front crossmember |
Tie-rod End Ball Joint Removal Note
1. Detach the tie-rod end from the steering knuckle using the SST
.
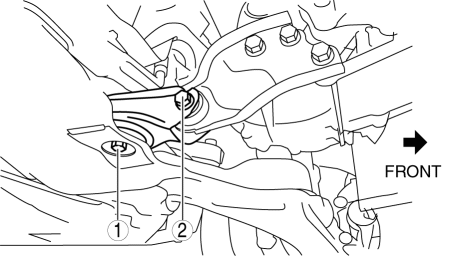
Front Crossmember Bracket Removal Note (SKYACTIV-G 2.0)
1. Disconnect the wiring harness connecting to the front crossmember bracket.
Front Crossmember Component Removal Note
WARNING:
-
Removing the crossmember is dangerous. The crossmember component could fall and cause serious injury or death. Verify that the jack securely supports the crossmember component.
1. Support the front crossmember component using a jack.
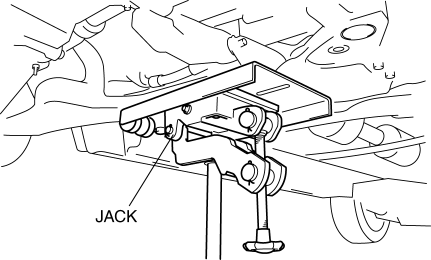
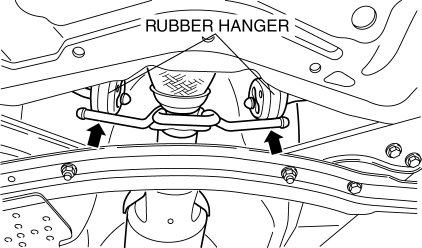
2. Detach the rubber hangers from the front crossmember.
3. Remove the front crossmember, front stabilizer, front lower arm, and steering gear and linkage as a single unit.
No. 1 Engine Mount Rubber and Front Crossmember Component Installation Note
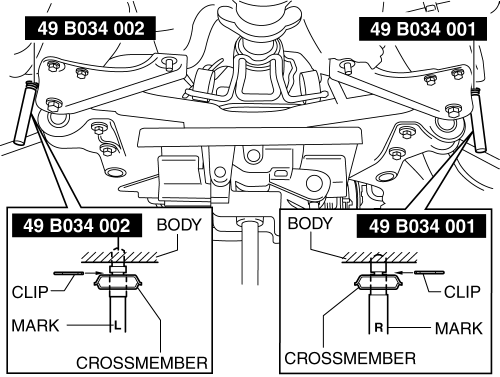
1. Verify the left and right identification marks and install the positioning SSTs
to the front crossmember.
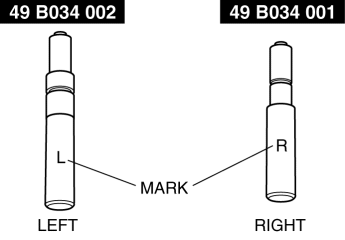
NOTE:
-
Verify the identification marks before installation because the left and right parts of the SSTs
have different shapes.
2. Temporarily tighten the No.1 engine mount rubber to the front crossmember.
3. Raise the transmission jack gradually and install the front crossmember to the vehicle. At this point verify that the SSTs
is securely inserted in the positioning holes on the body.
WARNING:
-
The front crossmember component could fall and cause serious injury or death. Verify that the jack securely supports the front crossmember component.
4. Tighten the front crossmember installation bolts and nuts.
5. Tighten the bolts in the order shown in the figure.
MZR 2.0, MZR 2.3 DISI Turbo, MZR 2.5
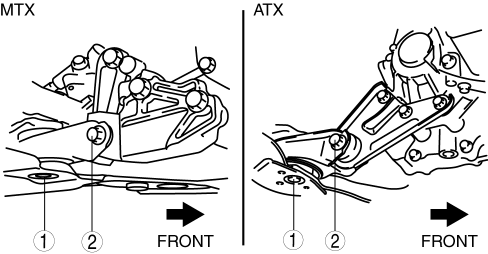
SKYACTIV-G 2.0
CAUTION:
-
Tighten the bolts in the order shown in the figure to prevent abnormal noise and vibration after assembly.
-
Tighten the bolts while being careful of their length to prevent interference between the steering gear housing and bolt.
-
Tightening torque
-
73—90 N·m {7.5—9.1 kgf·m, 54—66 ft·lbf}
-
Bolt stem length
-
Front crossmember side: 62 mm {2.4 in}
-
No.1 engine mount bracket side: 65 mm {2.6 in}
Front Lower Arm Ball Joint Installation Note
NOTE:
-
The bolt insertion direction can be either front or rear of the vehicle, however, keep the insertion direction the same on both the left and right sides of the vehicle.
 Ventilator Grille Removal/Installation
Side Ventilator grille
1. Through the wiring harness into the position shown in the figure, remove the
side ventilator grille in the direction of arrow.
2. When installing the side ventilator ...
 Rear Crossmember Removal/Installation
CAUTION:
Performing the following procedures without first removing the ABS wheel-speed
sensor may possibly cause an open circuit in the wiring harness if it is pulled
by mistake. Before ...
Other materials:
Vacuum Line Inspection
MZR 2.0, MZR 2.5, MZR 2.3 DISI Turbo
1. Remove the vacuum hose..
2. Verify that air can be blown from the power brake unit side of the vacuum
hose towards the intake manifold side, and that air cannot be blown in the opposite
direction.
If there is any malfunction of the inner che ...
Fog Lights
Use this switch to turn on the fog lights.
The fog lights will improve visibility at
night and during foggy conditions.
To turn the fog lights on, rotate the fog
light switch to the position.
The headlight switch must be in the
position before turning on the fog lights.
To turn t ...
Controller Area Network (Can) System
Outline
With the addition of the following, the system wiring diagram and CAN communication
table have been added.
USB adapter
System Wiring Diagram
CAN Signal Table
Signals transmitted using the CAN system are as follows:
MS-CANOUT: Output (send ...
