Mazda 3 Service Manual: Front Door Trim Disassembly/Assembly
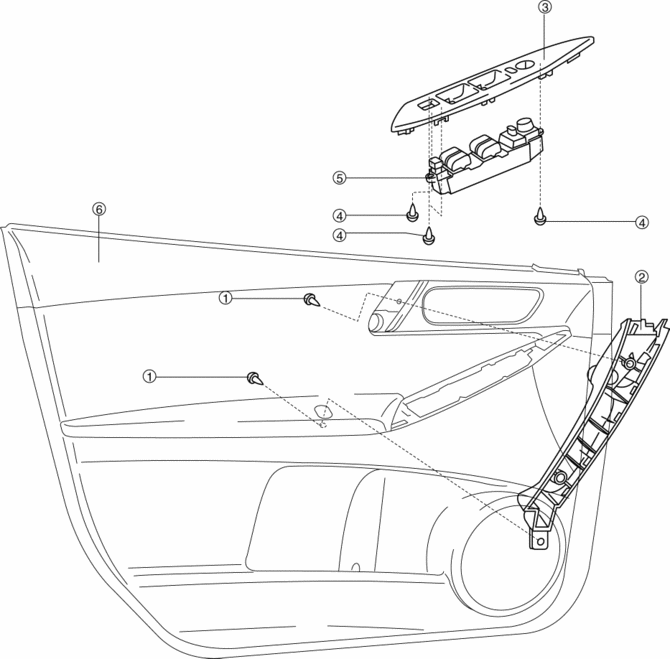
Driver-side
1. Disassemble in the order shown in the figure.
|
1 |
Screw A |
|
2 |
Assist handle |
|
3 |
Switch panel cover |
|
4 |
Screw B |
|
5 |
Power window main switch |
|
6 |
Front door trim |
2. Assemble in the reverse order of disassembly.
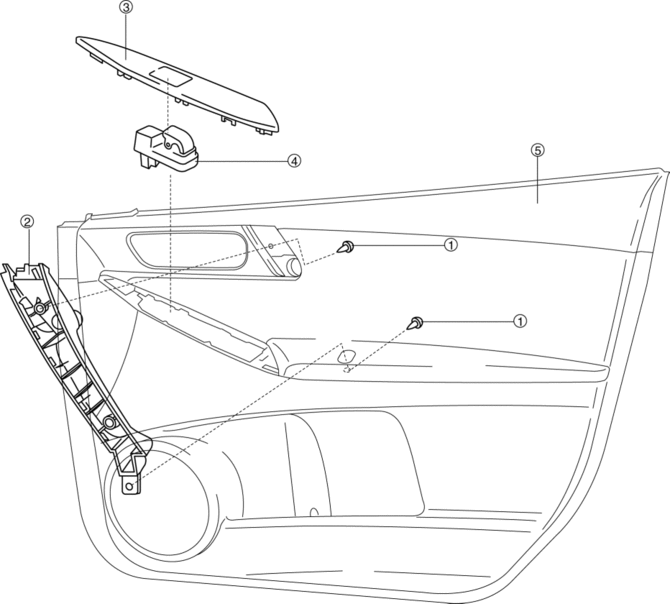
Passenger-side
1. Disassemble in the order shown in the figure.
|
1 |
Screw |
|
2 |
Assist handle |
|
3 |
Switch panel cover |
|
4 |
Power window subswitch |
|
5 |
Front door trim |
2. Assemble in the reverse order of disassembly.
 Trunk Lid Opener Switch Removal/Installation
1. Disconnect the negative battery cable..
2. Remove the trunk lid trim..
3. Remove the high-mount brake light..
4. Remove the screw.
5. Install in the reverse order of removal. ...
 Front Door Trim Removal/Installation
1. Disconnect the negative battery cable..
2. Remove the inner garnish..
3. Move the hook in the direction of arrow shown in the figure using a tape-lapped
flathead screwdriver and detach it fro ...
Other materials:
Drive Belt Removal/Installation [Skyactiv G 2.0]
WARNING:
A hot engine can cause severe burns. Turn off the engine and wait until it
is cool before servicing.
NOTE:
Remove/install the drive belt from the underside of the vehicle.
Generator Drive Belt Removal/Installation
CAUTION:
To prevent damage to the dri ...
Audio Amplifier Removal/Installation
1. Slide the passenger seat rearward.
2. Remove the cover.
3. Remove the bolt.
4. Detach the clips and set the vehicle wiring harness aside.
5. Slide the passenger seat forward.
6. Disconnect the negative battery cable..
7. Remove the caps.
8. Remove the nuts.
9. Disconnect t ...
Oil Pressure Inspection [Mzr 2.0, Mzr 2.5]
WARNING:
Hot engines and engine oil can cause severe burns. Turn off the engine and
wait until it and the engine oil have cooled.
A vehicle that is lifted but not securely supported on safety stands is dangerous.
It can slip or fall, causing death or serious injury. Never work ...
