
Mazda 3 Service Manual: Fuel Filler Lid Opener Bezel Removal/Installation
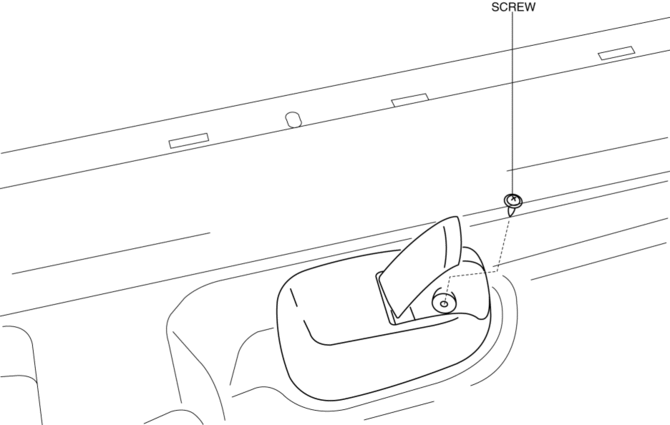
1. Remove the screw.
2. Pull the fuel-filler lid opener bezel in the direction of the arrow (1) then remove the tab.
3. Move the fuel-filler lid opener bezel in the direction of the arrow (2) shown in the figure.
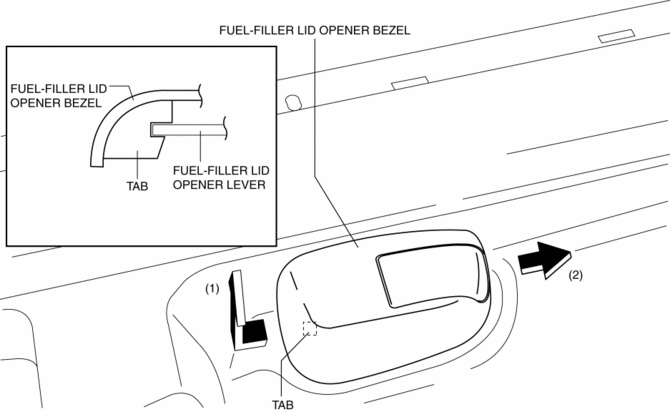
4. Remove the fuel-filler lid opener bezel.
5. Install in the reverse order of removal.
 Fuel Filler Lid Opener And Lever Removal/Installation
Fuel-filler Lid Opener
4SD
1. Open the fuel-filler lid.
2. Remove the following parts:
a. Trunk end trim.
b. Trunk side trim (RH).
3. Remove the nut.
4. Remove the lift spring.
5 ...
 Fuel Filler Lid Opener Cable Removal/Installation
4SD
1. Disconnect the negative battery cable..
2. Remove the following parts:
a. Front seat (LH).
b. Front scuff plate (LH).
c. Rear scuff plate.
d. B-pillar lower trim.
e. Rear seat cush ...
Other materials:
Replacing a Tire
WARNING
Always use tires that are in good
condition:
Driving with worn tires is dangerous.
Reduced braking, steering, and
traction could result in an accident.
Replace all four tires at the same time:
Replacing just one tire is dangerous. It
could cause poor handling ...
Child-Restraint System Installation
Child-Restraint System Types
In this owner's manual, explanation of
child-restraint systems is provided for the
following three types of popular childrestraint
systems: infant seat, child seat,
booster seat.
NOTE
Installation position is determined
by the type of child-restraint system.
...
List of storage features
Location of the storage features
Bottle holders
Card holders
Cup holders
Auxiliary box (if equipped)
Console box
Open tray
WARNING
■ Items that should not be left in the vehicle
Do not leave glasses, aerosol cans, or similar items inside the Subaru Solterra
storage co ...
