Mazda 3 Service Manual: Glove Compartment Removal/Installation
CAUTION:
-
If the glove compartment is closed without being joined to the stay damper, the stay damper may be damaged. Verify that the stay damper is joined to the glove compartment before closing the glove compartment.
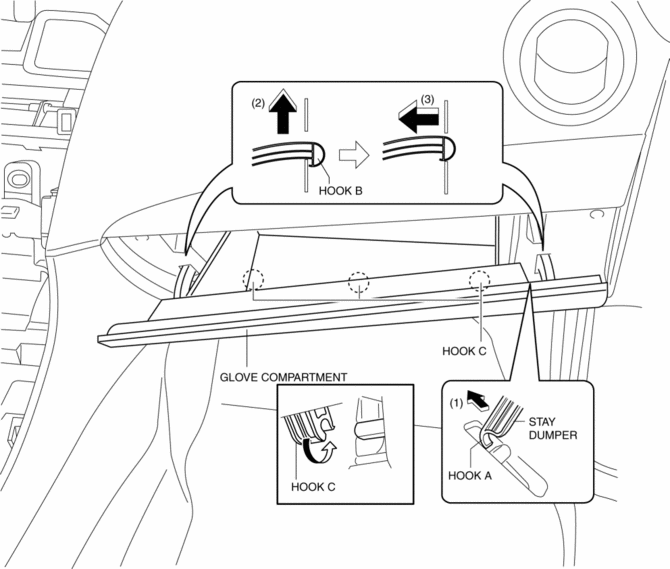
1. Pull the stay damper in the direction (1) shown in the figure, and detach the hook A between the glove compartment and the stay damper.
2. Pull up the hook B in the direction of arrow (2) and remove it in the direction of arrow (3) shown in the figure.
3. Lower the glove compartment.
4. Detach the hook C from the dashboard and remove the glove compartment.

5. Install in the reverse order of removal.
 Glove Compartment Light Bulb Removal/Installation
1. Disconnect the negative battery cable..
2. Remove the following parts:
a. Passenger-side front scuff plate.
b. Passenger-side front side trim.
c. Dashboard under cover.
d. Glove compartme ...
 Knee Bolster Removal/Installation
1. Disconnect the negative battery cable..
2. Remove the following parts:
a. Driver-side front scuff plate.
b. Driver-side front side trim.
c. Hood release lever.
d. Upper panel.
e. Shift ...
Other materials:
Ignition Coil Removal/Installation [Mzr 2.0, Mzr 2.5]
1. Remove the battery cover..
2. Disconnect the negative battery cable..
3. Remove the plug hole plate..
4. Remove in the order indicated in the table.
5. Install in the reverse order of removal.
1
Plug hole plate bracket
2
Connector
...
Auxiliary Jack/Usb Port
NOTE:
“iPod” is a registered trademark of Apple Inc. in the United States and other
countries.
Purpose, Function
The Auxiliary jack/USB port outputs the audio signals of commercially-available
portable audio, a USB device, or an iPod connected to the Auxiliary jack/USB
...
Displayable Range on the Screen
The images on the screen may be different from the actual conditions.
NOTE
The displayable range varies depending on the vehicle and road
conditions.
The displayable range is limited. Objects under the bumper or around
the bumper ends
cannot be displayed.
The distance appearing ...
