Mazda 3 Service Manual: Pressure Sensor Removal/Installation [Two Step Deployment Control System]
1. Switch the ignition to off.
2. Disconnect the negative battery cable and wait for 1 min or more
..
3. Remove the inner garnish..
4. Remove the front door trim..
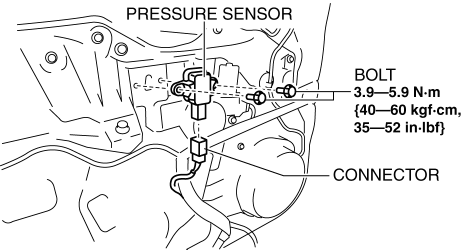
5. Remove the bolts.

6. Remove the pressure sensor.
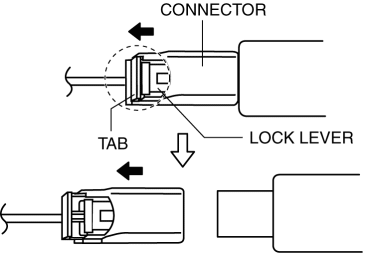
7. Disconnect the connector from the pressure sensor by pressing the connector tab and pulling out the lock lever in the direction of the arrow.

-
When connecting the pressure sensor connector, insert the lock lever (connector disconnection prevention lever) completely.
8. Install in the reverse order of removal.
9. Switch the ignition to ON.
10. Verify that the air bag system warning light illuminates for approx. 6 s
and goes out.
-
If the air bag system warning light does not operate normally, refer to the on-board diagnostic system (air bag system) and perform inspection of the system..
 Brake Fluid Pressure Sensor Inspection
1. Switch the ignition to off.
2. Install the SSTs to the master cylinder (secondary side) as shown in
the figure.
NOTE:
When installing the SST (49 D043 0A0) to the master cylinder, ...
 Refrigerant Pressure Sensor Inspection [Full Auto Air Conditioner]
MZR 2.3 DISI Turbo, MZR 2.5
1. Install the manifold gauge.
2. Verify the high-pressure side reading of the manifold gauge.
3. Measure the terminal voltage of the climate control unit.
1C, ...
Other materials:
Fan Switch Inspection [Manual Air Conditioner]
1. Disconnect the negative battery cable..
2. Remove the following parts:
a. Upper panel.
b. Shift lever knob (MTX).
c. Selector lever knob (ATX).
d. Shift panel.
e. Side wall.
f. Console.
g. Front scuff plate.
h. Front side trim.
i. Dashboard under cover.
j. Glove compartment. ...
Closing the Hood
Check under the hood area to make
certain all filler caps are in place and all
loose items (e.g. tools, oil containers,
etc.) have been removed.
Lift the hood, grasp the padded area on
the support rod, and secure the support
rod in the clip. Verify that the support
rod is secured in ...
Console Removal/Installation
1. Disconnect the negative battery cable..
2. Remove the following parts:
a. Upper panel.
b. Shift knob (MTX).
c. Selector lever knob (ATX).
d. Shift panel.
e. Side wall.
3. Remove the bolts.
4. Remove the screws.
5. Pull the console in the direction of the arrow shown in t ...
