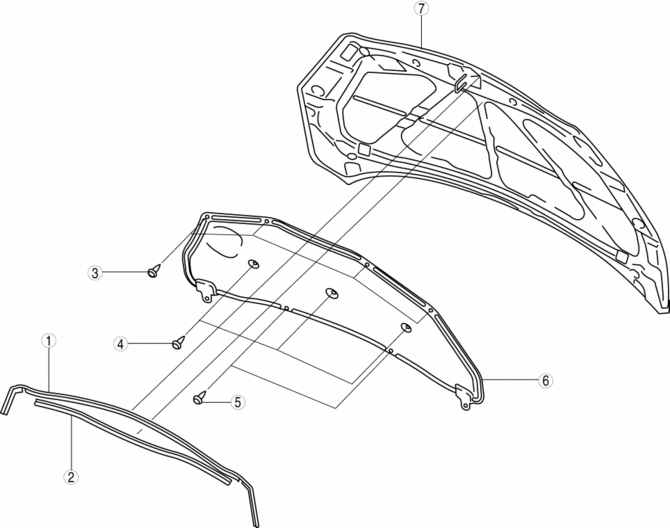
Mazda 3 Service Manual: Hood Disassembly/Assembly
Except Mazdaspeed3
1. Disassemble in the order indicated in the table.
|
1 |
Weather strip parting seal |
|
2 |
Weather strip shroud seal |
|
3 |
Fasteners A |
|
4 |
Fasteners B |
|
5 |
Fasteners C |
|
6 |
Hood insulator |
|
7 |
Hood component |
2. Assemble in the reverse order of disassembly.
Mazdaspeed3
1. Disassemble in the order indicated in the table.

|
1 |
Weather strip parting seal |
|
2 |
Weather strip shroud seal |
|
3 |
Nut A |
|
4 |
Fasteners B |
|
5 |
Charge air cooler duct |
|
6 |
Fasteners C |
|
7 |
Hood insulator |
|
8 |
Nut D |
|
9 |
Charge air cooler duct cover |
|
10 |
Grommet |
|
11 |
Hood component |
2. Assemble in the reverse order of disassembly.
 Hood Adjustment
Gap Adjustment
1. Verify that the gap between the hood and the body is within the specification.
Standard clearance
a: -2.8—0.8 mm {-0.11—0.03 in}
b: –1.2—1.2 mm {–0. ...
 Hood Latch And Release Lever Removal/Installation
Hood latch
1. Open the hood.
2. Disconnect the negative battery cable..
3. Disconnect the hood latch switch connector. (vehicles with theft-deterrent
system)
4. Remove the bolts.
5. ...
Other materials:
Seat Belt Warning Beep
If the driver's seat belt is not fastened
when the ignition is switched ON, a beep
sound will be heard for about 6 seconds. If
the driver or the front passenger's seat belt
is not fastened and the vehicle is driven
at a speed faster than about 20 km/h (12
mph), a beep sound will be heard again ...
Schedule 1
U.S.A. residents - Engine oil flexible maintenance interval
Use when the maintenance monitor for “Oil Change” is set to “Flexible”. For
details, see maintenance monitor.
Chart symbols:
I: Inspect: Inspect and clean, repair, adjust, fill up, or replace if
necessary.
T: Tighten
R ...
Parking brake
The parking brake system in the Subaru Solterra can be engaged or
released either automatically or manually, providing flexibility and enhanced convenience
depending on driving conditions.
When operating in automatic mode, the Subaru Solterra intelligently manages the
parking brake, activat ...
