Mazda 3 Owners Manual: Information on Temporary Tires
Please refer to the sample below
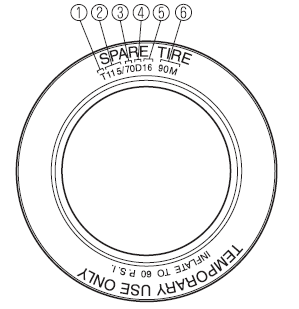
- Temporary tires
- Nominal width of tire in millimeters
- Ratio of height to width (aspect ratio)
- Diagonal
- Rim diameter code
- Load index & speed symbol
T115/70D16 90M is an example of a tire size and load index rating. Here is an explanation of the various components of that tire size and load index rating. Note that the tire size and load index rating may be different from the example.
T
Indicates a tire that may be installed on cars, SUVs, minivans and light trucks as designated by the Tire and Rim Association (T&RA).
115
“115” is the nominal width of the tire in millimeters. This three-digit number gives the width in millimeters of the tire from sidewall edge to sidewall edge. In general, the larger the number, the wider the tire.
70
“70” is the aspect ratio. This two-digit number indicates the tire's ratio of height to width.
D
“D” is the tire construction symbol. D indicates “diagonal ply construction”.
16
“16” is the wheel rim diameter in inches.
90
“90” is the Load Index. This two-or three-digit number indicates how much weight each tire can support.
M
“M” is the speed rating. The speed rating denotes the maximum speed for which the use of the tire is rated.

 Information on Passenger Vehicle Tires
Please refer to the sample below.
TIN: U.S. DOT tire identification number
Passenger car tire
Nominal width of tire in millimeters
Ratio of height to width (aspect ratio)
Radial
Run- ...
 Location of the Tire Label
(Placard)
Location of the Tire Label
(Placard)
You will find the tire label containing tire inflation pressure by tire size
and other important
information on the driver's side B-pillar or on the edge of the driver's door
frame.
SAMPLE
...
Other materials:
Refrigerant Pressure Sensor Removal/Installation [Manual Air Conditioner]
1. Disconnect the negative battery cable..
2. Discharge the refrigerant..
3. Disconnect the refrigerant pressure sensor connector.
CAUTION:
If moisture or foreign material enters the refrigeration cycle, cooling ability
will be lowered and abnormal noise will occur. Always immediate ...
Aerodynamic Under Cover No.1 Removal/Installation
1. Remove the aerodynamic under cover No.2..
2. Peel off the front mudguard..
3. Remove the bolts and fastener.
4. Remove the aerodynamic under cover No.1 in the direction of the arrow shown
in the figure.
CAUTION:
Be careful not to damage the aerodynamic under cover No.1 durin ...
Parking Brake Lever Removal/Installation
1. Remove the following parts:
a. Upper panel.
b. Shift knob (MTX).
c. Selector lever knob (ATX).
d. Shift panel.
e. Side wall.
f. Console.
2. Remove in the order indicated in the table.
3. Install in the reverse order of removal.
4. After installation, inspect the parking brake le ...
