Mazda 3 Service Manual: Intake Air System Removal/Installation [Mzr 2.0, Mzr 2.5]
WARNING:
-
A hot engine and intake air system can cause severe burns. Turn off the engine and wait until they are cool before removing the intake air system.
-
Fuel is very flammable liquid. If fuel spills or leaks from the pressurized fuel system, it will cause serious injury or death and facility breakage. Fuel can also irritate skin and eyes. To prevent this, always complete the “Fuel Line Safety Procedure”, while referring to the “BEFORE SERVICE PRECAUTION”.
1. Complete the “BEFORE SERVICE PRECAUTION”..
2. Remove the battery cover..
3. Disconnect the negative battery cable..
4. Remove the plug hole plate..
5. Disconnect the wiring harness.
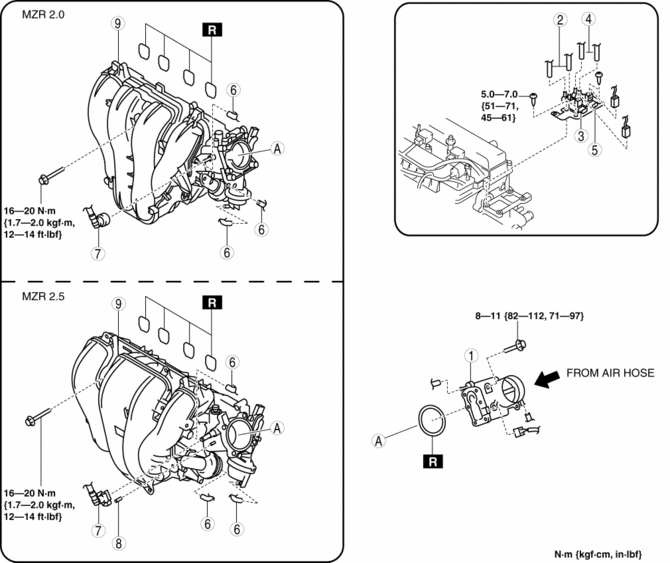
6. Remove in the order indicated in the table.
7. Install in the reverse order of removal.
8. Add the engine coolant to the cooling system filler neck and the coolant reserve tank to replace that during servicing.
9. Inspect the engine coolant level..
10. Inspect for engine coolant leakage..
11. Complete the “AFTER SERVICE PRECAUTION”..
Step 1

|
1 |
MAF/IAT sensor |
|
2 |
Ventilation hose |
|
3 |
Air cleaner cover (See Air Cleaner Cover Removal Note.) |
|
4 |
Resonance chamber |
|
5 |
Air hose (See Air Hose Installation Note) |
|
6 |
Air cleaner element |
|
7 |
Air cleaner case |
|
8 |
Fresh-air duct (No.1) (See Fresh-Air Duct (No.1) Removal Note) |
|
9 |
Fresh-air duct (No.2) |
|
10 |
Fresh-air duct (No.3) |
Step 2
|
1 |
Throttle body (See Throttle Body Removal Note.) (See Throttle Body Installation Note.) |
|
2 |
Vacuum hose |
|
3 |
Variable intake air solenoid valve |
|
4 |
Vacuum hose |
|
5 |
Variable tumble solenoid valve |
|
6 |
Vacuum hose |
|
7 |
Quick release connector (See QUICK RELEASE CONNECTOR (EMISSION SYSTEM) REMOVAL/INSTALLATION [MZR 2.0, MZR 2.5].) |
|
8 |
Vacuum cap (MZR 2.5) |
|
9 |
Intake manifold (See Intake Manifold Removal Note.) |
Air Cleaner Cover Removal Note
1. Remove the air cleaner cover and resonance chamber and air hose as single unit.
2. Remove the air cleaner cover.
Fresh-Air Duct (No.1) Removal Note
1. Remove the fresh-air duct (No.1) and fresh-air duct (No.2) as single unit.
2. Remove the fresh-air duct (No.1).
Throttle Body Removal Note
WARNING:
-
Turn off the engine and wait until it is cool. Even then, be very careful when removing the cap. Wrap a thick cloth around it and slowly turn it counterclockwise to the first stop. Step back while the pressure escapes.
-
When you are sure all the pressure is gone, press down on the cap using the cloth, turn it, and remove it.
CAUTION:
-
Do not plug the water hose with a sharp-edged object. Otherwise, the hose could be damaged.
1. Wrap a clean cloth around the cooling system cap and release the pressure by loosening the cap slowly.
2. Remove the water hose from the throttle body and plug the water hose quickly.
Intake Manifold Removal Note
1. Remove the aerodynamic under cover No.2..
2. Remove all clips for securing wiring harnesses from the intake manifold.
3. Disconnect the vacuum hoses connecting the intake manifold.
4. Remove the fuel distributor and fuel injector a as single unit..
5. Remove the intake manifold.
Throttle Body Installation Note
1. Temporarily tighten the throttle body to the intake manifold.
2. Tighten the installation bolts in the order shown in the figure.
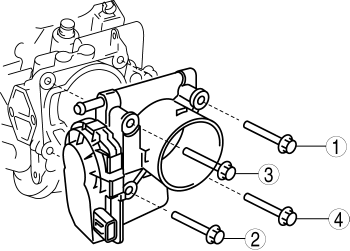
-
Throttle body tightening torque
-
8—11 N·m {82—112 kgf·cm, 71—97 in·Ibf}
3. Remove the plug from the engine coolant hose and install the water hose to the throttle body quickly.
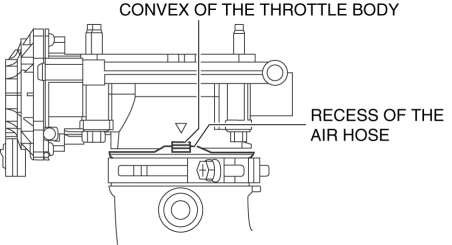
Air Hose Installation Note
1. Adjust the convex of the throttle body to the recess of the air hose.
 Air Intake Actuator Removal/Installation [Manual Air Conditioner]
1. Set the air intake mode to FRESH.
2. Disconnect the negative battery cable..
3. Remove the following parts:
a. Front scuff plate (Passenger-side).
b. Front side trim (Passenger-side).
c. ...
 Intake Air Temperature (Iat) Sensor Inspection [Mzr 2.0, Mzr 2.5]
Resistance Inspection
NOTE:
Because the IAT sensor is integrated in the MAF sensor, replacing the IAT
sensor includes replacement of the MAF/IAT sensor.
1. Remove the battery cover.. ...
Other materials:
Instrument Cluster Configuration
1. Connect the M-MDS (IDS) to the DLC-2.
2. After the vehicle is identified, select the following items from the initialization
screen of the IDS.
Select the “Module Programming”.
3. Then, select items from the screen menu in the following order.
Select “Programma ...
Flywheel Inspection [C66 M R]
1. Remove the flywheel..
2. Perform the following procedures to inspect the flywheel.
If there is any malfunction or it exceeds the maximum specification, replace
the flywheel..
a. Inspect the surface that contacts the clutch disc for scratches, nicks, and
discoloration.
...
Front passenger occupant classification system
The Subaru Solterra is equipped with an advanced front passenger
occupant classification system that continuously monitors the status of the front
passenger seat. Based on detected conditions, this intelligent system automatically
activates or deactivates specific SRS airbags to optimize safet ...
