
Mazda 3 Service Manual: Air Intake Actuator Removal/Installation [Manual Air Conditioner]
1. Set the air intake mode to FRESH.
2. Disconnect the negative battery cable..
3. Remove the following parts:
a. Front scuff plate (Passenger-side).
b. Front side trim (Passenger-side).
c. Dashboard under cover.
d. Glove compartment.
e. Lower panel (Passenger-side).
f. Shower duct (Passenger-side).
4. Disconnect the harness clip from the blower case.
5. Disconnect the air intake actuator connector.
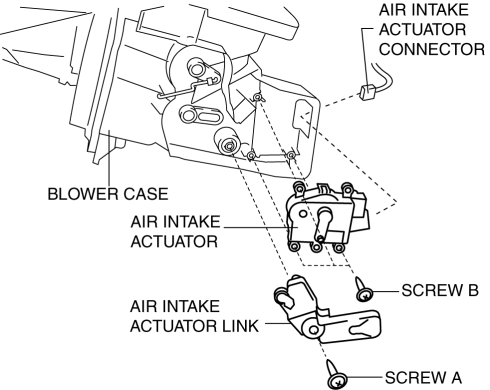
6. Remove the blower case..
7. Remove the screw A.
8. Remove the air intake actuator link.
9. Remove the screw B.
10. Remove the air intake actuator.
11. Install in the reverse order of removal.
 Air Intake Actuator Removal/Installation [Full Auto Air Conditioner]
1. Set the air intake mode to FRESH.
2. Disconnect the negative battery cable..
3. Remove the following parts:
a. Front scuff plate (Passenger-side).
b. Front side trim (Passenger-side).
c. ...
 Intake Air System Removal/Installation [Mzr 2.0, Mzr 2.5]
WARNING:
A hot engine and intake air system can cause severe burns. Turn off the engine
and wait until they are cool before removing the intake air system.
Fuel is very flammable li ...
Other materials:
Spark Plug Inspection [Skyactiv G 2.0]
Specification
Spark plug type
PE01-18110, PE02-18110, PE5R-18110, PE5S-18110
Plug Gap Inspection
CAUTION:
To avoid possible damage to the tip, do not adjust the plug gap.
To prevent damaging the tip, use a wire type plug gap gauge when inspecting
the plug gap.
...
Boost Air Temperature Sensor Inspection [Mzr 2.3 Disi Turbo]
Resistance Inspection
NOTE:
Because the boost air temperature sensor is integrated in the MAP sensor,
replacing the boost air temperature sensor includes replacement of the MAP sensor/boost
air temperature sensor.
1. Remove the battery cover..
2. Disconnect the negative batter ...
Gps Antenna Feeder Inspection
With Audio Unit (Without Display)
1. Verify that the continuity is as indicated in the table.
If not as indicated in the table, replace the GPS antenna feeder.
With Audio Unit (With Display)
NOTE:
GPS antenna feeder is integrated with the antenna feeder No.4.
1. ...
