Mazda 3 Service Manual: Audio Amplifier Removal/Installation
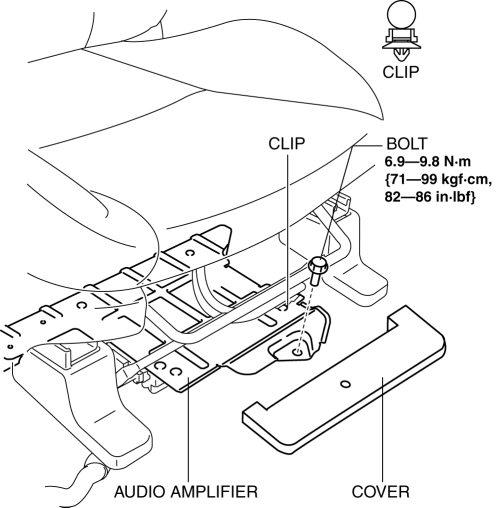
1. Slide the passenger seat rearward.
2. Remove the cover.

3. Remove the bolt.
4. Detach the clips and set the vehicle wiring harness aside.
5. Slide the passenger seat forward.
6. Disconnect the negative battery cable..
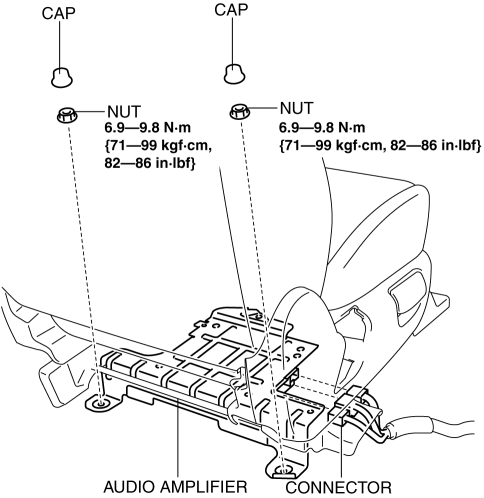
7. Remove the caps.

8. Remove the nuts.
9. Disconnect the connector.
10. Remove the audio amplifier.
11. Install in the reverse order of removal.
 Antenna Feeder No.7 Removal/Installation
1. Disconnect the negative battery cable..
2. Remove the liftgate upper trim..
3. Disconnect the connector A.
4. Disconnect the connector B..
5. Remove the bolt.
6. Remove the antenna fe ...
 Audio Pilot®2 Microphone Removal/Installation
NOTE:
AudioPilot® 2 is a registered trademark of Bose® Corporation.
1. Disconnect the negative battery cable..
2. Disconnect the connector.
3. Remove the nut.
4. Remove the Aud ...
Other materials:
Fuel Gauge Sender Unit Removal/Installation
MZR 2.0, MZR 2.5
NOTE:
Fuel pump unit cannot be disassembled.
1. Remove the fuel gauge sender unit..
MZR 2.3 DISI Turbo
NOTE:
Fuel pump unit cannot be disassembled.
1. Remove the fuel gauge sender unit..
SKYACTIV-G 2.0
NOTE:
Fuel pump unit cannot be disasse ...
Keyless Control Module Configuration
1. Connect the M-MDS (IDS) to DLC-2.
2. After the vehicle is identified, select the following items from the initialization
screen of the IDS.
Select “Module Programming”.
3. Then, select items from the screen menu in the following order.
Select “Programmable Module Ins ...
Oil Control Valve (OCV) Removal/Installation [Skyactiv G 2.0]
WARNING:
A hot engine can cause severe burns. Turn off the engine and wait until it
is cool before servicing.
1. Remove the battery cover..
2. Disconnect the negative battery cable..
3. Remove the plug hole plate..
4. Remove the ignition coil/ion sensors..
5. Remove the cyli ...
